Asynchronous Pre-Request script in #Postman

A Pre-request script in Postman allows you to dynamically change the request body based on any JavaScript function you provide, this sometimes is done to dynamically calculate HMACs in the request, such that you don’t have to manually calculate it before every request.
However, it’s not obvious how to create an asynchronous pre-request script, that is one that does not return instantly, but has to wait for some external factor (i.e. a HTTP Request), before completing the main request.
Here is the simple example, where we want to inject the user’s IP address into the HTTP request body before sending; as follows –
new Promise(resolve =>

pm.sendRequest("http://checkip.amazonaws.com/",function(e, r){
   pm.request.body.update(JSON.stringify(r.text()));
   resolve();
})


);
And, the main request will not execute until the promise returned in the pre-request script is resolved.
Firewall rules to allow internal connection to #AWS Elastic IP

This is probably a very specific problem, that I’m not sure that many people will have, but I’ll share the problem and solution here, since it’s not very obvious.
Given a piece of software, with a config file containing a DSN. I want the DSN to be the same on Dev as on Production, so that there are no “Works on my machine” errors.
My server on AWS has an Elastic IP, and a windows firewall to permit remote access to limited IP addresses to the Database port.
On Dev, we point the DSN to the Elastic IP, and all is good. On Prod, the same Elastic IP times out. — help!!
SQLCMD LOCALHOST -> Works
SQLCMD PRIVATE IP -> Works
SQLCMD ELASTIC IP -> Times out (only on same machine)
Obviously “LOCALHOST” and “PRIVATE IP” are not going to work from DEV.
So, the solution; Add the ELASTIC IP into the Scope on the Firewall !!
Comparing #OCR services on #handwritten text.
| 1 | Filename | Image | Tesseract | OCR.SPACE | Azure | IRON OCR | AWS Texttract | AWS Textract (DDT) | |
|---|---|---|---|---|---|---|---|---|---|
| 2 | 1457617912-CROP.jpg |  | 1FTME1HL84DA439N | 1FTNELGLRDATNG | 1FT 4L87DA73914 | 1FT4L87DA73914 | |||
| 3 | 1457617924-CROP.jpg |  | MGPWUEWLML | DLEPLLL1R29LDSL | LD4GP4412R296096 | LD4GP4412R296096 | |||
| 4 | 1457638629-CROP.jpg |  | 2STME20U071MEM | JTNCR2000776480GL | |||||
| 5 | 1457643042-CROP.jpg |  | 5H63H5H8SFHTFM | SHEKHSHESTMTHY | BHGGKSH85FM7499 | BHGGKSH85FM7499 | |||
| 6 | 1457670471-CROP.jpg |  | JNFML3WFNSWSS3 | IN4 | IN4. | ||||
| 7 | 1457670537-CROP.jpg |  | LNEPALBAPEMWM | ()VE-IV 1 | ANDPALZAPLENZFRST | LNPAL3, | LNPAL3, | ||
| 8 | 1457677623-CROP.jpg |  | TUBM1FXMGW1AG1 | TTRMEX1WUS1720S | JTJBMTEXIH5176297 | JTJBMTEXIH5176297 | |||
| 9 | 1457677635-CROP.jpg |  | MJHSHGB91 | JTTTRMTEXHES17963932 | JTJ8M7FX1H5176397 | JTJ8M7FX1H5176397 | |||
| 10 | 1457734011-CROP.jpg |  | FWHATSGSGCMDWW | 9UUASCSATATL | 1944A86509ALY7 | 1944A86509ALY7 | |||
| 11 | EASY-CROP.jpg |  | WAUDH74F16N117113 | WAUDH74F16N117113 | WAUDH74F16N117113 | WAUDH74F16N117113 | WAUDH74F16N117113 | WAUDH74F16N117113 |
Given 10 images, 9 containing handwritten text, 1 containing printed text, I ran these through five different OCR services to compare accuracy. Each one could correctly interpret the printed text, but the handwritten text was not accurately recognised by any service, except for AWS Textract.
There were a few “didn’t run” contenders, because I couldn’t get their API to work in the time I allotted myself (one hour). Which were FileStack, Mindee, and Google Cloud Vision. These may have returned better results but the APIs were too convolute to run a simple test.
First up is Tesseract, which was some software running locally, with the following additional parameters,
-psm 8 -c tessedit_char_whitelist=ABCDEFGHJKLMNPRSTUVWXYZ0123456789
What does this mean. Well – the text are handwritten VIN numbers, which do not include the letters O, I and Q because these are too similar to numbers, and the text was in uppercase, and one word.
Tesseract made a good attempt, and fared very well against commercial offerings, but in effect, it was wrong on each example apart from the printed text.
OCR.SPACE is a free OCR API, and was easy to get started with; You should get your own API key, but this key is free, so I don’t care if it’s public
private static string OcrSpace(string imageFileLocation)
{

	var postData = "apikey=b8fd788a8b88957";
	postData += "&url=" + HttpUtility.UrlEncode(imageFileLocation);
	const string strUrl = "https://api.ocr.space/parse/image";
	var web = new WebClient();
	web.Headers.Add(HttpRequestHeader.ContentType, "application/x-www-form-urlencoded");
	var json = "";
	try
	{
		json = web.UploadString(strUrl, postData);
	}
	catch (WebException ex)
	{
		var resp = new StreamReader(ex.Response.GetResponseStream()).ReadToEnd();
		Console.WriteLine(resp);
	}

	var jParsed = JObject.Parse(json);
	var result = jParsed["ParsedResults"].FirstOrDefault();
	return result["ParsedText"] + "";
}
This code takes in an image URL and returns text – very simple, but it returns an empty string when it fails to recognise, so it was one of the worst performers.
Microsoft Azure computer vision was pretty useless too with handwritten text. Returning either nothing or complete garbage. Although it was very fast.
private static string Azure(string imageFileLocation)
{
	const string strUrl = "https://westeurope.api.cognitive.microsoft.com/vision/v1.0/ocr?language=unk&detectOrientation=true";
	var wc = new WebClient();
	wc.Headers["Ocp-Apim-Subscription-Key"] = "**REDACTED**";
	var jPost = new { url = imageFileLocation };
	var post = JsonConvert.SerializeObject(jPost, Formatting.Indented);
	var json = wc.UploadString(strUrl, "POST", post);
	var jObject = JObject.Parse(json);
	var output = "";
	foreach (var region in jObject["regions"])
	{
		foreach (var line in region["lines"])
		{
			foreach (var word in line["words"])
			{
				output += word["text"] + " ";
			}
			output += Environment.NewLine;
		}
	}
	return output.Trim();
}
IRON OCR is also based on tesseract, and preformed similarly to the local Tesseract version. Very easy to use, but comes with a price tag. Not having to upload the image to temporary storage is a plus.
private static string ironOCR(string filename)
{
	var engine = new IronTesseract
	{
		Configuration =
		{
			WhiteListCharacters = "ABCDEFGHJKLMNPRSTUVWXYZ0123456789",

		}
	};
	var Result = engine.Read(filename).Text;
	return Result;
}
The winning service that I tried was AWS textract, and I tested it using their online demo:
https://eu-west-1.console.aws.amazon.com/textract/home?region=eu-west-1#/demo
Here is the equivalent code;
private static string Textract(string filename)
{
	var readFile = File.ReadAllBytes(filename);
	var stream = new MemoryStream(readFile);
	var client = new AmazonTextractClient();

	var ddtRequest = new DetectDocumentTextRequest
	{
		Document = new Document
		{
			Bytes = stream
		}
	};
	var detectDocumentTextResponse = client.DetectDocumentText(ddtRequest);
	var words = detectDocumentTextResponse.Blocks
		.Where(b => b.BlockType == BlockType.WORD)
		.Select(b => b.Text)
		.ToArray();
	var result = string.Join("", words);
	return result;
}#Ajax #Proxy add HTTP proxy support to Ajax requests with AjaxProxy.com

This is a new tool that developers can add to their toolbelt. AjaxProxy.com transparently permits the use of HTTP proxies from JavaScript Ajax requests. It also bypasses CORS restrictions, to help with accessing services not designed for direct consumption from client-side JavaScript.
AjaxProxy.com
What is it
If you need to use a HTTP Proxy with Ajax, this polyfill library will allow you to specify a HTTP proxy to be used with Ajax requests. This could be useful to ensure that your Ajax requests come from a fixed IP address.
Quickstart
Step 1;
Add the library AjaxProxy.js from the following URL
<script src=”https://www.ajaxproxy.com/js/ajaxproxy.js”><script>
Step 2;
Before any Ajax requests are made, call
ajaxProxy.init();
Step 3:
Define your Proxy server as follows;
ajaxProxy.proxy.url = “http://<your proxy>”;
ajaxProxy.proxy.credentials.username = “<proxy username>”;
ajaxProxy.proxy.credentials.password = “<proxy password>”;
Step 4:
If you are using JQuery, then modify your $.Ajax to add
headers: ajaxProxy.proxyHeaders()
Such as like follows;
$.ajax({
type: “GET”,
url: “https://ICANHAZIP.COM”,
headers: ajaxProxy.proxyHeaders(),
dataType: “text”
}).done (function (data) {
console.log(data);
});
If you are using plain XHR requests, then add xhr.addProxyHeaders();
Such as shown below;
var xhr = new XMLHttpRequest();
xhr.onreadystatechange = function() {
if (this.readyState === 4 && this.status === 200) {
console.log(this.responseText);
}
};
xhr.open(“GET”, “https://ICANHAZIP.COM”, true);
xhr.addProxyHeaders();
xhr.send();
Step 5:
If you run your code, then the request should be proxied through your proxy server.
Under the hood.
What is happening? In effect, this goes through two levels of proxies, first your request is sent to an AWS Lambda function, which checks for the following http request headers;
X-target : The destination URL
X-proxy : The proxy HTTP Address
X-proxy-username: The proxy username
X-proxy-password: The proxy password
Please note that if your proxy is limited by IP address, then this technique will not work, since the egress IP for the AWS Lambda function is dynamic. You will need a proxy that is either open (not advised), or restricted by username and password.
The AWS Lambda function will then make a connection to your proxy server, and supply it with the original destination URL, and will pass through other common headers such as the Content-Type and Authorization headers.
Additional security
Using the technique above, your proxy username and password will be visible to anyone who can view the source of your website. If you have an intranet, and trust your users, then this may be fine, however, we do recommend taking the following security step;
You can encrypt your proxy username and password by calling:
ajaxProxy.Encrypt(“password”);
Which will return a string such as follows
:ENCRYPTED:H20n0hTqmOduBYNOatwApO1almPAr/ue
You can pass this string in place of the username and/or password and the script will do the decryption under the hood.
There is no public method to reverse this encryption, so it is not possible for an attacker to reverse engineer your password without stealing our private keys, which we keep secret.
Additions / Requests
This library has been offered for free, it was developed for internal use, but we are offering it to the public out of goodwill and public service. Please do not abuse this service, we will throttle requests from excessive usage.
If you would like an addition to this software, or need help with your specific application, then we may be able to help. However, nothing in this life is for free, so we do invite you to sponsor this project, if you would like an addition or change made to it.
We can supply source code if required, under NDA, please contact us for more information.
Intercept #AJAX “open” statements in #JavaScript

If you want to change the default behaviour of AJAX across your website, perhaps you want to make sure that every AJAX called is logged before executing, or that it is somehow audited for security before being called, you can use interceptor scripts in Javascript that override the default functionality of the XMLHttpRequest object that is behind every AJAX call, even if a library like JQuery is used ontop of it.
So, for instance, if you wanted to catch the body of all POST requests sent via AJAX, you could do this;
(function(send) {
    XMLHttpRequest.prototype.send = function(body) {
        var info="send data\r\n"+body;
        alert(info);
        send.call(this, body);
    };
})(XMLHttpRequest.prototype.send);
Or, if you wanted to change the destination of all AJAX requests such that all communications are sent via a logging service first, then you could do this;
(function(open) {
    XMLHttpRequest.prototype.open = function(verb,url,async,user,password) {
        open.call(this, verb,"https://somewhere.com/log",async,user,password);
	this.setRequestHeader("X-Original-URL", url);
    };
})(XMLHttpRequest.prototype.open);
Where somewhere.com/log is obviously fictitious.
Hope this is useful to somebody!
Car Registration #API now available via #NuGET

NuGet is the de-facto package manager for .NET, and as perhaps a major oversight, the Car Registration API was never available via a NuGet Package.
We’ve put this live today, here: https://www.nuget.org/packages/LicensePlateAPI/ and here is are the steps to use it;
Install the following three NuGet Packages
Install-Package LicensePlateAPI
Install-Package System.ServiceModel.Primitives
Install-Package System.ServiceModel.Http
Then, assuming you’ve already opened an account, here is some sample code;
var client = LicensePlateAPI.API.GetClient();
var car = client.CheckAsync("{LICENSE PLATE}", "{USERNAME}").Result;
Console.WriteLine(car.vehicleJson);
Where evidently {LICENSE PLATE} and {USERNAME} are placeholders. “CheckAsync” checks for UK license plates, but you can change this to any country by using CheckUSAAsync or Check<Country>Async.
Enjoy!
Car Registration #API now available in #Slovenia

Slovenia is a European country with a population of 2.081 Million, and a total of 1.118 million passenger cars registered, giving a car ownership rate of just over 53%. If your business operates in the automotive industry in Slovenia, then being able to streamline the customer onboarding experience by allowing your user enter a license plate, rather than selecting a make / model can both speed up the user intake. The API also reveals information about the vehicle’s insurer, which may not be known to third parties.
Car registration plates in Slovenia use the /CheckSlovenia endpoint and return the following information:
- Make / Model
- Region
- Insurer
- Insurance policy number
- Representative image
Latency warning: This particular request may take over 10 seconds to complete.
Sample Registration Number:
LJ-20-SUN
Sample Json:
{
“Description”: “Ford (D) Mustang 2,3 EcoBoost Avt.”,
“CarMake”: {
“CurrentTextValue”: “Ford (D)”
},
“CarModel”: {
“CurrentTextValue”: “Mustang 2,3 EcoBoost Avt.”
},
“MakeDescription”: {
“CurrentTextValue”: “Ford (D)”
},
“ModelDescription”: {
“CurrentTextValue”: “Mustang 2,3 EcoBoost Avt.”
},
“Insurer”: “Zavarovalnica Sava d.d.”,
“InsurancePolicy”: “000671-4716157”,
“Code”: “MBKECO11”,
“Category”: “Osebno vozilo”,
“Region”: “Ljubljana”,
“ImageUrl”: “http://registrskatablica.si/image.aspx/@Rm9yZCAoRCkgTXVzdGFuZyAyLDMgRWNvQm9vc3QgQXZ0Lg==”
}
Sign up for 10 free requests to this API today, via http://www.registrskatablica.si/
The source at nuget.org [https://www.nuget.org/api/v2/] is unreachable. [FIXED]
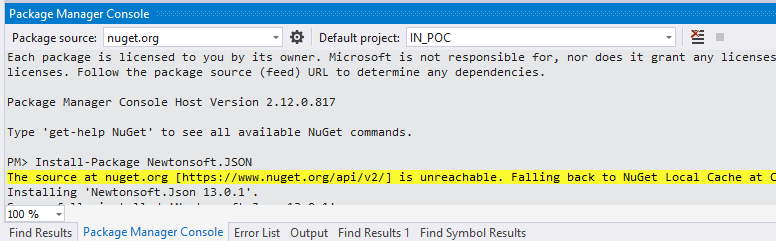
If you are still using Visual Studio 2013, you may notice that today, the Package Manager Console will have stopped working, any attempt to install a new package will give an error like
The source at nuget.org [https://www.nuget.org/api/v2/] is unreachable. Falling back to NuGet Local Cache at C:\Users\you\AppData\Local\NuGet\Cache
This is because NUGET has withdrawn support for TLS 1.1, and VS 2013 will use TLS 1.1 by default.
To Fix this, type this into the PM console:
[Net.ServicePointManager]::SecurityProtocol=[Net.ServicePointManager]::SecurityProtocol-bOR [Net.SecurityProtocolType]::Tls12
Updating a Windows Service via a batch file

If you’ve written a Windows service, and you need to update it, perhaps with a bug fix, you’ll find that the process is very cumbersome, you need to stop the service, uninstall it, pull your changes, install it again, configure the service, then start the service.
This procedure, although not difficult, can eat away 15 minutes of development time on every update, and slows the fix/release cycle.
This is where I created a windows batch file, that does these steps in sequence, to save lots of time.
@echo off
REM – ADMIN ACCESS IS REQUIRED
REM – MAKE SURE LATEST CHANGES ARE CHECKED IN TO GIT, THIS CODE WILL UNDO UNCOMMITTED CHANGES.
net stop “My Service”
C:\Windows\Microsoft.NET\Framework64\v4.0.30319\installutil /u MyService.exe
git stash save –keep-index –include-untracked
git pull
C:\Windows\Microsoft.NET\Framework64\v4.0.30319\installutil MyService.exe
SC failure “My Service” actions=restart/60000/restart/60000/restart/60000 reset=86400
net start “My Service”
The SC command may not be applicable to you, but this tells the service to restart in the event of a failure.
Hope this helps someone!
Generate video from collection of images in C# #FFMPEG
You want to create a dynamic video, from a collection of images – Here is where FFMpeg is a great tool to use with C#
So, as a pre-requisite, you’ll need to download FFMpeg and put it in a folder, I’m calling it “C:\FFmpeg\” – but you can put it anywhere. I’m also assuming you have a collection of images in c:\input, and you want the output video in C:\out-video\out.mp4 – all these paths can be changed.
If you’ve seem my earlier example of capturing video from a webcam and saving to a video, this approach is more elegant, since it doesn’t involve chopping the header off the bitmap array, and swapping the red and blue channels, however, this solution is for Windows only, it’s not cross platform.
I used the FFMediaToolkit Nuget package, and also System.Drawing.Common
FFmpegLoader.FFmpegPath =
	@"C:\FFmpeg\";

var settings = new VideoEncoderSettings(width: 960, height: 544, framerate: 30, codec: VideoCodec.H264);
settings.EncoderPreset = EncoderPreset.Fast;
settings.CRF = 17;
var file = MediaBuilder.CreateContainer(@"C:\out-video\out.mp4").WithVideo(settings).Create();
var files = Directory.GetFiles(@"C:\Input\");
foreach (var inputFile in files)
{
	var binInputFile = File.ReadAllBytes(inputFile);
	var memInput = new MemoryStream(binInputFile);
	var bitmap = Bitmap.FromStream(memInput) as Bitmap;
	var rect = new System.Drawing.Rectangle(System.Drawing.Point.Empty, bitmap.Size);
	var bitLock = bitmap.LockBits(rect, ImageLockMode.ReadOnly, PixelFormat.Format24bppRgb);
	var bitmapData = ImageData.FromPointer(bitLock.Scan0, ImagePixelFormat.Bgr24, bitmap.Size);
	file.Video.AddFrame(bitmapData); // Encode the frame
	bitmap.UnlockBits(bitLock);


}

file.Dispose();
So, what this does, is create a container video of a given size and framerate, and codec. (H264), then adds the images one by one. The container is hard-coded to 960×544, but you should base this on the maximum size of the images in your image folder instead.
The images need to be decompressed, from jpeg to Bitmap, then from Bitmap to ImageData, which is an array of BGR24 structures.
Hope this helps someone!
