Archive
Understanding #protocols in #swift
![]()
Protocols are the Swift / Objective C name for Interfaces, as they would be known in .NET , C++ or Java. What they basically say, is that any object that is of this type will definitely handle a particular function call.
A really common thing to do in Swift is to pass data between two viewControllers. When you segue between them, then you get a reference to the destination viewController, and you can call methods and set properties on the destination viewController in order to pass data.
The issue is, that if you dismiss a view Controller, you are no longer seguing – and therefore have no reference to the destination view Controller in order to pass any data.
The trick is on the first view Controller, you set a reference to self (the first view controller) on the second view controller. Then, just before the second view controller dismisses itself, it can call methods and set properties on the reference that was set previously, in order to pass it’s data back.
override func prepare(for segue: UIStoryboardSegue, sender: Any?) {
let dest = segue.destination as! SecondViewController
dest.delegate = self
dest.textPassedViaSegue = “Hello World”
}
Now, this reference (delegate) can be of type FirstViewController, and that’s 100% fine. but you are then making the assumption that the only way to get to the SecondViewController is via the First one, maybe, you may have a third view controller somewhere? – You are also perhaps exposing too much functionality when it’s not really needed.
So, instead of setting the reference to be of type FirstViewController, you could define a protocol (Interface) as follows;
protocol Callable
{
func calledFromOtherViewController(text : String);
}
And ensure that your first view controller implements this protocol (Interface) like so;
class FirstViewController: UIViewController, Callable {
func calledFromOtherViewController(text : String)
{
print(text)
}
Now, the reference on the Second View Controller can be of type Callable?
// delegate can defined as type FirstViewController
// but this is less flexible, in the case that
// this could be returning to multiple possible view controllers
var delegate : Callable? = nil
To see an example of this in action, you can clone this project on GitHub
Writing #Async code with #Swift

I’ve just started to learn Swift, and I’m going to start posting some coding nuggets that for me, are quite a novel way that the language handles things. Async code is my first post on this language, since it’s really crucial for modern software development.
So, I’m working with the PlayGround, and in order to write code in the playground that does not immediately execute, you need to add two lines:
import PlaygroundSupport
PlaygroundPage.current.needsIndefiniteExecution = true
which means that the Playground may continue executing indefinitely.
Now, lets say we want to write some code that does something after 1 second (without freezing the UI), we would write:
DispatchQueue.global().async
{
sleep(1)
// Do Something
}
Then, if you wanted to wrap this in a function that, does something really simple, like add one to a number, then you would write:
func addOneAsync( input : Int, completion: @escaping (Int) -> Void){
DispatchQueue.global().async
{
sleep(1)
completion(input+1)
}
}
Since the last parameter is a function, it can be called using the following syntax;
addOneAsync(input: 3){ output in
print(output)
}
print(“hello”)
the output is then appears as
hello
4
Note, that the 4 appears after the hello, after 1 second, because the execution was deferred to a background thread. – Obviously, this is a contrived example, since you would never need to delay execution of a simple addition, but imagine you are doing a HTTP request, or a complex database query here.
#HelloWorld for #Firebase for the web

While creating a demo site, which was purely static HTML page Payhook.co.uk, I decided that it would be worthwhile recording anyone who actually went to register on the website. My usual approach would have been the following
- Create a SQL server database, with a ‘users’ table
- Write C# code to insert into the users table
- Write an ASPX page to receive an Ajax call and call the user insertion function
- Write Javascript to post the fields to the ASPX page via Ajax.
All that is fine, and arguably more secure than the aproach listed below, but since my motivations were really more to learn about Firebase, let’s put security aside for now.
First, you go and create a Firebase project with Google, and insert the initialisation script in the page, which looks something like the following;
// Initialize Firebase
var config = {
apiKey: “xxxxx-xxxxx”,
authDomain: “xxx-xxx.firebaseapp.com”,
databaseURL: “https://xxxx-xxxx.firebaseio.com”,
projectId: “xxxx-xxxx”,
storageBucket: “”,
messagingSenderId: “xxxxx”
};
firebase.initializeApp(config);
That initialises the Firebase connection, but doesn’t really do much.
Now, the big Gotcha here, is that by default, the Firebase database is locked down, so you cannot read or write to it. Which is useless. Instead, I’m opening the doors right up, which makes it useless for security, but as I said, I’m glossing over that for now.
Press Database > Rules, and use this template;
{
“rules”: {
“.read”: true,
“.write”: true
}
}
Now, I’m going to use the push command to push a user object up to the database server. It’s NoSQL, so I don’t need to define a schema first.
firebase.database().ref().child(‘users’).push({
username: $(“#tbName”).val(),
email: $(“#tbEmail”).val(),
password: $(“#tbPassword”).val()
},
function () {
location.href = “dashboard.html”;
});
Here, tbName, tbEmail, and tbPassword were defined on the page as id’s for their respective text boxes. Also, you probably see that this code requires JQuery to be included and initialised.
The second parameter to push() is the callback, and is used to make sure the data is sent to Google Firebase before the user moves to the next page.
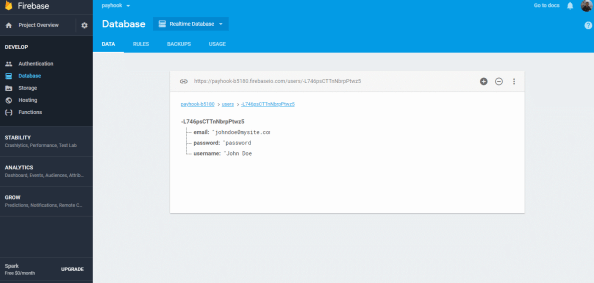
And, to verify that everthing is there, you can log back into Google Firebase, and you can see the data displayed there.
This no-security approach to Firebase is only realy useful for storing data that you don’t care who sees or edits, like simple analytics, and certainly should never be used to store passwords, like this demo. But you should get the idea.
Integrating #OpenYolo into a existing username/password login

When you first develop a website, everyone starts from the premise that the user creates an account and stores it in your own database, the idea of OAuth logins from Google / Facebook – only come as an afterthought as you start getting more users.
But then you have an issue, you have existing users that are authenticated against your own database, and other users that are going to be authenticated against Google YOLO.
I had the same issue with httpsImage.com where I just added OpenYOLO.
What I did was, when a signin happens with OpenYolo, I pass the response (email, name, token) back to the server. Which records the email address, and a random guid as the password, and returns the user account back to the client.
If the user is already registered, then it looks for a matching email address, and returns that account, without checking the password.
This now opens a serious security hole. If someone fakes the response from OpenYolo and includes an email address of another user, then they can become any user on the system.
This is where token validataion comes in, and it’s really important, since without it, you don’t know if your website is really talking to Google, or a hacker.
var strUrl = “https://www.googleapis.com/oauth2/v3/tokeninfo?id_token=” + Request.Form[“idToken”];var wc = new WebClient();var strJson = wc.DownloadString(strUrl);var jCredential = JObject.Parse(strJson);
   {
         "aud": "xxxx.apps.googleusercontent.com",
         "sub": "xxxx",
         "email": "xxx.xxx@gmail.com",
         "email_verified": "true",
         "azp": "xxxx-.apps.googleusercontent.com",
         "exp": "xxx",
         "iss": "https://accounts.google.com",
         "jti": "xxx",
         "iat": "xxx",
         "nbf": "xx",
         "name": "xxx xxxx",
         "picture": "https://lh5.googleusercontent.com/xxxc/photo.jpg",
         "given_name": "xxx",
         "family_name": "xxx",
         "alg": "xxx",
         "kid": "xxxx"
}
Importantly, you can now be sure that the information is definitely from Google, and you should expect the email field to match the email field in the request. Otherwise you should fail silently, since it’s probably a hacker.
I did find that OpenYolo doesn’t work with IE11, since it uses promises, but hey, you’ve always got your origional login system.
Adding properties at #runtime to an object in C#

C# is designed to be a statically typed language, i.e. when you define your type at compile time, you can’t change that type at runtime. Which is the opposite to how Javascript operates.
However, with the recent addition of dynamic types and the Expando Object, it is possible to add a property to an object as follows;
dynamic c = new ExpandoObject();
c.a = “1“;
c.b = “2“;
However, one of the not-so good things about the ExpandoObject, is that it doesn’t take a constructor argument, that would allow you to start off with an anonymous type, and then add some properties to it. This is where Clay comes in – which is a NUGET package you can install and reference as follows;
using ClaySharp; // Install-Package Clay
Then you can define much deeper types, and add properties to them.
dynamic New = new ClayFactory();
var person = New.Person(
FirstName: “George“,
LastName: “Washington“,
Country: new {
Name = “United States“,
Code = “US“
}
);person.Sex = “Male“;
Console.WriteLine(person.FirstName + “ “ + person.LastName + “ is “ + person.Sex);
That’s all great. However, you may notice, if you try to serialize the object to JSON using Newtsonsoft.JSON, or System.Web.Script.Serialization then you either get an error (Newtonsoft) or an empty string.
However, there is a similar project called Dynamitey which you can install using:
Install-Package Dynamitey
And you change the line
dynamic New = new ClayFactory();
to
dynamic New = Builder.New();
This nuget package doesn’t seem to be compatible with .NET Core vNext (i.e. Mac), but it does create objects that are serialisable to JSON, like the following:
string output = JsonConvert.SerializeObject(person, Formatting.Indented);
giving:
{
  "FirstName": "George",
  "LastName": "Washington",
  "Country": {
    "Name": "United States",
    "Code": "US"
  },
  "Sex": "Male"
}
Automatically sign in users to your website with Google #YOLO

How often have you been fed-up with having to create yet another account, with a username, and password – that you are going to forget. Your users feel the same way when they visit your website, and you prompt them to enter a new username and password.
Of course systems like Oauth have existed for ages, but you have to manage server side code to exchange auth tokens, and manage token refreshes, which is just a pain. Google have come out with a system called YOLO – which makes it super easy, using client-side code only, to grab the user’s public profile (i.e. name, email and profile pic) as long as they have signed in elsewhere on the same browser.
It makes it really seamless to capture a user’s profile, without any effort from the user.
Google have a great step-by-step guide, and I’d recommend reading their instructions, rather than me replicating them here. But effectively, you set up your Oauth credentials in the Google API console, to get your client ID, then you add a script reference to :
Then use code such as the following to grab the user’s profile:
window.onGoogleYoloLoad = (googleyolo) => {
console.log(“Yolo loaded!”);
const retrievePromise = googleyolo.retrieve({
supportedAuthMethods: [
“https://accounts.google.com”,
“googleyolo://id-and-password”
],
supportedIdTokenProviders: [
{
uri: “https://accounts.google.com”,
clientId: “xxxxxxx.apps.googleusercontent.com”
}
]
});
retrievePromise.then((credential) => {
console.log(“ok!”);
console.log(credential);
if (credential.password) {alert(credential.id);
} else {
// A Google Account is retrieved. Since Google supports ID token responses,
// you can use the token to sign in instead of initiating the Google sign-in
// flow.
//useGoogleIdTokenForAuth(credential.idToken);
}
}, (error) => {
console.log(“oops!”);
console.log(error);
// Credentials could not be retrieved. In general, if the user does not
// need to be signed in to use the page, you can just fail silently; or,
// you can also examine the error object to handle specific error cases.// If retrieval failed because there were no credentials available, and
// signing in might be useful or is required to proceed from this page,
// you can call `hint()` to prompt the user to select an account to sign
// in or sign up with.
if (error.type === ‘noCredentialsAvailable’) {
const hintPromise = googleyolo.hint({
supportedAuthMethods: [
“https://accounts.google.com”
],
supportedIdTokenProviders: [
{
uri: “https://accounts.google.com”,
clientId: “xxx-xxxx.apps.googleusercontent.com”
}
]
});
hintPromise.then((credential) => {
console.log(“hint worked”);
console.log(credential);
if (credential.idToken) {
// Send the token to your auth backend.
useGoogleIdTokenForAuth(credential.idToken);
}
}, (error) => {
console.log(“hint failed”);
console.log(error);
switch (error.type) {
case “userCanceled”:
// The user closed the hint selector. Depending on the desired UX,
// request manual sign up or do nothing.
break;
case “noCredentialsAvailable”:
// No hint available for the session. Depending on the desired UX,
// request manual sign up or do nothing.
break;
case “requestFailed”:
// The request failed, most likely because of a timeout.
// You can retry another time if necessary.
break;
case “operationCanceled”:
// The operation was programmatically canceled, do nothing.
break;
case “illegalConcurrentRequest”:
// Another operation is pending, this one was aborted.
break;
case “initializationError”:
// Failed to initialize. Refer to error.message for debugging.
break;
case “configurationError”:
// Configuration error. Refer to error.message for debugging.
break;
default:
// Unknown error, do nothing.
}
});
}
});
};
Simplifying #webpush – a #HTTP to #VAPID service.

If you don’t want, or can’t install the server side components to handle web push notifications, you can use this service http://webpush.apixml.net/ to handle the push notification. As long as you can do a HTTP request, you can call this.
Send VAPID authenticated Web Push notifications with a single HTTP request
API Endpoint
http://webpush.apixml.net/server.js
Call with the following querytring variables:
- endpoint
- p256dh
- auth
- publicKey
- privateKey
- payload
– The endpoint returned by pushManager.subscribe
– The P256DH Key returned by pushManager.subscribe
– The Auth key returned by pushManager.subscribe
– The Public Key from VAPID
– The Private Key from VAPID
– The Json Payload
Here’s the source of the project if you want to host this yourself;
https://github.com/infiniteloopltd/webpushservice
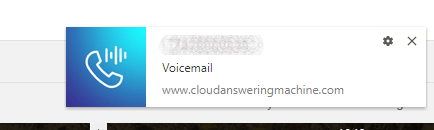
And here’s a demo in action from www.cloudansweringmachine.com
#WebPush Notifications using #NodeJS or C#

Web push notifications allow websites to communicate with their users after the user has left the website. Think of it like collecting an email address from a user. You ask the user to provide their email address, then at some point in the future, you can send a message to your user from your server – even if that user is no longer on your website.
It has three main parts,
- A website, which subscribes a user to notifications.
- A server-side script that sends notifcations
- A service worker js file, which displays notifications when they arrive.
To get started, you need to create a pair of VAPID encryption keys;
npm install web-push -gweb-push generate-vapid-keys
You should then get a response like the following
=======================================
Public Key:
BLCxKncb0uomifRWXeGvUtVy6vVSMbb2KBBKdSZPlHGC-ow0_wHW9ciUxNbjIeVa5zA8SGI-PKsoGCfk12pwFVwPrivate Key:
IoNkDX1EtBWvxu1GPQ65hFDV8c2OcxWfpfpl9JMYZ3Y=======================================
Now, lets get started on the client-side, your website.
function askPermission() {
return new Promise(function(resolve, reject) {
const permissionResult = Notification.requestPermission(function(result) {
resolve(result);
});if (permissionResult) {
permissionResult.then(resolve, reject);
}
})
.then(function(permissionResult) {
if (permissionResult !== ‘granted’) {
throw new Error(‘We weren\’t granted permission.’);
}
});
}function urlBase64ToUint8Array(base64String) {
const padding = ‘=’.repeat((4 – base64String.length % 4) % 4);
const base64 = (base64String + padding)
.replace(/\-/g, ‘+’)
.replace(/_/g, ‘/’);const rawData = window.atob(base64);
const outputArray = new Uint8Array(rawData.length);for (let i = 0; i < rawData.length; ++i) {
outputArray[i] = rawData.charCodeAt(i);
}
return outputArray;
}function subscribeUserToPush() {
return navigator.serviceWorker.register('service-worker-2.js')
.then(function(registration) {
const subscribeOptions = {
userVisibleOnly: true,
applicationServerKey: urlBase64ToUint8Array(
'BO7CyOKScyHNQRU6NY_1C2cVGNRBMHDV9_7mYfmg3lxo3c53Vw7XNSlKkZCqERQsdt9PGY-NylfiWQPbswZd644'
)
};return registration.pushManager.subscribe(subscribeOptions);
})
.then(function(pushSubscription) {
console.log('Received PushSubscription: ', JSON.stringify(pushSubscription));
return pushSubscription;
});
}askPermission().then(subscribeUserToPush);
What this does is that it asks the user for permission to send them push notifications, and then subscribes the user to the push notifications using the VAPID public key above.
Note also, that it registers the service worker “service-worker-2.js”, which will be used later to display the notifications once recieved.
The service worker file “service-worker-2.js” should have the following content:
// https://developers.google.com/web/fundamentals/codelabs/push-notifications/
self.addEventListener(‘push’, function(event) {
console.log(‘[Service Worker] Push Received.’);
console.log(`[Service Worker] Push had this data: “${event.data.text()}”`);const title = event.data.json().title;
const options = {
body: event.data.json().message,
icon: ‘images/icon.png’,
badge: ‘images/badge.png’
};event.waitUntil(self.registration.showNotification(title, options));
});
If you now open this page, accept notifications, and then view the console window, you’ll see an endpoint url, Auth key, and p256dh key, you’ll need all these in the next step.
Now, let’s take a look on the server side. Create a new folder for your node project, and run npm init to create your package.json.
Run npm install web-push to pull down a library which will help you in this next step.
const webpush = require(‘web-push’);
const vapidKeys = {
publicKey:
‘BO7CyOKScyHNQRU6NY_1C2cVGNRBMHDV9_7mYfmg3lxo3c53Vw7XNSlKkZCqERQsdt9PGY-NylfiWQPbswZd644’,
privateKey: ‘OnWh44RFgdpwcUPpxgFHwJVMDHdhcPKEajFIR7Epdp4’
};
webpush.setVapidDetails(
‘mailto:fiach.reid@gmail.com’,
vapidKeys.publicKey,
vapidKeys.privateKey
);const pushSubscription = {
“endpoint”:”https://fcm.googleapis.com/fcm/send/dKTKjDlNWmU:APA91bGYEzNVHhLGKuyCPZdrEqqYZFq__FnPAFSA2ZhBEDeg8_bjbgNJMKpm6xPMl2xEXCN1wM61Tl4_pz43OjrUyPW2T0dsmmRxWk6wuWa4Ai7YcE-UAv4qvNCl_FAYn9mzmSgCiBKU”,
“expirationTime”:null,
“keys”:{
“p256dh”:”BMIYEcFX0DaOpruw1D5KMUIhgwAl2HqK8qEb1JOtONmEktNR6OVd-CTtDFwNX8KJedixAX6Jo9D04D0Kg6mcoRQ=”,
“auth”:”QL2TNBsW4KdUR83s6-L13A==”
}
};webpush.sendNotification(pushSubscription, ‘Send!’);
You can see both the public and private keys from VAPID are included, also the push subscription includes the endpoint, p256dh and auth keys.
Finally, you call webpush.sendNotification(pushSubscription, ‘Send!’); where “Send!” is your payload.
- You can get the full version of this code on GitHub at https://github.com/infiniteloopltd/webPushNotifications
If you prefer to use C# on your back-end, you need to install via NuGet “WebPush” and “Newtonsoft.Json” and use the following code
var pushEndpoint = @"https://fcm.googleapis.com/fcm/send/fJLc6xP6HIE:APA91bFnK_dv8fdBYSaGx5HnJ7PHc696DcBAfD-5XJ7Vke4INBVWGaGiexaeVBseWiq1opmRrLZ9Z_XxvfZUe3PyryARxUfNAlTtXeOxssszZBTlQdQ2qkvEIsmObsJigrJylTZO0_p2";
var p256dh = @"BGbqvhUQPyC-QSrm_pQ45Als58dKuehPn-mz1PGXzSvghowZJmEroBMIMAVzuc6QB2zxo032H2NSWgzboMhHFK8=";
var auth = @"SvXCMDcjgzkGWjFNNVtMOw==";

var subject = @"mailto:fiach.reid@gmail.com";
var publicKey = @"BIzwHJzJXHkqjncpDVSZGbwbbIvoHT6LH4Z6oIpFwiZyArDPeHMuuQzWo_ncBWzidBhAvI_mh7QWrSndRnaneCE";
var privateKey = @"L4NtEgeRS0gVnvK-qJ6ovvz5LE2onltGdJy1dLhXD7I";

var subscription = new PushSubscription(pushEndpoint, p256dh, auth);
var vapidDetails = new VapidDetails(subject, publicKey, privateKey);


var webPushClient = new WebPushClient();
try
{
	var payLoad = new
	{
		message = "Yo mamma!",
		title = "My Website"
	};
	string strPayload = JsonConvert.SerializeObject(payLoad);

	webPushClient.SendNotification(subscription, strPayload, vapidDetails);

}
catch (WebPushException exception)
{
	Console.WriteLine("Http STATUS code" + exception.StatusCode);
}
