Archive
#OCR using #Azure Cognitive services

OCR or Optical Character Recognition is the process of extracting text from an Image. Microsoft Azure offers a service within Azure, called “Computer Vision”, which offers a free tier, that you can use to run small batches of OCR on images.
Here’s some sample code to use it in C#. I’ve used the Nuget package Newtonsoft.JSON for Json processing. I’ve also omitted the key, which you can get from Azure
private static string OcrUsingAzure(string url)
{
const string strUrl = “https://westeurope.api.cognitive.microsoft.com/vision/v1.0/ocr?language=unk&detectOrientation=true&enhanced=True”;
var wc = new WebClient();
wc.Headers[“Ocp-Apim-Subscription-Key”] = “xxxxxxx”;
var jPost = new { url = url };
var strPost = JsonConvert.SerializeObject(jPost, Formatting.Indented);
var strJson = wc.UploadString(strUrl, “POST”, strPost);
var jObject = JObject.Parse(strJson);
var strOutput = “”;
foreach (var region in jObject[“regions”])
{
foreach (var line in region[“lines”])
{
foreach (var word in line[“words”])
{
strOutput += word[“text”] + ” “;
}
strOutput += Environment.NewLine;
}
}return strOutput.Trim();
}
You pass in a url of an image with some text, and it spits out the text the other side.
If you know in advance the language of the document, i.e. english, you can improve the accuracy by changing the language parameter in the Querystring.
Add and List mailboxes set up in #MailEnable

MailEnable is a popular mail server for windows, that allows you manage your own email accounts on your server, but instead of managing it via remote desktop, they also offer an API to adminsister it. If your email needs are quite simple, but repetitive, then this could be a great way to pass on mail administration from developers to admin staff, by creating a web interface for email management.
My particular need for this was for printfromIpad.com , migrating from Linux (Dovecot) to Windows (MailEnable) – The source code for this article is available on GitHub here; https://github.com/infiniteloopltd/MailEnable/
First, you have to add a reference to MailEnable.Adminstration, which is available here;
C:\Program Files (x86)\Mail Enable\Bin\NETWebAdmin\bin\MailEnable.Administration.dll
(Assuming a default installation path)
The most simple thing is to list all mailboxes in a PostOffice, as follows
private static IEnumerable<string> ListMailboxes(string postOffice)
{
var oMailbox = new Mailbox
{
Postoffice = postOffice
};
if (oMailbox.FindFirstMailbox() != 1)
{
throw new Exception(“Failed to find mailboxes”);
}
var mailboxes = new List<string>();
do
{
var sMailboxName = oMailbox.MailboxName;
mailboxes.Add(sMailboxName);
}
while (oMailbox.FindNextMailbox() == 1);
return mailboxes;
}
This code needs to be run as an administrator, or it hangs unhelpfully on FindFirstMailbox()
Now, it’s more complex code to actually add an account, which would be as follows;
private static void AddMailbox(string postOffice, string email, string password)
{
var user = email.Split(‘@’)[0];
var domain = email.Split(‘@’)[1];
var oMailbox = new MailEnable.Administration.Mailbox();
var oLogin = new Administration.Login();
var sMailboxName = user;
var sPassword = password;
const string sRights = “USER”; // USER – User, ADMIN – Administrator;
oLogin.Account = postOffice;
oLogin.LastAttempt = -1;
oLogin.LastSuccessfulLogin = -1;
oLogin.LoginAttempts = -1;
oLogin.Password = “”;
oLogin.Rights = “”;
oLogin.Status = -1;
oLogin.UserName = sMailboxName + “@” + domain;
// If the login does not exist we need to create it
if (oLogin.GetLogin() == 0)
{
oLogin.Account = postOffice;
oLogin.LastAttempt = 0;
oLogin.LastSuccessfulLogin = 0;
oLogin.LoginAttempts = 0;
oLogin.Password = sPassword;
oLogin.Rights = sRights;
oLogin.Status = 1; // 0 – Disabled, 1 – Enabled
oLogin.UserName = sMailboxName + “@” + domain;
if (oLogin.AddLogin() != 1)
{
// Error adding the Login
throw new Exception(“Failed to add Login”);
}
}
// Now we create the mailbox
oMailbox.Postoffice = postOffice;
oMailbox.MailboxName = sMailboxName;
oMailbox.Size = 0;
oMailbox.Limit = -1; // -1 – Unlimited OR size value (in KB)
oMailbox.Status = 1;
if (oMailbox.AddMailbox() != 1)
// Failed to add mailbox
throw new Exception(“Failed to add mailbox”);
// Now we need to add the Address Map entries for the Account
var oAddressMap = new MailEnable.Administration.AddressMap
{
Account = postOffice,
DestinationAddress = “[SF:” + postOffice + “/” + sMailboxName + “]”,
SourceAddress = “[SMTP:” + sMailboxName + “@” + domain + “]”,
Scope = “0” // ?
};
if (oAddressMap.AddAddressMap() != 1)
// Failed to add Address Map for some reason!
throw new Exception(“Failed to add AddressMap”);}
For a full reference for this code, refer to the MailEnable .NET reference here;
Click to access NET%20Reference.pdf
Publish a #Google Doc to the web on your own domain name
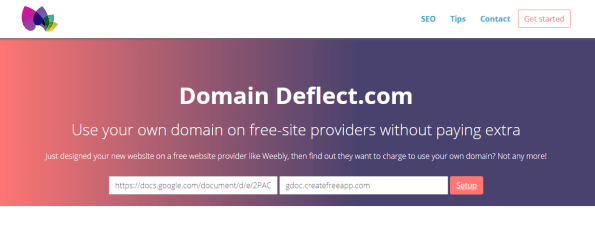
Writing a Google Doc is super easy, and you can even publish a Google doc to the web with two clicks, but unfortunately, you end up with a URL like this;
https://docs.google.com/document/d/e/2PACX-1vQ……….
Which nobody is ever going to remember, but with DomainDeflect.com you can now use your own domain name, so it can be on http://www.yourwebsite.com not “docs.google.com….” – and it doesn’t cost anything, as long as you own the domain name
Here’s a quick example.

Create a Google doc, and write some text in it, as shown above.

Press File then “Publish to the web”
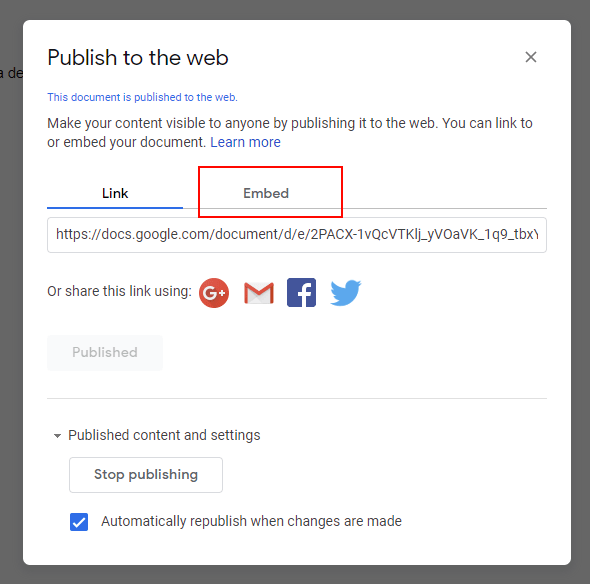
Press Embed.

Copy the URL between the https:// and the embed=true as shown above. Now go to DomainDeflect.com

In the left box, paste the URL from google, and add a “#” to the end of the url. so it should look something like this;
In the right box, enter your domain name, and then press “Setup”
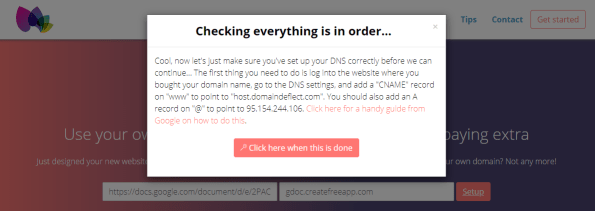
At this point, you need to set up the DNS on your domain. This means that you need to do is log into the website where you bought your domain name, go to the DNS settings, and add a “CNAME” record on “www” to point to “host.domaindeflect.com”. You should also add an A record on “@” to point to 176.105.255.48
When this is done, press the “Click here when this is done” button, and it will check the DNS on your domain.
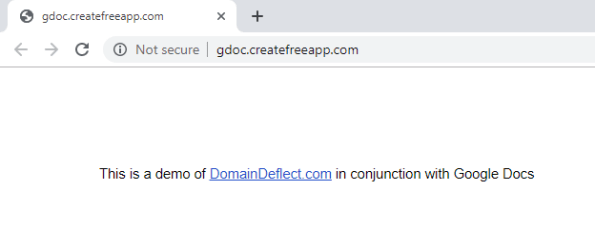
And Voila! once it’s done, you can navigate to your domain name in your browser, and you will see your google doc, with a pretty url. – and it’s perfectly SEO friendly. This example shows “http://gdoc.createfreeapp.com” as a demo.
Sending attachments #base64 encoded with #SMTPJS

SmtpJS is a client-side javascript library, that allows you send Email from webpages without any server-side code hosted on your server.
It’s really simple just to send a simple email, but imagine, you wanted to send an attachment also, perhaps asking the user to upload their own attachment to be sent?
Here is a code example, that allows a user “upload” a file to be sent, and then sends the attachment as base64 data. I’ve omitted the secure token, from the example below – you can get one at SMTPJS.com
<html>
<script src="https://smtpjs.com/v3/smtp.js"></script>
<input type="file" id="fileupload" onchange="uploadFileToServer()" />
<script>
function uploadFileToServer()
{
  var file = event.srcElement.files[0];
   var reader = new FileReader();
   reader.readAsBinaryString(file);
   reader.onload = function () {
       var dataUri = "data:" + file.type + ";base64," + btoa(reader.result);
       Email.send({
           SecureToken : "********",
           To : 'info@destination.com',
           From : "you@source.com",
           Subject : "Send with base64 attachment",
           Body : "Sending file:" + file.name,
           Attachments : [
          	{
          		name : file.name,
          		data : dataUri
          	}]
       }).then(
         message => alert(message)
       );
   };
   reader.onerror = function() {
       console.log('there are some problems');
   };
}
</script>
</html>
What this does, is when the user selects a file, uploadFileToServer is triggered, this then passes a reference to the uploaded file to FileReader which then reads the contents of the file asynchronously, when the file reading is complete the “onload” event of the FileReader object is triggered. The file data is converted form a BLOB to base 64 using the BTOA method, and simple string concatenation forms this into the correct format for a DataUri.
The base64 data, and the file name is then included in the Attachments array of the object passed to the Email.send function. Using the property “data” rather than “path”.
An alert box reporting “OK” indicates that everything has worked well.
Handling #Stripe #webhooks in asp.net for #SCA

Stripe Webhooks are going to become very important on September 14th 2019, because that is when new EU regulations come into effect for SCA (Strong Customer Authentication). This is where, if you are handling an off-session card transaction, then the you may need to engage the user to authorise the payment.
Webhooks are HTTP endpoints that are called on certain (or all) events triggered by Stripe, here is a simple example of a webhook handler written in C#, that will send an email with the data from Stripe to you. In the future, I will develop this further to actually handle the SCA transaction.
So, lets get started, with a simple ASHX file as follows;
<%@ WebHandler Language=“C#“ Class=“StripeWebhook.handler“ %>
using System;
using System.Web;
using System.IO;
namespace StripeWebhook
{
public class handler : System.Web.IHttpHandler
{
public void ProcessRequest (HttpContext context)
{
context.Response.Write(“OK“);
var poststring = new StreamReader(context.Request.InputStream).ReadToEnd();
Email.Send(“you@gmail.com“,“Received a Stripe Webhook call“, poststring);
}
public bool IsReusable {
get {
return false;
}
}
}
}
Now, the Email.Send is pretty boiler plate, and I’m leaving out my credentials with Amazon SES.
using System;
using System.Configuration;
using System.Net.Mail;
using System.Text;
namespace StripeWebhook
{
public class Email
{
private static string FromAddress = “info@you.net”;
private static string MailServer = “email-smtp.eu-west-1.amazonaws.com”;
private static string Username = “*****”;
private static string Password = “****/****”;
/// <summary>
/// Sends the specified recipient with reply to
/// </summary>
/// <param name=“recipient“>The recipient.</param>
/// <param name=“subject“>The subject.</param>
/// <param name=“body“>The body.</param>
public static void Send(string recipient, string subject, string body)
{
var mail = new MailMessage(FromAddress, recipient);
var client = new SmtpClient
{
Port = 25,
EnableSsl = true,
DeliveryMethod = SmtpDeliveryMethod.Network,
UseDefaultCredentials = false,
Host = MailServer,
Credentials = new System.Net.NetworkCredential(
Username,
Password)
};
mail.Subject = subject;
mail.Body = body;
mail.IsBodyHtml = true;
mail.BodyEncoding = Encoding.UTF8;
client.Send(mail);
}
}
}
This, I then deploy to an IIS server, at say https://www.yourwebsite.com/stripe.ashx , and check it works by just opening the page in a browser.
I then go into Stripe, Switch to Test mode, then click Developers > Webhooks, then Add endpoint. Enter the url, of your handler, then click on “Receive all events”. then “Add Endpoint”
Make a test transaction against stripe with a test card like 4242 4242 4242 4242, and then you should receive an email like this;
{
  "id": "evt_1ElBYWGpNuQPqazsiV1UgOXs",
  "object": "event",
  "api_version": "2015-04-07",
  "created": 1560503923,
  "data": {
    "object": {
      "id": "ch_1ElBYUGpNuQPqazsGPLyUzjN",
      "object": "charge",
      "amount": 10000,
      "amount_refunded": 0,
      "application": null,
      "application_fee": null,
      "application_fee_amount": null,
      "balance_transaction": "txn_1ElBYVGpNuQPqazsEDEsOqBj",
      "billing_details": {
        "address": {
          "city": null,
          "country": null,
          "line1": null,
          "line2": null,
          "postal_code": null,
          "state": null
        },
        "email": null,
        "name": null,
        "phone": null
      },
      "captured": true,
      "created": 1560503922,
      "currency": "gbp",
      "customer": null,
      "description": "Charge for Paypal card",
      "destination": null,
      "dispute": null,
      "failure_code": null,
      "failure_message": null,
      "fraud_details": {

      },
      "invoice": null,
      "livemode": false,
      "metadata": {

      },
      "on_behalf_of": null,
      "order": null,
      "outcome": {
        "network_status": "approved_by_network",
        "reason": null,
        "risk_level": "normal",
        "risk_score": 9,
        "seller_message": "Payment complete.",
        "type": "authorized"
      },
      "paid": true,
      "payment_intent": null,
      "payment_method": "card_1ElBYUGpNuQPqazsgLWEJ5qr",
      "payment_method_details": {
        "card": {
          "brand": "visa",
          "checks": {
            "address_line1_check": null,
            "address_postal_code_check": null,
            "cvc_check": "pass"
          },
          "country": "US",
          "exp_month": 9,
          "exp_year": 2022,
          "fingerprint": "9nK3pNZASU9W8AOL",
          "funding": "credit",
          "last4": "4242",
          "three_d_secure": null,
          "wallet": null
        },
        "type": "card"
      },
      "receipt_email": null,
      "receipt_number": null,
      "receipt_url": "https:\/\/pay.stripe.com\/receipts\/acct_15s8pNGpNuQPqazs\/ch_1ElBYUGpNuQPqazsGPLyUzjN\/rcpt_FFgwbvHE1qdC84353g8eqXNRSouDIo5",
      "refunded": false,
      "refunds": {
        "object": "list",
        "data": [

        ],
        "has_more": false,
        "total_count": 0,
        "url": "\/v1\/charges\/ch_1ElBYUGpNuQPqazsGPLyUzjN\/refunds"
      },
      "review": null,
      "shipping": null,
      "source": {
        "id": "card_1ElBYUGpNuQPqazsgLWEJ5qr",
        "object": "card",
        "address_city": null,
        "address_country": null,
        "address_line1": null,
        "address_line1_check": null,
        "address_line2": null,
        "address_state": null,
        "address_zip": null,
        "address_zip_check": null,
        "brand": "Visa",
        "country": "US",
        "customer": null,
        "cvc_check": "pass",
        "dynamic_last4": null,
        "exp_month": 9,
        "exp_year": 2022,
        "fingerprint": "9nK3pNZASU9W8AOL",
        "funding": "credit",
        "last4": "4242",
        "metadata": {

        },
        "name": null,
        "tokenization_method": null
      },
      "source_transfer": null,
      "statement_descriptor": null,
      "status": "succeeded",
      "transfer_data": null,
      "transfer_group": null
    }
  },
  "livemode": false,
  "pending_webhooks": 2,
  "request": "req_HHqTmHqjKXT6iA",
  "type": "charge.succeeded"
}
Free #website #Translation using a translator-proxy
![]()
If you want to translate your website into languages other than English, then you might think you have your work cut out, but perhaps not.
WebsiteTranslation.net is a translator-proxy which takes HTML source from your home domain (in english), translates the content into another language, then spits it out onto another domain, which then appears in the new language.
To use it, you set up a subdomain on your website, and use a CNAME DNS setting to point it to “websiteTranslation.net”, on the first visit to the new website, the proxy will fetch content from your domain, translate it to the required language, and then serve the content back, ready-translated.
It supports dynamic content, deep urls, SSL (with let’s encrypt), and will proxy all other types of content, like images, CSS and scripts, without interfering with them. The initial loading time is quite slow as the initial translation is performed, but afterwards, it speeds up 100-fold, thanks to a caching mechanism.
Although the demo is only for one webpage, if you want your whole website translated, then all you need to do is make a change to your website’s DNS settings to point a sub domain to our servers. No coding required! Your DNS settings are managed by the company who registered your website domain, and the process only takes a few minutes.
SEO Friendly
Unlike many website translation services, where the translated text is not visible to Google’s spider, this approach ensures that Google can read your translated website, and will index and rank it seperately to your main website. You can even get a country-specific ranking-boost by setting the geo-targeting option within Google Search Console
Dynamic websites supported
Every if your website is dynamic, and changes all the time, then the translated version will keep automatically up to date, by always using the latest version of your site. This means that you don’t have to manually update the translated versions of your site.
Fine tuning
Machine translation is far from perfect, and often it can make glaring mistakes that anyone can see. We offer an interface that allows you edit translated text on your website, to perfect the translated version
Getting started.
If you’d like to have your website translated, then you need to edit your DNS settings on your domain to point to our servers, and create a CNAME record to point to “WebsiteTranslation.net” for each subdomain / language you want to have available.
For example, if your website is “www.MyShoes.com”, and you wish to have this website available in Spanish and Italian, then you would set up the subdomains “it.MyShoes.com” and “es.MyShoes.com” and add corresponding CNAME records to “WebsiteTranslation.net”. Of Course, if you happen to own “www.MyShoes.es” and “www.MyShoes.it”, then you can point the CNAMES on these domains also – It’s even better for SEO.
We don’t yet support the facility for translating within the same domain – such as http://www.myshoes.com/it and http://www.myshoes.com/es – but talk to us, if this is what you need, and we can develop a solution for you.
After you’ve set up the CNAME records, you’ll need to tell us that you’re ready to go live. Use the contact us form below, and tell us your domains, and what language is needed for each. Also, tell us if you want automated or professional translation.
HTTPS supported
If you need to have HTTPS (Secure HTTP) on your website, then we offer free SSL certificates from Let’s Encrypt. These gives you an SEO boost due to Google’s Trustrank scoring, and also keeps your customer’s data more secure.
If you have your own HTTPS certificate issued by another authority, that you would prefer to use, then you need to ensure that it is valid for the subdomain being used – typically, this means a wildcard certificate. You will need to send us the PFX file of your certificate, and PFX password in order for us to use a third-party certificate.
Website Translation.net came as an idea, to cut the time needed to translate a website from one language to another, without duplicating the source code, so that changes in English could be reflected instantly in all other languages.
#Forward phone calls from a phone number anywhere in the world to your mobile phone.
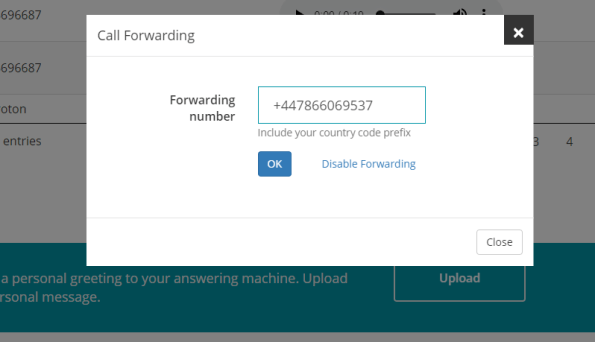
This is a new feature of CloudAnsweringMachine.com – which now allows you to provision a phone number anywhere in the world, and then forward calls from that number to your mobile phone, or another landline.
This could be great if you don’t want to give away your personal phone number, but at the same time you want to receive calls on it. You can always cancel or redirect the phone number that is provisioned on CloudAnsweringMachine.
It’s also useful, if your friends / family / customers are located in another country and you want to give them a local number to call, which will be redirected to your phone number in your country.
At the moment, this comes at no addtional cost over the rental of the Cloud Answering Machine number, however, this may be reviewed, depending on usage levels.
To activate it, simply Login, then scroll to “Redirect”, then enter your forwarding number, and press OK. Any calls to your number will then be redirected to you, rather than going to an answering machine. – Soon this will be available on the app too!
Enhanced email validation using #DNS #MX

If you have a sign-up form, and you are collecting user’s email addresses, then you really want to cut down on the number of typos. I’ve seen as many as 5% of users mistyping “@gmail.com” as “@gmail.con, @gmail.co, @gmai.com, and @gmail.xom etc.”
Many of these email addresses pass basic regex checks, it’s “Gmail.co” is in the correct format for a domain name, but alas, your user will never be able to re-log in.
So, instead of only relying on regexes, you can also use a DNS MX lookup, that can check if there are mail exchanger(s) associated with the domain. This means that “@gmail.com” will work, but “@gmail.co” won’t
Firstly, we have to delve into how to perform a DNS MX lookup in C#, which is a UDP request sent over port 53 to a DNS server, in this case 8.8.8.8, which is Google’s public DNS resolver.
Here’s the class
using System;
using System.Collections.Generic;
using System.Linq;
using System.Net;
using System.Net.Sockets;
using System.Text;public static class Dns
{
public static IEnumerable<string> MxLookup(string domain)
{
const string strDns = “8.8.8.8”; // Google DNS
var udpClient = new UdpClient(strDns, 53);
// SEND REQUEST——————–
var list = new List<byte>();
list.AddRange(new byte[] { 88, 89, 1, 0, 0, 1, 0, 0, 0, 0, 0, 0 });
var tmp = domain.Split(‘.’);
foreach (string s in tmp)
{
list.Add(Convert.ToByte(s.Length));
var chars = s.ToCharArray();
list.AddRange(chars.Select(c => Convert.ToByte(Convert.ToInt32(c))));
}
list.AddRange(new byte[] { 0, 0, Convert.ToByte(15), 0, 1 });
var req = new byte[list.Count];
for (var i = 0; i < list.Count; i++) { req[i] = list[i]; }
udpClient.Send(req, req.Length);
// RECEIVE RESPONSE————–
IPEndPoint ep = null;
var receiveBuffer = udpClient.Receive(ref ep);
udpClient.Close();
var resp = new int[receiveBuffer.Length];
for (var i = 0; i < resp.Length; i++)
resp[i] = Convert.ToInt32(receiveBuffer[i]);
var status = resp[3];
if (status != 128) return null; // throw new Exception(string.Format(“{0}”, status));
var answers = resp[7];
if (answers == 0) return null; // throw new Exception(“No results”);
var pos = domain.Length + 18;
var lRecords = new List<string>();
while (answers > 0)
{
pos += 14; //offset
var str = GetMxRecord(resp, pos, out pos);
lRecords.Add(str);
answers–;
}
return lRecords;
}private static string GetMxRecord(int[] resp, int start, out int pos)
{
StringBuilder sb = new StringBuilder();
int len = resp[start];
while (len > 0)
{
if (len != 192)
{
if (sb.Length > 0) sb.Append(“.”);
for (int i = start; i < start + len; i++)
sb.Append(Convert.ToChar(resp[i + 1]));
start += len + 1;
len = resp[start];
}
if (len != 192) continue;
var newPosition = resp[start + 1];
if (sb.Length > 0) sb.Append(“.”);
sb.Append(GetMxRecord(resp, newPosition, out newPosition));
start++;
break;
}
pos = start + 1;
return sb.ToString();
}
}
[Credit due to Christian Salway @ccsalway for this code]
This when called as Dns.MxLookup(“gmail.com”), would return a list of strings as follows;
"gmail-smtp-in.l.google.com",
"alt4.gmail-smtp-in.l.google.com",
"alt1.gmail-smtp-in.l.google.com",
"alt2.gmail-smtp-in.l.google.com",
"alt3.gmail-smtp-in.l.google.com"
These correspond to the mail exchange servers used by gmail, and indicate that the domain can receive email, otherwise, this function returns null.
Now, lets create an ASP.NET page that will act as a handler for an Ajax call to validate an email address as follows;
using System;
using System.Collections.Generic;
using Newtonsoft.Json;public partial class ajax_ValidateEmail : System.Web.UI.Page
{
private class ResponseClass
{
public bool success { get; set; }
public string error { get; set; }
public IEnumerable<string> information { get; set; }
}protected void Page_Load(object sender, EventArgs e)
{
var response = new ResponseClass();
var email = Request.QueryString[“email”];
if (string.IsNullOrEmpty(email))
{
response.error = “Need on email on querystring”;
}
else
{
var idxAt = email.IndexOf(“@”, StringComparison.CurrentCulture);
if (idxAt == -1)
{
response.error = “Invalid email address”;
}
else
{
var domain = email.Substring(idxAt+1);
var mx = Dns.MxLookup(domain);
if (mx == null)
{
response.error = “Invalid domain”;
}
else
{
response.success = true;
response.information = mx;
}
}
}
var json = JsonConvert.SerializeObject(response, Formatting.Indented);
Response.ContentType = “application/json”;
Response.Write(json);
}
}
This will respond with the following Json in the case of success;
{
  "success": true,
  "error": null,
  "information": [
    "gmail-smtp-in.l.google.com",
    "alt4.gmail-smtp-in.l.google.com",
    "alt1.gmail-smtp-in.l.google.com",
    "alt2.gmail-smtp-in.l.google.com",
    "alt3.gmail-smtp-in.l.google.com"
  ]
}
And, in the case of failure;
{
  "success": false,
  "error": "Invalid domain",
  "information": null
}
This can then be called from Javascript (jquery) as follows;
var strEmail = $(“#tbEmail”).val();
$.get(“/ajax/ValidateEmail.aspx?email=” + strEmail,
function(response) {
if (!response.success) {
$(“#fgEmail”).addClass(“has-error”);
} else {
$(“#fgEmail”).removeClass(“has-error”);
}
});
You can go a step further and prevent the form submission, at the moment, I’m just relaying user feedback, and see what happens.
To see this live, see https://www.regcheck.org.uk
Using #Electron to call a .NET #API

Electron is a platform that allows you develop desktop applications which are cross-platform, and run on standard HTML , CSS , Javascript and Node. The mix of typically client-and-“server side” javascript is very unusual, but quite liberating.
Here is a simple example of using Electron with an API that typically would be called by server-side Node, in a desktop app here –
https://github.com/infiniteloopltd/ElectronRegCheck
It’s not really that much beyond the “hello world” example, but shows the basics of using a simple user interface, and calling an API.
The code in “renderer.js” is as follows;
var api = require(‘car-registration-api-uk’);
window.$ = window.jQuery = require(‘jquery’);$(init);
function init()
{
$(“#btnSearch”).bind(“click”,btnSearch_click);
}function btnSearch_click()
{
var reg = $(“#reg”).val();
api.CheckCarRegistrationUK(reg,”*** your username here***”,function(data){
$(“#output”).html(data.Description);
});
}
You’ll need an account on RegCheck.org.uk for this to work.
