Archive
Car Registration API #Pakistan #Sindh

Sindh, one of the four provinces of Pakistan, and the latest addition to our support to our Car Registration API network. In Pakistan, we currently cover Punjab (PB), Khyber (KP) and now Sindh (SD). See more at http://pk.carregistrationapi.com/
Data is returned in Pakistan Sindh province in the following format;
{
  "Description": "HONDA",
  "CarMake": {
    "CurrentTextValue": "HONDA"
  },
  "MakeDescription": {
    "CurrentTextValue": "HONDA"
  },
  "RegistrationDate": "2002-03-06",
  "TaxDate": "2019-12-31",
  "EngineNumber": "D16W9-1003512",
  "BodyType": "SALOON",
  "Owner": "JAM MAHAR ALI RF",
  "CPLC": "CLEAR",
  "Seats": "4",
  "Class": "PR",
  "HP": "1590CC",
  "RegistrationYear": 2002,
  "Image": "http:\/\/pk.carregistrationapi.com\/image.aspx\/@SE9OREE=",
  "Extended": [
    {
      "Key": "Registration No",
      "Value": "ADX-008"
    },
    {
      "Key": "Make",
      "Value": "HONDA"
    },
    {
      "Key": "Registration Date",
      "Value": "2002-03-06"
    },
    {
      "Key": "Tax Payment",
      "Value": "2019-12-31"
    },
    {
      "Key": "Engine No",
      "Value": "D16W9-1003512"
    },
    {
      "Key": "Safe Custody",
      "Value": "PURCHASER are advised to contact MR \r\nWing for avoidng dispute on this subject vehicle"
    },
    {
      "Key": "Body Type",
      "Value": "SALOON"
    },
    {
      "Key": "Owner Name",
      "Value": "JAM MAHAR ALI RF"
    },
    {
      "Key": "Model Year",
      "Value": "2002"
    },
    {
      "Key": "CPLC",
      "Value": "CLEAR"
    },
    {
      "Key": "Seating Capacity",
      "Value": "4"
    },
    {
      "Key": "Class of Vehicle",
      "Value": "PR"
    },
    {
      "Key": "Horse Power",
      "Value": "1590CC"
    }
  ]
}
Intercept HTTPS requests made by a live #iOS app using @Telerik #Fiddler
If you want to debug an iOS app that’s installed on a iPhone, to determine what network calls it is making, then if you have a Windows PC, then you can use Telerik’s Fiddler to intercept requests between any iOS app and whatever back-end API it is using, even over HTTPS.
Make sure your PC and iPhone are on the same WIFI network before starting.
First, Install the Telerik Fiddler Application, and make sure your firewall allows connections on port 8888. Now, go Settings > Wifi > (i) > Configure proxy > Manual
Get the IP address of your PC using ipConfig, Mine was 192.168.0.22, yours may be different.

Enter the port as 8888 and press Save. Now, Fiddler should be able to capture HTTP (insecure) requests.
To Capture Secure Requests (HTTPS), you will need to install a certificate on your iPhone. To Do so, you can download it from your iPhone from here http://www.javatiger.com/fiddler/FiddlerRoot.cer
Or use the Camera app on your iPhone to scan this QR code:


When asked to chose a device, select iPhone

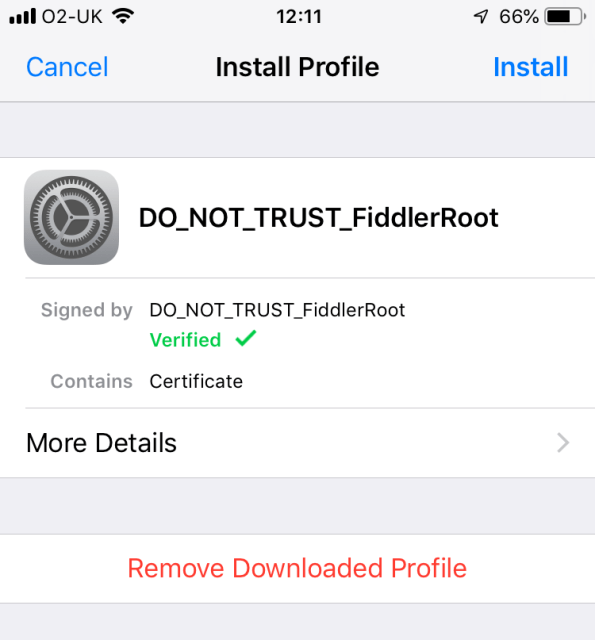
This downloads the cert, but you need to install it and activate it.
Open your settings app, and click “Profile Downloaded” then “Install”
then enable the cert

By pressing settings – general – about – certificate trust settings
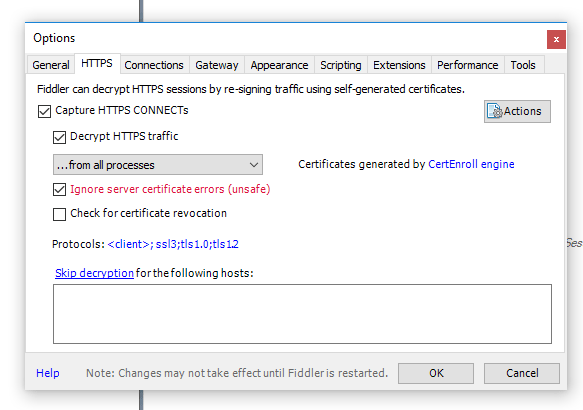
Make sure that In Fiddler, you have selected Tools > Options > HTTPS > Decrypt HTTPS traffic, and then restart Fiddler.

I also added extra TLS protocols amd selected the Ignore server cert errors.
Hopefully now, if you operate your iPhone, you should see both HTTP and HTTPS requests appearing in Fiddler.
Certain apps, like the App store (for example) will not work, since they are smart enough to notice that there is a “Man-In-The-Middle” attack going on – and this does highlight the importance of Certificate pinning, which you should do, if you are handling financial data in apps.
Customising #Intellisense for #Javascript libraries

If you’re using an IDE like Visual Studio to write web apps, then you may have noticed these “(in <filename>.d.ts)” appearing in the intellisense. Most of these are in-built, but you can write your own in order to customise how this appears, so that you can provide added assistance to people using your Javascript library. Here I am experimenting with the SMTPJS.com Javascript library.
First, I’m going to auto-generate my d.ts file using Typescript (TSC). So I just rename my js file to a .ts file and run this
tsc –lib dom,ES6 smtp.debug.ts –declaration
The libaries used here (ES6 & dom) where what I needed for my file, you might need to play with this to get it to work with your Javascript.
This generates a Typings file (d.ts) as follows;
declare var Email: {
send: (params: any) => Promise<{}>;
ajaxPost: (url: any, params: any, callback: any) => void;
ajax: (src: any, callback: any) => void;
createCORSRequest: (method: any, url: any) => XMLHttpRequest;
};
Then you optionally can reference the typings file from the JS file like so;
/// <reference path=”smtp.debug.d.ts” />
However, I found the IDE picked it up automatically, even without this, due to the file names. Unfortunately, it didn’t seem to load a remote d.ts file, so I abandoned this project at this point.
Using #AI in #Cryptanalysis
![]()
SETUP
First we set some helper variables that define the project
ROOT_DIR = 'C:\\Users\\Andrew\\Documents\\Work\\string-prediction\\Final' # The home location of this project
SEED = 42 # The seed to ensure consistency across experiments, not used in production
INPUT_SIZE = 24 # A helper variable to define the size of the input
OUTPUT_SIZE = 17 # A helper variable to define the size of the output
Next, we load the data from the csv file. We also cache the content of the csv file in “pickle” format. This is because csv format files take a few seconds to load but pickle format files load almost instataneously, therfore, to keep the developer sane, we utilize the cache in development.
import pandas as pd # pandas is a commonly used data processing library, used here to load the csv initially
DATA_FILE = '{}/{}'.format(ROOT_DIR, 'RealWorkload.csv') # the filepath of the csv file
DATA_PICKLE = '{}/{}'.format(ROOT_DIR, 'data.pickle') # the cached version of the csv file for faster loading in development
data = pd.read_csv(DATA_FILE, header=None, names=['input', 'output']) # use pandas to read the input
data = data.dropna() # drop any rows with null values just in case
data.to_pickle(DATA_PICKLE) # cache csv file in a "pickle" format for faster loading in development
# data = pd.read_pickle(DATA_PICKLE) # loading csv file in pickle format, not used here
data.head() # display the first five rows in the console
DATA PREPARATION
We then transform the data into x for the input features, and y for the output predictions. We could have continued to use pandas as our data structure of choice, however we don’t need the advanced features of pandas, therefore we simply load the data input numpy arrays which are much more lightweight.
import numpy as np # numpy is a utility mathematical library
x = np.zeros((len(data), INPUT_SIZE)) # construct an empty container that will track the input values
for i, row in enumerate(data['input'].values): # iterate through the input values
arr = row.split('|') # split the string by the '|' delimiter
for j, value in enumerate(arr): # iterate through each value in a row
x[i, j] = int(value) # set the appropriate value in the container to the value in the input as an integer
y = data['output'].values # simply copy over the output values into the y container
# note that even though we are constructing the x and y containers separately, it is guaranteed that their values will sync up.
# Such that the first x element will correspond to the first y element
We split the data into three portions.
- Test – used for final testing, completely unseen by the model
- Validation – used for tuning the model hyperparameters, functions as a “pretend” test set
- Train – the data used to train the model
The key difference between the test set and validation set is the fact that the models will be tuned for the validation set but not the test set.
import string
from sklearn.model_selection import train_test_split # sklearn is a commonly used data science library
SIZE = 100000 # we define our working-set size
x_work, y_work, x_test, y_test = x[:SIZE], y[:SIZE], x[SIZE:], y[SIZE:] # we split the data into a working set and test set
x_train, x_val, y_train, y_val = train_test_split(x_work, y_work, test_size=0.2, random_state=SEED)
# we then further split the working set into a training and validation using the SEED variable to
# control randomness during development, the validation set is 20% of the working set
We then build and train our models. We use a random forest classifier to predict each character in the output sequence. Through experimentation this was the best performing approach.
A high level description of a random forest classifier is that decision trees are built by construction a tree of decision points based on the input data. The decision points are adjusted in training. Multiple trees are built and their combined result is the prediction.
For more information see here: https://towardsdatascience.com/understanding-random-forest-58381e0602d2
Further models that were experimented with include a simple feedforward network, a recurrent network and an autoencoder neural network. However, this approach was the best performing by a large margin.
from sklearn.ensemble import RandomForestClassifier
# a random forest classifier is an advanced implementation of decision trees and
# has been shown to be the best statistical learning method
models = []
for i in range(OUTPUT_SIZE):
target = list(map(lambda v: v[i], y_train)) # we fetch the appropriate target digits
model = RandomForestClassifier(random_state=SEED, n_estimators=10) # we use 100 estimators in our random forest setup
model.fit(x_train, target)
models += [model]
print('finished with model #{}'.format(i))
EVALUATION
Now we evaluate the model to see how it performs and how well it generalizes
from sklearn.metrics import accuracy_score # a utility helper function that evaluates models
import matplotlib.pyplot as plt # import plotting library
def measure(x, y):
output = []
for i in range(OUTPUT_SIZE): # we iterate through each character in the output string
target = list(map(lambda x: x[i], y)) # we fetch the appropriate expected target
predicted = models[i].predict(x) # we use our trained model to predict the the character
accuracy = accuracy_score(target, predicted) # we check the accuracy of the predictions against the expected
output += [accuracy * 100]
return output
def graph_results(results, title):
plt.bar(np.arange(OUTPUT_SIZE), results, align='center', alpha=0.5)
plt.xticks(np.arange(OUTPUT_SIZE), np.arange(1, OUTPUT_SIZE + 1))
plt.ylabel('accuracy %')
plt.xlabel('character in output')
plt.title(title)
plt.show()
train_results = measure(x_train, y_train)
val_results = measure(x_val, y_val)
test_results = measure(x_test, y_test)
now we graph the results to see that the training set attains a near-perfect performance which is to be expected with tree based models. The validation and test sets are consistent with each other, showing that the first 8 digits and the 11th digit are the most accurate. The 9th digit, the security digit, is the least accurate as expected. Everything after the 9th digit (with the exception of digit 11) also has drastically reduced accuracy
graph_results(train_results, 'train accuracy')
graph_results(val_results, 'validation accuracy')
graph_results(test_results, 'test accuracy')
USAGE
Now we construct our model for production by training on the entire dataset and serialized to file.
models = []
for i in range(OUTPUT_SIZE):
target = list(map(lambda v: v[i], y)) # we fetch the appropriate target digits
model = RandomForestClassifier(random_state=SEED, n_estimators=10) # we use 100 estimators in our random forest setup
model.fit(x, target)
models += [model]
print('finished with model #{}'.format(i))
import pickle
for i in range(OUTPUT_SIZE):
pickle.dump(models[i], open('{}/model_{}.pickle'.format(ROOT_DIR, i), 'wb')) # serializing models to pickle format
print('finished {}'.format(i))
DEPLOYMENT
After serializing the models, they can then be used by our server. We use a flask server that loads the models and responds to inputs to make predictions. The code of which lives in “server.py” and should be fairly self-explanatory.
To run the server, make sure python is installed from
- standard distribution – https://www.python.org/downloads/
- anaconda distribution – https://www.anaconda.com/distribution/ – recommended
After installing python:
- Open the command line program – cmd on windows, terminal on osx
- Navigate to the server folder
- Run the install file – note this may take some time depending on the computer specifications
and may look like the program has frozen, please allow it to finish
a. For osx: run “./install.sh” b. For windows: run “install” - Run the run file
a. For osx: run “./run.sh”
b. For windows: run “run” - After the server starts, a process will run to load the model. The console output will denote the progress and the final message “ALL MODELS LOADED” will indicate the server is ready to use.
Now a Flask server will be available at “http://localhost:5000”. This server can be queried by any REST client. For testing, I recommend PostMan or Restlet Client.
The following endpoints are supported:
- /test – a test endpoint that responds with a test message
- /info – responds with test probabilities of each character in the output, can be used to estimate confidence
- /- accepts a parameter “text” with 24 signed integers separated with “|”, returns the predicted 17 character output sequence
For example: http://localhost:5000?text=-2|-72|-11|-2|18|100|-69|15|93|120|15|-97|-35|52|85|-114|53|-123|-1|-101|-38|125|-100|113
Will return: 1D8HB58D04F177301
Uploading to #AWS #Glacier with the #CLI

Amazon Glacier is a great place to store data cheaply that you have no urgent requirement to recover quickly. This could be data that you need to store for “safe keeping”, or backups-of-backups. It’s not a replacement for S3, since you can’t retrieve the data quickly.
The CLI examples on the Amazon site are quite complex, since they recommend you break the data into 1MB chunks before uploading. This approach is simpler, but will only work for files up to 4GB.
First, you’ll need to install the AWS CLI and run AWS configure, and enter your IAM access key, secret, and region (i.e. eu-west-1).
You can create a vault via the AWS web interface, this just confirms that you have access to them via the CLI;
aws glacier list-vaults –account-id –
Which returns;
{
“VaultList”: [
{
“VaultARN”: “arn:aws:glacier:eu-west-1:xxxx:vaults/AI-String
-xxxx”,
“VaultName”: “AI-String-xxx”,
“CreationDate”: “2019-08-20T14:19:59.345Z”,
“NumberOfArchives”: 0,
“SizeInBytes”: 0
},
{
“VaultARN”: “arn:aws:glacier:eu-west-1:xxxxxx:vaults/xxxxx
-www-backup”,
“VaultName”: “xxxxx-www-backup”,
“CreationDate”: “2017-08-27T14:45:10.021Z”,
“LastInventoryDate”: “2017-08-28T09:09:29.270Z”,
“NumberOfArchives”: 3,
“SizeInBytes”: 8880671766
}
]
}
Now, you can upload a file as follows;
aws glacier upload-archive –vault-name AI-String-Processing –accou
nt-id – –archive-description “AI String xxxx” –body AI-String-xxxx
.zip
Which returns
{
“location”: “/xxxxx/vaults/AI-String-xxxx/archives/….”,
“checksum”: “…..f”,
“archiveId”: “…Q”
}
Now, if you wait about 4 hours, you should see the archive counter increase in the AWS Web User interface.
Car Registration #API in #Cyprus

Cyprus has the highest rate of car ownership in the world, with 742 cars per 1,000 people, which in 2009, was 651,149 cars out of a total population of 854,802. If your company is in the automotive trade, and is selling cars, car services, or car parts to Cyprus, then knowing the exact make and model of a Cypriot car from it’s license plate, will make your website that much easier to use.
We’ve developed an API at www.api.com.cy that allows you determine the make, model, age and engine size of a Cypriot car from it’s number plate. The website is in Greek, but don’t worry if you don’t speak greek, you can access the same API by clicking any of the other country versions, and access the /CheckCyprus API directly.
Cyprus support
Car registration plates in Cyprus use the /CheckCyprus endpoint and return the following information:
- Make / Model
- Engine Size
- Age
- Representative image
Sample Registration Number:
KXJ391
Sample Json:
{
“Description”: “DODGE CALIBER”,
“CarMake”: {
“CurrentTextValue”: “DODGE”
},
“CarModel”: {
“CurrentTextValue”: “CALIBER”
},
“MakeDescription”: {
“CurrentTextValue”: “DODGE”
},
“ModelDescription”: {
“CurrentTextValue”: “CALIBER”
},
“EngineSize”: {
“CurrentTextValue”: “1998”
},
“Power”: “115”,
“RegistrationDate”: “17/03/2010”,
“ManufactureDate”: “01/01/2006”,
“Convertible”: “False”,
“ImageUrl”: “http://www.api.com.cy/image.aspx/@RE9ER0UgQ0FMSUJFUg==”
}
.@MaxMind IP to Country offline lookup with #autoUpdate in C#

If you want to determine the country from an IP address, then there are a million and one APIs that you can use, but they tend to have free usage limits, plus there is a performance hit of making a network call every time.
You can donwload a free database from Maxmind that you can use to do the lookup offline, but it ads another complexity – that the fact that IP addresses change ownership, and can map to a different country, if you don’t keep the database updated.
So, not only does this demo determine the Country from an IP address from an offline database, but it also has code to automatically download and update the data every month.
So, if you don’t want to read further, and just jump to the code, here is the repo;
https://github.com/infiniteloopltd/MaxMindDemo
So, the basics first. If you are happy with a rough lookup, then just pull the MaxMind Nuget package as follows
install-package MaxMind.GeoIP2
Then download and unzip the GeoLite2-Country.mmdb file from https://geolite.maxmind.com/download/geoip/database/GeoLite2-Country.tar.gz and place it in your bin folder.
Then all you need is this;
var reader = new DatabaseReader(“GeoLite2-Country.mmdb”);
var response = reader.Country(“8.8.8.8”);
Console.WriteLine(response.Country.IsoCode);
Which should say that IP 8.8.8.8 is in the US (It’s Google)
Now, the next fun part is how to update this mmdb file automatically. We can download the TAR.GZ as follows;
var wc = new WebClient();
var bData = wc.DownloadData(“https://geolite.maxmind.com/download/geoip/database/GeoLite2-Country.tar.gz”);
var zippedStream = new MemoryStream(bData);
Which give’s us a Tar GZ file, Which is a file that is in Tar format (*Uncompressed, but a format where multiple files are stored as one) and Gzipped (Compressed). So, we need to Gzip the file, and copy it into a memory stream –
var gzip = new GZipStream(stream, CompressionMode.Decompress);
var mTar = new MemoryStream();
gzip.CopyTo(mTar);
mTar.Seek(0, SeekOrigin.Begin);
Now, with a TAR stream, we have to separate this into a list of objects that define as follows;
public class TarEntry
{
public string FileName { get; set; }
public byte[] Contents { get; set; }
}
The code to parse the TAR file is as follows;
private static List<TarEntry> ExtractTarEntries(Stream stream)
{
var lTarEntries = new List<TarEntry>();
var buffer = new byte[100];
while (true)
{
stream.Read(buffer, 0, 100);
var name = Encoding.ASCII.GetString(buffer).Trim(‘\0’);
if (String.IsNullOrWhiteSpace(name))
break;
stream.Seek(24, SeekOrigin.Current);
stream.Read(buffer, 0, 12);
var size = Convert.ToInt64(Encoding.ASCII.GetString(buffer, 0, 12).Trim(‘\0’), 8);
stream.Seek(376L, SeekOrigin.Current);
var buf = new byte[size];
stream.Read(buf, 0, buf.Length);
lTarEntries.Add(new TarEntry
{
Contents = buf,
FileName = name
});var pos = stream.Position;
var offset = 512 – (pos % 512);
if (offset == 512)
offset = 0;stream.Seek(offset, SeekOrigin.Current);
}
return lTarEntries;
}
finally, the code to check the age is as follows;
var fi = new FileInfo(“GeoLite2-Country.mmdb”);
if (!fi.Exists || (DateTime.Now – fi.LastWriteTime).TotalDays > 30)
{
DownloadGeoliteDB();
}
Make #DNS queries using client side #Javascript using DNS-JS

DNS is a very simple protocol, which runs over UDP port 53. It’s primary role is to determine the IP address that is related to a domain. So for example, DNS-JS.com resolves to 95.154.244.106, but it’s also used to determine what server handles the email for a given domain, and lots of other ‘glue’ that holds the internet together.
The issue is, you can’t make a low level packet requests using Javascript alone, so this library helps you make DNS requests using Browser-side javascript.
So, a simple example would be;
DNS.Query(“dns-js.com”,
DNS.QueryType.A,
function(data) {
console.log(data);
});
Which makes a DNS “A” type request for “dns-js.com”, and will return the result as a parameter to your callback function, in this case as “data”, and written to the console.
The full list of Query types are as follows;
A : Address Mapping record
NS : Name Server record
MD : A mail destination (OBSOLETE - use MX)
MF : A mail forwarder (OBSOLETE - use MX)
CNAME : Canonical Name record
SOA : Marks the start of a zone of authority
MB : A mailbox domain name (EXPERIMENTAL)
MG : A mail group member (EXPERIMENTAL)
MR : A mailbox rename domain name (EXPERIMENTAL)
NULL : A Null resource record (EXPERIMENTAL)
WKS : A well known service description
PTR : Reverse-lookup Pointer record
HINFO : Host information
MINFO : Mailbox or mail list information
MX : Mail exchanger record
TXT : Text Record
RP : Responsible Person
AFSDB : AFS Data Base location
AAAA : IP Version 6 Address record
SRV : Service Location
SSHFP : A SSH Fingerprint resource record
RRSIG : RRSIG rfc3755
AXFR : DNS zone transfer request.
ANY : Generic any query
URI : A Uniform Resource Identifier (URI) resource record
CAA : A certification authority authorization
and, you can see other demos at https://www.dns-js.com/
Error getting value from ‘ScopeId’ on ‘System.Net.IPAddress’.

When you try to serialize an object that contains an IPAddress, you get the error message Error getting value from ‘ScopeId’ on ‘System.Net.IPAddress’.
So, you have to override how Json.NET (Newtonsoft) serializes this type. Which means you create a class that converts a this problematic type to and from a string youself.
public class IPConverter : JsonConverter<IPAddress>
{
public override void WriteJson(JsonWriter writer, IPAddress value, JsonSerializer serializer)
{
writer.WriteValue(value.ToString());
}public override IPAddress ReadJson(JsonReader reader, Type objectType, IPAddress existingValue, bool hasExistingValue, JsonSerializer serializer)
{
var s = (string)reader.Value;
return IPAddress.Parse(s);
}
}
Now, you pass this class into JsonSerializerSettings, like so;
var jsonSettings = new JsonSerializerSettings();
jsonSettings.Converters.Add(new IPConverter());
var json = JsonConvert.SerializeObject(result, Formatting.Indented, jsonSettings);
Where results is the object that contains the IP address.
Controlling #AWS #Route53 via the command line

If your emergency backup system for your website, is a standby server, and the idea is to boot up the standby server, and switch DNS if your main server ever goes down, then this is all fine … until the day when the server goes down, and every second costs money in downtime, And logging into Route53, and changing those DNS records manually seems to take ages, especially, if you have lots of websites, subdomains, MX records … etc.
Here is where creating a script for AWS Route53 in advance can save precious seconds, and makes sure that you can have an orderly and predictable changeover of DNS records, from live to backup, and then backup to live again.
AWS has a command line interface (CLI), and you can download the tools here; https://aws.amazon.com/cli/
Now, you’ll have to set up AWS CLI by typing aws configure, and providing your access key etc.
You’ll need to get the zone ID of each domain you want to configure, which you can get a list of them all by typing aws route53 list-hosted-zones
Next, you’ll need to create a JSON file for each domain you want to change, with details of the new records you need to change. Here is a sample JSON file:
{
“Comment”: “Update A record”,
“Changes”: [
{
“Action”: “UPSERT”,
“ResourceRecordSet”: {
“Name”: “www.domain.com”,
“Type”: “A”,
“TTL”: 300,
“ResourceRecords”: [
{
“Value”: “xxx.xxx.xxx.xxx”
}
]
}
},
{
“Action”: “UPSERT”,
“ResourceRecordSet”: {
“Name”: “domain.com”,
“Type”: “A”,
“TTL”: 300,
“ResourceRecords”: [
{
“Value”: “xxx.xxx.xxx.xxx”
}
]
}
}
]
}
Obviously, domain.com is updated with your domain, and xxx.xxx.xxx.xxx with your new server IP. You should set the TTL low on the switch-to-backup phase, so that the DNS change is held only temporarily by clients.
You should also create the reverse of this file (switch back to live) for when your main server recovers. The TTL on the switch-to-live file can be longer, as long as you don’t expect your main server to crash again anytime soon!
Now, create a batch file with the command
aws route53 change-resource-record-sets –hosted-zone-id XXXXXX –change-batch file://update.json
Where XXXXX is your zone ID from earlier, and update.json is the file above.
In a real-world example, this batch file, should have lists of lots of domains and subdomains to be changed, and a corresponding batch file that reverses all the changes.
This means, that if your live server ever goes down, you boot up the backup, and run this batch, and the DNS will start directing traffic at your backup server. Once the main server is fixed, you can quickly reverse it, so that traffic is returned to your main server again.
One of the benifits of this, is that, during the stressful event of an outage, you are not wasting time configuring DNS, but can change everything at once, even non-essential websites or domains, that would probably be let crash during an outage.
