Archive
#API to get vehicle information from a car number plate in #Mexico

Mexico, a country with 43 million motor vehicles, is the latest south american country to be added to our growing coverage of vehicle number plate lookup APIs. This API allows you to input a car number plate in Mexico, and get the vehicle information in response.
Car registration plates in Mexico use the /CheckMexico endpoint and return the following information:
- Make & Model
- Age
- Representative image
- Engine
- NCI
- VIN number
Sample Registration Number:
JGS9180
Sample Json:
{
“Description”: “NISSAN SENTRA”,
“RegistrationYear”: “2007”,
“CarMake”: {
“CurrentTextValue”: “NISSAN”
},
“CarModel”: {
“CurrentTextValue”: “SENTRA”
},
“MakeDescription”: {
“CurrentTextValue”: “NISSAN”
},
“ModelDescription”: {
“CurrentTextValue”: “SENTRA”
},
“Class”: “AUTOMOVIL”,
“Type”: “SEDAN”,
“VIN”: “3N1AB61D17L630743”,
“NCI”: “0A3J8GO2”,
“Doors”: “4”,
“Country”: “MEXICO”,
“Version”: “CUSTOM 20 TM”,
“EngineSize”: “2.0L”,
“Cylinders”: “L4”,
“Axles”: “”,
“AssemblyPlant”: “AGUASCALIENTES, MEXICO”,
“Institution”: “”,
“RegistrationDate”: “03/07/2007”,
“IssueDate”: “20/01/2012”,
“LastUpdate”: “12/01/2017”,
“CertifiateOfRegistration”: “”,
“Observations”: “”,
“ImageUrl”: “http://mx.placaapi.com/image.aspx/@TklTU0FOIFNFTlRSQQ==”
}
Get a free account at http://mx.placaapi.com
New #API to determine vehicle information from registration numbers in #Brazil

With a driving population of over 90 million, brazil is the largest country in south america, and via www.placaapi.com you can now determine make, model, VIN, location and other technical information from a vehicle registered in Brazil via its number plate.
Car registration plates in Brazil use the /CheckBrazil endpoint and return the following information:
- Make & Model
- Age
- Representative image
- Colour
- Fuel
- Location
- VIN number
Sample Registration Number:
KNX9595
Sample Json:
{
  "Description": "GM - CHEVROLET VECTRA GT 2.0 MPFI 8V FLEXPOWER MEC.",
  "RegistrationYear": "2011",
  "CarMake": {
    "CurrentTextValue": "CHEVROLET"
  },
  "CarModel": {
    "CurrentTextValue": "Vectra GT 2.0 MPFI 8V FlexPower Mec."
  },
  "MakeDescription": {
    "CurrentTextValue": "CHEVROLET"
  },
"ModelDescription": {
"CurrentTextValue": "Vectra GT 2.0 MPFI 8V FlexPower Mec."
},
"ImageUrl": "http://www.placaapi.com/image.aspx/@Q0hFVlJPTEVUIFZlY3RyYSBHVCAyLjAgTVBGSSA4ViBGbGV4UG93ZXIgTWVjLg==",
"Location": "SAO LUIS, MA",
"Vin": "9BGAJ48C0BB209328",
"Fuel": "ALCOOL / GASOLINA",
"Colour": "AZUL",
"Power": "140",
"EngineCC": "2000",
"Type": "PASSAGEIRO",
"Seats": "5",
"Axles": "{}",
"GrossWeight": "180",
"MaxTraction": "230"
}
Use #Namecheap #API to configure your #DNS

If you have domains registered with Namecheap, and you’d like a programmatic way to update DNS setttings – i.e. you want to change the IP address of a domain automatically in the event of a server outage, here’s how their API works.
First, you have to active the API via the control panel as follows;
- Login to your Namecheap account.
- Go to the Profile > Tools menu.
- Scroll down to the Business & Dev Tools section.
- Click MANAGE, next to Namecheap API Access.
- Toggle ON/OFF, read the Terms of Service
- Enter your account password.
Then add IP addresses that you are going to use to access the API. i.e. your local IP, and server IP.
When you call the command namecheap.domains.dns.setHosts on the namecheap API, it overwrites all existing DNS records, so you need to first read all the DNS records on a domain, then set them all back again, plus your change. So first step is to read all DNS records.
So, create a class to hold a DNS record
class HostRecord
{
public string Name { get; set; }
public string Type { get; set; }
public string Value { get; set; }public override string ToString()
{
return string.Format(“[{0}] {1} : {2}”, Name, Type, Value);
}
}
The ToString() is just for debug purposes
Another helper method we need is some code to get our current IP, which is required by the API
private static string GetIP()
{
var wc = new WebClient();
var strIP = wc.DownloadString(“http://icanhazip.com”).Trim();
return strIP;
}
To get DNS hosts for a Domain registered on Namecheap;
private static List<HostRecord> GetHostsFromDomain(string SLD, string TLD)
{
var strUrl = “https://api.namecheap.com/xml.response?”;
strUrl += “ApiUser=….”;
strUrl += “&ApiKey=…..”;
strUrl += “&UserName=…..”;
strUrl += “&Command=namecheap.domains.dns.getHosts”;
strUrl += “&ClientIp=” + GetIP();
strUrl += “&SLD=” + SLD;
strUrl += “&TLD=” + TLD;
var wc = new WebClient();
var strXml = wc.DownloadString(strUrl);
XmlDocument xdoc = new XmlDocument();
xdoc.LoadXml(strXml);
XmlNamespaceManager ns = new XmlNamespaceManager(xdoc.NameTable);
ns.AddNamespace(“xxx”, “http://api.namecheap.com/xml.response”);
var hosts = xdoc.SelectNodes(“//xxx:host”, ns);
var lHosts = new List<HostRecord>();
Console.WriteLine(“Previous DNS Records”);
foreach (XmlNode host in hosts)
{
var record = new HostRecord()
{
Name = host.Attributes[“Name”].Value,
Type = host.Attributes[“Type”].Value,
Value = host.Attributes[“Address”].Value
};
lHosts.Add(record);
Console.WriteLine(record);
}
return lHosts;
}
If your domain is “boo.com”, then SLD is “boo” and TLD is “com”.
Once you have the list of Hostrecords, you can add or modify this collection, and then update the hosts as follows;
public static string SetHostRecords(string SLD, string TLD, List<HostRecord> records)
{
var strUrl2 = “https://api.namecheap.com/xml.response”;
string strPostData = “ApiUser=….”;
strPostData += “&ApiKey=….”;
strPostData += “&UserName=….”;
strPostData += “&Command=namecheap.domains.dns.setHosts”;
strPostData += “&ClientIp=” + GetIP();
strPostData += “&SLD=” + SLD;
strPostData += “&TLD=” + TLD;
for (int i = 0; i< records.Count; i++)
{
strPostData += “&HostName” + (i+1) + “=” + records[i].Name;
strPostData += “&RecordType” + (i+1) + “=” + records[i].Type;
strPostData += “&Address” + (i+1) + “=” + records[i].Value;
strPostData += “&TTL” + (i+1) + “=60”;
}
var wc2 = new WebClient();
wc2.Headers[“Content-Type”] = “application/x-www-form-urlencoded”;
var strXml2 = wc2.UploadString(strUrl2,strPostData);
return strXml2;
}
If you want to create a console app for this, where you can pass in command line arguments, then here’s some sample code for this;
var strSLD = args[0];
var strTLD = args[1];
var strName = args[2];
var strAddress = args[3];
var hosts = GetHostsFromDomain(strSLD, strTLD);
if (hosts.Any(h => h.Name == strName))
{
Console.WriteLine(“Updating Record “+ strName);
hosts.First(h => h.Name == strName).Value = strAddress;
}
else
{
Console.WriteLine(“Adding Record ” + strName);
hosts.Add(new HostRecord() { Type = “A”, Name = strName, Value = strAddress });
}
var strResponse = SetHostRecords(strSLD, strTLD, hosts);
Console.WriteLine(strResponse);
This only updates A records, you could modify the code to also update MX records, if you need to change email providers.
Backing up a #SQL server Database to Amazon #S3 the easy way…

You may have all your code saved safely in Source control, but your data is not something that can easily be regenerated in the event of a hard drive failure, or simple fat fingered, update or delete statement without a where clause.
Backing up your databases to the same machine saves against typos, but it doesn’t save against a server outage, you really need to get your backups off the server. Amazon S3 is a good option, since it costs under 2p per GB (London datacenter)
| S3 Standard Storage | |
|---|---|
| First 50 TB / Month | $0.024 per GB |
Now, there are a million ways you could get your server backups to S3, you could use a batch file, a custom script, some c# … However, I tried our Tnt Drive, which maps a drive to your S3 bucket, and uploads your files asyncronously.
Then all you need to do, is to put your backup on the mapped drive (Z), with a script like
backup database db to disk = ‘Z:\db.bak’
Deciding which languages to localise an app or website to.

In the past, selling your services internationally was a logistically difficult task, however, with many IT products, you could just as easily find customers in Azerbaijan as you would in the USA. However, nobody in their right mind would consider localising to Azerbaijani before English. But, is Japanese more important than Spanish? for example.
So, lets get some caveats out of the way. This article assumes there is zero logistical, legal or technical boundaries between selling your app or website in any country worldwide. An app that gambles with real money will require country-specific licenses. It also assumes that your App is not culturally biased, few people in Japan will be interested in a weather app for Sweden.
So, do you focus on the richest countries, and target your app at Luxembourg, or the most populous countries, and go for Nigeria?, neither is a good choice, since one is too small, and the other is too poor. So, by going by total GDP you get US, China, Japan, Germany – the full list is here: https://en.wikipedia.org/wiki/List_of_countries_by_GDP_(nominal)
Now, this does not take into account the idea that an App in Spanish not only is applicable to Spanish users, but is also usable by Mexicans, Argentinians, Colombians etc. So, to combine GDP by Language, you get the following:
| Rank | Language | Percentage of world GDP |
|---|---|---|
| 1 | English | 29.3% |
| 2 | Chinese | 12.5% |
| 3 | Japanese | 7% |
| 4 | Spanish | 6.5% |
| 5 | German | 5.5% |
| 6 | French | 4.6% |
| 7 | Portuguese | 3.3% |
| 8 | Italian | 3.2% |
| 9 | Russian | 2.6% |
| 10 | Arabic | 2.5% |
| 11 | Hindi | 2.3% |
| 12 | Korean | 1.7% |
| 13 | Indonesian | 1.4% |
| 14 | Dutch | 1.3% |
| 15 | Bengali | 1% |
| 16 | Turkish | 0.9% |
| 17 | Thai | 0.9% |
| 18 | Polish | 0.9% |
| N/A | Other | 12.5% |
This list was compiled by Unicode.org.
So, in short, English is the obvious first language – and if you’re reading this, then your app is probably already in English. Chinese and Japanese come second, but Spanish comes before German – Even though Germany has higher GDP than Spain.
The next issue, is that you may need to take into account disposable income when planning your expansion. You have to discount the part of the population who are living in poverty, and thus will not buy anything outside their immediate needs. In china, the rate of poverty (i.e. <$5.50 a day), is 31.5%, (https://en.wikipedia.org/wiki/List_of_countries_by_percentage_of_population_living_in_poverty), so its relative importance is 8.5% , still above Spanish.
Of course, if you’re reading this, and you’re a translator – please feel free to register on OutsourceTranslation.com
Cloud Answering Machine App now available in Spanish, German, and French

Our Cloud Answering Machine App, version 1.5, available via the iOS App store is now available in Spanish, German and French. It will automatically detect your phone language, and will switch the user interface to your preferred language. Version 1.6, which is currently in review, will add support for Japanese, Korean and Portuguese
It also supports 32 new counties for provisioning phone numbers – which are :
| Georgia |
| Kenya |
| United Arab Emirates |
| Bolivia |
| Belarus |
| Colombia |
| Philippines |
| Thailand |
| Barbados |
| Benin |
| Grenada |
| Ghana |
| Guinea |
| Jamaica |
| Trinidad and Tobago |
| Tanzania |
| Uganda |
| Cayman Islands |
| Guatemala |
| Algeria |
| Namibia |
| Ecuador |
| Tunisia |
| Vietnam |
| Mali |
| Bosnia and Herzegovina |
| Mauritius |
| Botswana |
| Macau |
| Singapore |
| Serbia |
The App is also available for android, windows phone, and the web at https://www.cloudansweringmachine.com/
UK Car Valuation #API available for free

We’re now offering our UK car valuation API for free, all you need is a valid account on our website. You can access this API via the following endpoint
https://www.regcheck.org.uk/api/bespokeapi.asmx?op=CheckPrice
Where you pass the vehicle reg number, mileage and your username, and it will return data in the format (Prices are in GBP);
<Valuationxmlns:xsi=”http://www.w3.org/2001/XMLSchema-instance“xmlns:xsd=”http://www.w3.org/2001/XMLSchema“xmlns=”http://Regcheck.org.uk/“><Price>9240</Price></Valuation>
Self Updating ASP.NET website using #Octokit and #GitHub

Deploying a website with every check-in is quite a risky buisness, but it’s great for testing, so that your testers can be sure that they are looking at the very latest build of your website.
So, if you are using GitHub as your source control, then you can use Github’s Webhook system to trigger your website to download the latest version of itself from Github, effectively self-updating.
So, if you want to skip to the end, just check out our Github repo at https://github.com/infiniteloopltd/AutoBuild and the corresponding test website at http://autobuild.webtropy.com The website is set to automatically download content from Github on every push.
First, set up a webhook. Go to the repo, and click Settings > WebHooks > Add Webhook
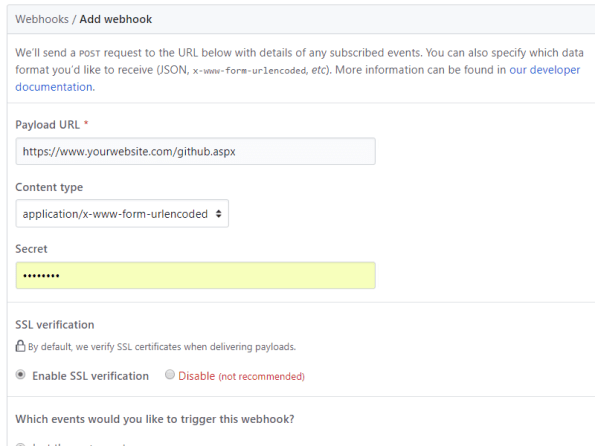
Set up the payload url to point to your website, plus “github.aspx”, and keep the other settings as default.
Next, Add the following three Nuget packages to your project;
Install-Package Octokit
Install-Package SharpZipLib
Install-Package Newtonsoft.Json
and then the corresponding using statements;
using Octokit; // Install-Package Octokit
using System;
using System.Configuration;
using System.IO;
using ICSharpCode.SharpZipLib.GZip; // Install-Package SharpZipLib
using ICSharpCode.SharpZipLib.Tar; // Install-Package SharpZipLib
using System.Threading;
using Newtonsoft.Json.Linq; // Install-Package Newtonsoft.Json
Now, I’ve kept my settings in my web.config, as follows;
<add key=”GITHUB_USERNAME” value=”infiniteloopltd”/>
<add key=”GITHUB_PASSWORD” value=”xxxxxx”/>
<add key=”GITHUB_REPO” value=”AutoBuild”/>
<add key=”DEPLOY_PATH” value=”C:\temp\”/>
And, I’ve set up some public variables as follows
protected GitHubClient client = new GitHubClient(new ProductHeaderValue(“Autobuild”));
string username = ConfigurationManager.AppSettings[“GITHUB_USERNAME”];
string password = ConfigurationManager.AppSettings[“GITHUB_PASSWORD”];
string repository = ConfigurationManager.AppSettings[“GITHUB_REPO”];
string output = ConfigurationManager.AppSettings[“DEPLOY_PATH”];
The ProductHeaderValue seems arbirary, but I’ve called it AutoBuild.
Now, the magic happens when I start using Octokit;
private bool DownloadArchive(string expectedCommit)
{
var tDownload = client.Repository.Content.GetArchive(username, repository);
var bArchive = tDownload.Result;
var stream = new MemoryStream(bArchive);
Stream gzipStream = new GZipInputStream(stream);
Stream gzipStream2 = new GZipInputStream(stream);
TarInputStream tarIn = new TarInputStream(gzipStream);
TarEntry tarEntry;
var strRoot = “”;
while ((tarEntry = tarIn.GetNextEntry()) != null)
{
string name = tarEntry.Name.Replace(‘/’, Path.DirectorySeparatorChar);
if (strRoot == “”)
{
strRoot = name;
if (!strRoot.Contains(expectedCommit)) return false;
}
if (tarEntry.IsDirectory)
continue;
if (Path.IsPathRooted(name))
name = name.Substring(Path.GetPathRoot(name).Length);
name = name.Replace(strRoot, “”);
string outName = Path.Combine(output, name);
string directoryName = Path.GetDirectoryName(outName);
Directory.CreateDirectory(directoryName);
FileStream outStr = new FileStream(outName, System.IO.FileMode.Create);
tarIn.CopyEntryContents(outStr);
outStr.Close();
}
tarIn.Close();
gzipStream.Close();
stream.Close();
return true;
}
What happens here, is that I request the latest archive of my repo from GitHub, which is in TAR.GZ format. What that actually means is that it is a TAR container of files, that has been compressed into a GZip stream.
I unzip the byte array, and pass it into a TarInputStream from SharpZipLib. GitHub wraps all your files into a folder that’s named
infiniteloopltd-AutoBuild-51d1c48\
i.e. {username}-{repo}-{commit}, this means that each file needs to be extracted one by one, since this wrapper folder needs to be removed.
However, the wrapper folder comes in very handy later on.
Now, that’s where everything is nice and sensible, then it gets ugly….
Unfortunately, if you call GetArchive too soon after the webhook is called, then you get the previous commit, and that’s useless, your files don’t update.
So, therefore, I need to read the parameters sent to the webhook to ensure that the commit I am expecting matches the one in the Archive, luckily, there is plenty of data sent to the webhook by github in Json format as follows;
{
  "ref": "refs\/heads\/master",
  "before": "b75dcf060de3710bfd7c054e4869397cc75380ba",
  "after": "90d9567997f96203853e071500136a16b1335c3a",
  "created": false,
  ....
The first 7 chars of this commit guid match the code shown on the website

… and also match the code contained in the wrapper folder, which allows you match the archive with the code. And if it doesn’t match, I just wait 5 seconds and try again.
So my Page_Load is defined as (With some logging)
protected void Page_Load(object sender, EventArgs e)
{
var strLog = “Started at ” + DateTime.Now;
client.Credentials = new Credentials(username, password);
var strJsonPayload = Request.Form[“Payload”];
string strExpectedCommit = “”;
if (!string.IsNullOrEmpty(strJsonPayload))
{
strLog += “\nGitHub payload ” + strJsonPayload;
var jPayload = JObject.Parse(strJsonPayload);
strExpectedCommit = jPayload[“after”].ToString().Substring(0, 7);
strLog += “\nExpected Commit ” + strExpectedCommit;
}
for(int i=0;i<10;i++)
{
var blnOK = DownloadArchive(strExpectedCommit);
if (blnOK) break;
Thread.Sleep(TimeSpan.FromSeconds(5));
strLog += “\nRetry ” + i;
}
File.WriteAllText(output + “buildlog.txt”, strLog);
}
Et Voila … every time you push a code change to GitHub. github calls this webhook, which downloads a zip of the code, and deploys it ontop of itself, creating a self-updating website! 🙂
#internationalising an #Angular web app

This perhaps is not the best way to internationalize (i.e. make available in multiple languages) an Angular web app, but it works well for me, both as a Web app, or as part of a Cordova / Phonegap app.
In App.js, I define the following “Constant”
angular.module(‘app’, [‘ionic’, …. ])
.constant(‘translations’, {
‘en’ :
{
‘Register’ : ‘Register’,
‘Login’ : ‘Login’,
},
‘es’ :
{
‘Register’ : ‘Registrar’,
‘Login’ : ‘Iniciar sesión’,
},
current : function()
{
lang = ‘en’;
if (navigator.languages != undefined) lang = navigator.languages[0]; else lang = navigator.language;
if (lang.indexOf(“es”) != -1 ) return this.es;
return this.en; // default en
}
})
Which effectively defines two languages “en” (English) and “es” (Spanish), and defines two variables, or strings within it “Login” and “Register”, you can see how the translation differs between English and Spanish. You can of course define more words, and more languages, this demo is just making a basic case.
Now, in order to use this in a controller, you pass it in as follows;
.controller(‘loginCtrl’, [‘translations’,‘$scope’, …..
function (translations, $scope, …) {
$scope.translations = translations.current();
Then you can refer to the translation in the template html as follows;
<a class=“button” ng-click=“login()”>{{ translations.Login }}</a>
Or in code as follows;
alert($scope.translations.Login);
This, once again is going to be used in version 1.5 of our iOS app for CloudAnsweringMachine.com
Send #Whatsapp message with WhatsApp #API
The WhatsApp Business API is open for applications, which you can sign up for via https://www.facebook.com/business/m/whatsapp/business-api – and it looks like they are working with Twilio to create a webhook layer on top of this.
But, there are some simple things you can do today, for example, if you want to encourage your users to send you a WhatsApp message from your app or website, then you can add a link to;
https://api.whatsapp.com/send?phone=<your number>&text=hello
It’s important to remember that whatsapp is not typically used from the desktop, so if you want this to work, and your user is on a desktop browser, then it is better to show a QR code for the URL above – that they can scan with their phone, rather than sending them directly to this url.
Once this API is in general release, it’ll be a new feature that we’ll add to https://www.cloudansweringmachine.com
