Adding properties at #runtime to an object in C#

C# is designed to be a statically typed language, i.e. when you define your type at compile time, you can’t change that type at runtime. Which is the opposite to how Javascript operates.
However, with the recent addition of dynamic types and the Expando Object, it is possible to add a property to an object as follows;
dynamic c = new ExpandoObject();
c.a = “1“;
c.b = “2“;
However, one of the not-so good things about the ExpandoObject, is that it doesn’t take a constructor argument, that would allow you to start off with an anonymous type, and then add some properties to it. This is where Clay comes in – which is a NUGET package you can install and reference as follows;
using ClaySharp; // Install-Package Clay
Then you can define much deeper types, and add properties to them.
dynamic New = new ClayFactory();
var person = New.Person(
FirstName: “George“,
LastName: “Washington“,
Country: new {
Name = “United States“,
Code = “US“
}
);person.Sex = “Male“;
Console.WriteLine(person.FirstName + “ “ + person.LastName + “ is “ + person.Sex);
That’s all great. However, you may notice, if you try to serialize the object to JSON using Newtsonsoft.JSON, or System.Web.Script.Serialization then you either get an error (Newtonsoft) or an empty string.
However, there is a similar project called Dynamitey which you can install using:
Install-Package Dynamitey
And you change the line
dynamic New = new ClayFactory();
to
dynamic New = Builder.New();
This nuget package doesn’t seem to be compatible with .NET Core vNext (i.e. Mac), but it does create objects that are serialisable to JSON, like the following:
string output = JsonConvert.SerializeObject(person, Formatting.Indented);
giving:
{
  "FirstName": "George",
  "LastName": "Washington",
  "Country": {
    "Name": "United States",
    "Code": "US"
  },
  "Sex": "Male"
}
Automatically sign in users to your website with Google #YOLO

How often have you been fed-up with having to create yet another account, with a username, and password – that you are going to forget. Your users feel the same way when they visit your website, and you prompt them to enter a new username and password.
Of course systems like Oauth have existed for ages, but you have to manage server side code to exchange auth tokens, and manage token refreshes, which is just a pain. Google have come out with a system called YOLO – which makes it super easy, using client-side code only, to grab the user’s public profile (i.e. name, email and profile pic) as long as they have signed in elsewhere on the same browser.
It makes it really seamless to capture a user’s profile, without any effort from the user.
Google have a great step-by-step guide, and I’d recommend reading their instructions, rather than me replicating them here. But effectively, you set up your Oauth credentials in the Google API console, to get your client ID, then you add a script reference to :
Then use code such as the following to grab the user’s profile:
window.onGoogleYoloLoad = (googleyolo) => {
console.log(“Yolo loaded!”);
const retrievePromise = googleyolo.retrieve({
supportedAuthMethods: [
“https://accounts.google.com”,
“googleyolo://id-and-password”
],
supportedIdTokenProviders: [
{
uri: “https://accounts.google.com”,
clientId: “xxxxxxx.apps.googleusercontent.com”
}
]
});
retrievePromise.then((credential) => {
console.log(“ok!”);
console.log(credential);
if (credential.password) {alert(credential.id);
} else {
// A Google Account is retrieved. Since Google supports ID token responses,
// you can use the token to sign in instead of initiating the Google sign-in
// flow.
//useGoogleIdTokenForAuth(credential.idToken);
}
}, (error) => {
console.log(“oops!”);
console.log(error);
// Credentials could not be retrieved. In general, if the user does not
// need to be signed in to use the page, you can just fail silently; or,
// you can also examine the error object to handle specific error cases.// If retrieval failed because there were no credentials available, and
// signing in might be useful or is required to proceed from this page,
// you can call `hint()` to prompt the user to select an account to sign
// in or sign up with.
if (error.type === ‘noCredentialsAvailable’) {
const hintPromise = googleyolo.hint({
supportedAuthMethods: [
“https://accounts.google.com”
],
supportedIdTokenProviders: [
{
uri: “https://accounts.google.com”,
clientId: “xxx-xxxx.apps.googleusercontent.com”
}
]
});
hintPromise.then((credential) => {
console.log(“hint worked”);
console.log(credential);
if (credential.idToken) {
// Send the token to your auth backend.
useGoogleIdTokenForAuth(credential.idToken);
}
}, (error) => {
console.log(“hint failed”);
console.log(error);
switch (error.type) {
case “userCanceled”:
// The user closed the hint selector. Depending on the desired UX,
// request manual sign up or do nothing.
break;
case “noCredentialsAvailable”:
// No hint available for the session. Depending on the desired UX,
// request manual sign up or do nothing.
break;
case “requestFailed”:
// The request failed, most likely because of a timeout.
// You can retry another time if necessary.
break;
case “operationCanceled”:
// The operation was programmatically canceled, do nothing.
break;
case “illegalConcurrentRequest”:
// Another operation is pending, this one was aborted.
break;
case “initializationError”:
// Failed to initialize. Refer to error.message for debugging.
break;
case “configurationError”:
// Configuration error. Refer to error.message for debugging.
break;
default:
// Unknown error, do nothing.
}
});
}
});
};
Simplifying #webpush – a #HTTP to #VAPID service.

If you don’t want, or can’t install the server side components to handle web push notifications, you can use this service http://webpush.apixml.net/ to handle the push notification. As long as you can do a HTTP request, you can call this.
Send VAPID authenticated Web Push notifications with a single HTTP request
API Endpoint
http://webpush.apixml.net/server.js
Call with the following querytring variables:
- endpoint
- p256dh
- auth
- publicKey
- privateKey
- payload
– The endpoint returned by pushManager.subscribe
– The P256DH Key returned by pushManager.subscribe
– The Auth key returned by pushManager.subscribe
– The Public Key from VAPID
– The Private Key from VAPID
– The Json Payload
Here’s the source of the project if you want to host this yourself;
https://github.com/infiniteloopltd/webpushservice
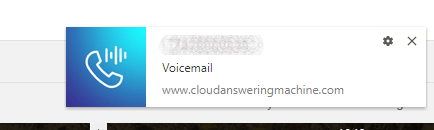
And here’s a demo in action from www.cloudansweringmachine.com
#WebPush Notifications using #NodeJS or C#

Web push notifications allow websites to communicate with their users after the user has left the website. Think of it like collecting an email address from a user. You ask the user to provide their email address, then at some point in the future, you can send a message to your user from your server – even if that user is no longer on your website.
It has three main parts,
- A website, which subscribes a user to notifications.
- A server-side script that sends notifcations
- A service worker js file, which displays notifications when they arrive.
To get started, you need to create a pair of VAPID encryption keys;
npm install web-push -gweb-push generate-vapid-keys
You should then get a response like the following
=======================================
Public Key:
BLCxKncb0uomifRWXeGvUtVy6vVSMbb2KBBKdSZPlHGC-ow0_wHW9ciUxNbjIeVa5zA8SGI-PKsoGCfk12pwFVwPrivate Key:
IoNkDX1EtBWvxu1GPQ65hFDV8c2OcxWfpfpl9JMYZ3Y=======================================
Now, lets get started on the client-side, your website.
function askPermission() {
return new Promise(function(resolve, reject) {
const permissionResult = Notification.requestPermission(function(result) {
resolve(result);
});if (permissionResult) {
permissionResult.then(resolve, reject);
}
})
.then(function(permissionResult) {
if (permissionResult !== ‘granted’) {
throw new Error(‘We weren\’t granted permission.’);
}
});
}function urlBase64ToUint8Array(base64String) {
const padding = ‘=’.repeat((4 – base64String.length % 4) % 4);
const base64 = (base64String + padding)
.replace(/\-/g, ‘+’)
.replace(/_/g, ‘/’);const rawData = window.atob(base64);
const outputArray = new Uint8Array(rawData.length);for (let i = 0; i < rawData.length; ++i) {
outputArray[i] = rawData.charCodeAt(i);
}
return outputArray;
}function subscribeUserToPush() {
return navigator.serviceWorker.register('service-worker-2.js')
.then(function(registration) {
const subscribeOptions = {
userVisibleOnly: true,
applicationServerKey: urlBase64ToUint8Array(
'BO7CyOKScyHNQRU6NY_1C2cVGNRBMHDV9_7mYfmg3lxo3c53Vw7XNSlKkZCqERQsdt9PGY-NylfiWQPbswZd644'
)
};return registration.pushManager.subscribe(subscribeOptions);
})
.then(function(pushSubscription) {
console.log('Received PushSubscription: ', JSON.stringify(pushSubscription));
return pushSubscription;
});
}askPermission().then(subscribeUserToPush);
What this does is that it asks the user for permission to send them push notifications, and then subscribes the user to the push notifications using the VAPID public key above.
Note also, that it registers the service worker “service-worker-2.js”, which will be used later to display the notifications once recieved.
The service worker file “service-worker-2.js” should have the following content:
// https://developers.google.com/web/fundamentals/codelabs/push-notifications/
self.addEventListener(‘push’, function(event) {
console.log(‘[Service Worker] Push Received.’);
console.log(`[Service Worker] Push had this data: “${event.data.text()}”`);const title = event.data.json().title;
const options = {
body: event.data.json().message,
icon: ‘images/icon.png’,
badge: ‘images/badge.png’
};event.waitUntil(self.registration.showNotification(title, options));
});
If you now open this page, accept notifications, and then view the console window, you’ll see an endpoint url, Auth key, and p256dh key, you’ll need all these in the next step.
Now, let’s take a look on the server side. Create a new folder for your node project, and run npm init to create your package.json.
Run npm install web-push to pull down a library which will help you in this next step.
const webpush = require(‘web-push’);
const vapidKeys = {
publicKey:
‘BO7CyOKScyHNQRU6NY_1C2cVGNRBMHDV9_7mYfmg3lxo3c53Vw7XNSlKkZCqERQsdt9PGY-NylfiWQPbswZd644’,
privateKey: ‘OnWh44RFgdpwcUPpxgFHwJVMDHdhcPKEajFIR7Epdp4’
};
webpush.setVapidDetails(
‘mailto:fiach.reid@gmail.com’,
vapidKeys.publicKey,
vapidKeys.privateKey
);const pushSubscription = {
“endpoint”:”https://fcm.googleapis.com/fcm/send/dKTKjDlNWmU:APA91bGYEzNVHhLGKuyCPZdrEqqYZFq__FnPAFSA2ZhBEDeg8_bjbgNJMKpm6xPMl2xEXCN1wM61Tl4_pz43OjrUyPW2T0dsmmRxWk6wuWa4Ai7YcE-UAv4qvNCl_FAYn9mzmSgCiBKU”,
“expirationTime”:null,
“keys”:{
“p256dh”:”BMIYEcFX0DaOpruw1D5KMUIhgwAl2HqK8qEb1JOtONmEktNR6OVd-CTtDFwNX8KJedixAX6Jo9D04D0Kg6mcoRQ=”,
“auth”:”QL2TNBsW4KdUR83s6-L13A==”
}
};webpush.sendNotification(pushSubscription, ‘Send!’);
You can see both the public and private keys from VAPID are included, also the push subscription includes the endpoint, p256dh and auth keys.
Finally, you call webpush.sendNotification(pushSubscription, ‘Send!’); where “Send!” is your payload.
- You can get the full version of this code on GitHub at https://github.com/infiniteloopltd/webPushNotifications
If you prefer to use C# on your back-end, you need to install via NuGet “WebPush” and “Newtonsoft.Json” and use the following code
var pushEndpoint = @"https://fcm.googleapis.com/fcm/send/fJLc6xP6HIE:APA91bFnK_dv8fdBYSaGx5HnJ7PHc696DcBAfD-5XJ7Vke4INBVWGaGiexaeVBseWiq1opmRrLZ9Z_XxvfZUe3PyryARxUfNAlTtXeOxssszZBTlQdQ2qkvEIsmObsJigrJylTZO0_p2";
var p256dh = @"BGbqvhUQPyC-QSrm_pQ45Als58dKuehPn-mz1PGXzSvghowZJmEroBMIMAVzuc6QB2zxo032H2NSWgzboMhHFK8=";
var auth = @"SvXCMDcjgzkGWjFNNVtMOw==";

var subject = @"mailto:fiach.reid@gmail.com";
var publicKey = @"BIzwHJzJXHkqjncpDVSZGbwbbIvoHT6LH4Z6oIpFwiZyArDPeHMuuQzWo_ncBWzidBhAvI_mh7QWrSndRnaneCE";
var privateKey = @"L4NtEgeRS0gVnvK-qJ6ovvz5LE2onltGdJy1dLhXD7I";

var subscription = new PushSubscription(pushEndpoint, p256dh, auth);
var vapidDetails = new VapidDetails(subject, publicKey, privateKey);


var webPushClient = new WebPushClient();
try
{
	var payLoad = new
	{
		message = "Yo mamma!",
		title = "My Website"
	};
	string strPayload = JsonConvert.SerializeObject(payLoad);

	webPushClient.SendNotification(subscription, strPayload, vapidDetails);

}
catch (WebPushException exception)
{
	Console.WriteLine("Http STATUS code" + exception.StatusCode);
}
BurnerSMS.com – view #SMS messages received online with #NodeJS
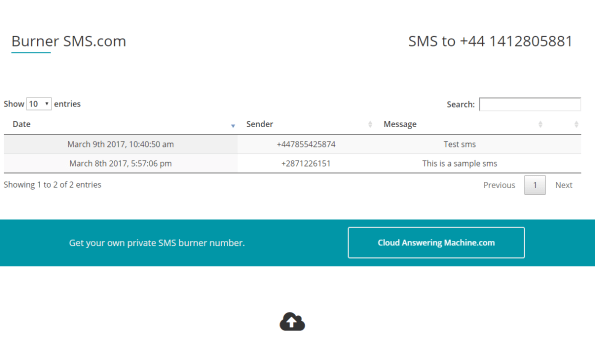
BurnerSMS.com is a website, where you can send a text message to a phone number, and the text and sender will appear on the webpage – after you refresh. It could be used for those services that want to use your mobile phone to send authorisation codes to, but you don’t want to share your real phone number.
That’s the idea anyway – but it really was a way so I could learn a bit about NodeJS, on a practical project.
So, here’s the architecture. The mobile messages actually come in via CloudAnsweringMachine.com – which offer an API that allow you view calls and texts sent to a given number. The API returns in XML, but I’ve used xml2js to convert the XML to a JSON.
The project is hosted on a Windows server, where I installed the latest version of NodeJs, NPM and IISNode. I had to do an IISReset after the installation for it to work.
I used NPM init to create my package.json file, which keeps track of the NPM packages I installed during the development. I used the following packages;
- request – Making life sooo much easier for HTTP requests
- xml2js – Converting the XML returned from the API to JSON
- underscore – A collection of handy Javascript functions just as _.filter
- ejs – A HTML templating engine, so I can separate my NodeJS and HTML presentation
- moment – handles date formatting, so I can display dates in a pretty format
The whole back end is as follows;
var http = require(‘http’);
const request = require(‘request’);
var parseString = require(‘xml2js’).parseString;
const _ = require(‘underscore’);
const ejs = require(‘ejs’);
var moment = require(‘moment’);http.createServer(function (req, res) {
res.writeHead(200, {‘Content-Type’: ‘text/html’});
request(‘https://www.cloudansweringmachine.com/api.asmx/GetMessages?email=xxxx@xxx.com&password=xxxx’, (err, response, body) => {
if (err) { res.end(err); return; };
parseString(body, function (err, result) {
// result.ArrayOfMessages.Messages
var TextMessages = _.filter(result.ArrayOfMessages.Messages, function(msg){
return msg.MessageUrl[0] == “”;
});
result.ArrayOfMessages.Messages.forEach(function(element){
element.prettyDate = moment(element.DateArrived[0],”YYYY-MM-DDTHH:mm:ss”).format(“MMMM Do YYYY, h:mm:ss a”);
});
ejs.renderFile(“burner.ejs”, { messages: TextMessages }, {}, function(err, str){
res.write(str);
res.end();
});
});
});
}).listen(process.env.PORT);
This file – which I called Burner.js; and I’ve ommitted the username/password for the API call, you can get one yourself!
It starts a server which listens on port 80, and immediately calls the API. If successful, it converts the XML to JSON. It then uses the underscore filter function to remove elements from the response that refer to phonecalls rather than text messages. Following that, it uses moment to parse the DateArrived property, which is in an ugly Year-Month-Day format to a more readable Month Day Year format.
Once all that is done, it uses EJS to load the file “Burner.ejs” from the same folder, and passes through the filtered object to the page. The resultant HTML is then output using res.write
You need to call res.end() once the operation is complete, since this will close the connection between server and client, otherwise the client may hang.
Burner.ejs, is effectively a HTML file, and I won’t include the entire HTML here, just the dynamic part:
<% messages.forEach(function(message){ %>
<tr>
<td>
<%= message.prettyDate %>
</td>
<td>
<%= message.Sender[0] %>
</td>
<td>
<%= message.MessageText[0] %>
</td>
<td></td>
</tr>
<% }); %>
It looks almost like Classic ASP … but you can see how it iterates through each message in the messages array, and puts the output between the td’s
Now, that’s almost a wrapped up, just to say that you also need a web.config document in that folder to tell IIS that burner.js is to be handled by the server, not a javascript file to be sent verbatim to the client. – and that burner.js is the default document.
<configuration>
<system.webServer>
<handlers>
<add name=”iisnode” path=”burner.js” verb=”*” modules=”iisnode” />
</handlers>
<defaultDocument>
<files>
<add value=”burner.js” />
</files>
</defaultDocument>
</system.webServer>
</configuration>
Accessing the Google #Analytics API via C#
![]()
Say you want to import Google Analytics Data into a database, for display on your own admin system, or as an alert if you stop getting traffic. – here’s some code to do so in C#,
Grab a few packages from Nuget to get started:
Google.Apis and Google.Apis.Analytics.v3
First, off you need to authenticate against Google, you can do this in a number of ways but I found OAuth easiest.
string[] scopes = new string[] {
AnalyticsService.Scope.Analytics, // view and manage your Google Analytics data
AnalyticsService.Scope.AnalyticsEdit, // Edit and manage Google Analytics Account
AnalyticsService.Scope.AnalyticsManageUsers, // Edit and manage Google Analytics Users
AnalyticsService.Scope.AnalyticsReadonly}; // View Google Analytics Datavar clientId = “xxxxxx.apps.googleusercontent.com”; // From https://console.developers.google.com
var clientSecret = “xxxxxx”; // From https://console.developers.google.com// Could use Service account, if we don’t want the web-popup.
// here is where we Request the user to give us access, or use the Refresh Token that was previously stored in %AppData%
var credential = GoogleWebAuthorizationBroker.AuthorizeAsync(new ClientSecrets
{
ClientId = clientId,
ClientSecret = clientSecret
},
scopes,
Environment.UserName,
CancellationToken.None,
new FileDataStore(“Daimto.GoogleAnalytics.Auth.Store”)).Result;var service = new AnalyticsService(new BaseClientService.Initializer()
{
HttpClientInitializer = credential,
ApplicationName = “Analytics API Sample”,
});
I’ve left out the client ID and Client Secret, you get these from your google developer console.
The Hierarchy of objects within Google Analytics is
Account > Property > View
So, you’ll need to enumerate each Account, Property and View to drill down to individual site statistics
ManagementResource.AccountSummariesResource.ListRequest list = service.Management.AccountSummaries.List();
AccountSummaries feed = list.Execute();foreach(AccountSummary acct in feed.Items)
{
ManagementResource.WebpropertiesResource.ListRequest propList = service.Management.Webproperties.List(acct.Id);
Webproperties webProperties = propList.Execute();
var allProps = webProperties.Items.ToList();……
}
This code enumerates each account, and each property within the account. Note that each call is limited to 1,000 records or so. I’m ignoring the case that you may have more than that.
Then to enumerate the views for each property – typically there may only be one, use this loop:
foreach (var lWeb in allProps)
{
ManagementResource.ProfilesResource.ListRequest viewList = service.Management.Profiles.List(acct.Id, lWeb.Id);
Profiles viewProperties = viewList.Execute();
var allViews = viewProperties.Items.ToList();
foreach (var lView in allViews)
{
…. store lWeb.Name & lView.Id
}
}
Now, for instance, if you wanted to get the number of unique sessions in the last month, given the View ID, then you use this
var strFrom = DateTime.Now.AddMonths(-1).ToString(“yyyy-MM-dd”);
var strTo = DateTime.Now.ToString(“yyyy-MM-dd”);
DataResource.GaResource.GetRequest request = service.Data.Ga.Get(“ga:” + strView, strFrom, strTo, “ga:sessions”);
GaData result = request.Execute();
If result.Rows is null, then you’ve had no visitors in the month, otherwise result.Rows[0][0] indicates the number of visitors.
List of available APIs by Google (Discovery API)
var service = new DiscoveryService(new BaseClientService.Initializer
{
ApplicationName = “Discovery Sample”,
ApiKey = “xxxxxxxxxxxxxxxxxx”,
});// Run the request.
Console.WriteLine(“Executing a list request…”);
var result = await service.Apis.List().ExecuteAsync();// Display the results.
if (result.Items != null)
{
foreach (DirectoryList.ItemsData api in result.Items)
{
Console.WriteLine(api.Id + ” – ” + api.Title);
}
}
Discovery API Sample
====================
Executing a list request…
abusiveexperiencereport:v1 – Google Abusive Experience Report API
acceleratedmobilepageurl:v1 – Accelerated Mobile Pages (AMP) URL API
adexchangebuyer:v1.2 – Ad Exchange Buyer API
adexchangebuyer:v1.3 – Ad Exchange Buyer API
adexchangebuyer:v1.4 – Ad Exchange Buyer API
adexchangebuyer2:v2beta1 – Ad Exchange Buyer API II
adexchangeseller:v1 – Ad Exchange Seller API
adexchangeseller:v1.1 – Ad Exchange Seller API
adexchangeseller:v2.0 – Ad Exchange Seller API
adexperiencereport:v1 – Google Ad Experience Report API
admin:datatransfer_v1 – Admin Data Transfer API
admin:directory_v1 – Admin Directory API
admin:reports_v1 – Admin Reports API
adsense:v1.4 – AdSense Management API
adsensehost:v4.1 – AdSense Host API
analytics:v2.4 – Google Analytics API
analytics:v3 – Google Analytics API
analyticsreporting:v4 – Google Analytics Reporting API
androiddeviceprovisioning:v1 – Android Device Provisioning Partner API
androidenterprise:v1 – Google Play EMM API
androidmanagement:v1 – Android Management API
androidpublisher:v1 – Google Play Developer API
androidpublisher:v1.1 – Google Play Developer API
androidpublisher:v2 – Google Play Developer API
appengine:v1alpha – Google App Engine Admin API
appengine:v1beta – Google App Engine Admin API
appengine:v1 – Google App Engine Admin API
appengine:v1beta4 – Google App Engine Admin API
appengine:v1beta5 – Google App Engine Admin API
appsactivity:v1 – G Suite Activity API
appstate:v1 – Google App State API
bigquery:v2 – BigQuery API
bigquerydatatransfer:v1 – BigQuery Data Transfer API
blogger:v2 – Blogger API
blogger:v3 – Blogger API
books:v1 – Books API
calendar:v3 – Calendar API
civicinfo:v2 – Google Civic Information API
classroom:v1 – Google Classroom API
cloudbilling:v1 – Google Cloud Billing API
cloudbuild:v1 – Cloud Container Builder API
clouddebugger:v2 – Stackdriver Debugger API
clouderrorreporting:v1beta1 – Stackdriver Error Reporting API
cloudfunctions:v2alpha1 – Google Cloud Functions API
cloudfunctions:v1 – Google Cloud Functions API
cloudfunctions:v1beta2 – Google Cloud Functions API
cloudiot:v1 – Google Cloud IoT API
cloudiot:v1beta1 – Google Cloud IoT API
cloudkms:v1 – Google Cloud Key Management Service (KMS) API
cloudresourcemanager:v1 – Google Cloud Resource Manager API
cloudresourcemanager:v1beta1 – Google Cloud Resource Manager API
cloudresourcemanager:v2beta1 – Google Cloud Resource Manager API
cloudshell:v1alpha1 – Cloud Shell API
cloudshell:v1 – Cloud Shell API
cloudtasks:v2beta2 – Cloud Tasks API
cloudtrace:v1 – Stackdriver Trace API
cloudtrace:v2 – Stackdriver Trace API
clouduseraccounts:alpha – Cloud User Accounts API
clouduseraccounts:beta – Cloud User Accounts API
clouduseraccounts:vm_alpha – Cloud User Accounts API
clouduseraccounts:vm_beta – Cloud User Accounts API
compute:alpha – Compute Engine API
compute:beta – Compute Engine API
compute:v1 – Compute Engine API
container:v1 – Google Kubernetes Engine API
container:v1beta1 – Google Kubernetes Engine API
content:v2sandbox – Content API for Shopping
content:v2 – Content API for Shopping
customsearch:v1 – CustomSearch API
dataflow:v1b3 – Google Dataflow API
dataproc:v1 – Google Cloud Dataproc API
dataproc:v1beta2 – Google Cloud Dataproc API
datastore:v1 – Google Cloud Datastore API
datastore:v1beta1 – Google Cloud Datastore API
datastore:v1beta3 – Google Cloud Datastore API
deploymentmanager:alpha – Google Cloud Deployment Manager Alpha API
deploymentmanager:v2beta – Google Cloud Deployment Manager API V2Beta Methods
deploymentmanager:v2 – Google Cloud Deployment Manager API
dfareporting:v2.8 – DCM/DFA Reporting And Trafficking API
dfareporting:v3.0 – DCM/DFA Reporting And Trafficking API
dialogflow:v2beta1 – Dialogflow API
digitalassetlinks:v1 – Digital Asset Links API
discovery:v1 – APIs Discovery Service
dlp:v2beta1 – DLP API
dlp:v2beta2 – DLP API
dns:v1 – Google Cloud DNS API
dns:v1beta2 – Google Cloud DNS API
dns:v2beta1 – Google Cloud DNS API
doubleclickbidmanager:v1 – DoubleClick Bid Manager API
doubleclicksearch:v2 – DoubleClick Search API
drive:v2 – Drive API
drive:v3 – Drive API
firebasedynamiclinks:v1 – Firebase Dynamic Links API
firebaseremoteconfig:v1 – Firebase Remote Config API
firebaserules:v1 – Firebase Rules API
firestore:v1beta1 – Google Cloud Firestore API
fitness:v1 – Fitness
fusiontables:v1 – Fusion Tables API
fusiontables:v2 – Fusion Tables API
games:v1 – Google Play Game Services API
gamesConfiguration:v1configuration – Google Play Game Services Publishing API
gamesManagement:v1management – Google Play Game Services Management API
genomics:v1alpha2 – Genomics API
genomics:v2alpha1 – Genomics API
genomics:v1 – Genomics API
gmail:v1 – Gmail API
groupsmigration:v1 – Groups Migration API
groupssettings:v1 – Groups Settings API
iam:v1 – Google Identity and Access Management (IAM) API
identitytoolkit:v3 – Google Identity Toolkit API
kgsearch:v1 – Knowledge Graph Search API
language:v1 – Google Cloud Natural Language API
language:v1beta1 – Google Cloud Natural Language API
language:v1beta2 – Google Cloud Natural Language API
licensing:v1 – Enterprise License Manager API
logging:v2 – Stackdriver Logging API
logging:v2beta1 – Stackdriver Logging API
manufacturers:v1 – Manufacturer Center API
mirror:v1 – Google Mirror API
ml:v1 – Google Cloud Machine Learning Engine
monitoring:v3 – Stackdriver Monitoring API
oauth2:v1 – Google OAuth2 API
oauth2:v2 – Google OAuth2 API
oslogin:v1alpha – Google Cloud OS Login API
oslogin:v1beta – Google Cloud OS Login API
oslogin:v1 – Google Cloud OS Login API
pagespeedonline:v1 – PageSpeed Insights API
pagespeedonline:v2 – PageSpeed Insights API
partners:v2 – Google Partners API
people:v1 – Google People API
playcustomapp:v1 – Google Play Custom App Publishing API
plus:v1 – Google+ API
plusDomains:v1 – Google+ Domains API
poly:v1 – Poly API
prediction:v1.2 – Prediction API
prediction:v1.3 – Prediction API
prediction:v1.4 – Prediction API
prediction:v1.5 – Prediction API
prediction:v1.6 – Prediction API
proximitybeacon:v1beta1 – Google Proximity Beacon API
pubsub:v1beta1a – Google Cloud Pub/Sub API
pubsub:v1 – Google Cloud Pub/Sub API
pubsub:v1beta2 – Google Cloud Pub/Sub API
replicapool:v1beta1 – Replica Pool API
replicapool:v1beta2 – Google Compute Engine Instance Group Manager API
replicapoolupdater:v1beta1 – Google Compute Engine Instance Group Updater API
reseller:v1 – Enterprise Apps Reseller API
resourceviews:v1beta1 – Resource Views API
resourceviews:v1beta2 – Google Compute Engine Instance Groups API
runtimeconfig:v1 – Google Cloud Runtime Configuration API
runtimeconfig:v1beta1 – Google Cloud Runtime Configuration API
safebrowsing:v4 – Google Safe Browsing API
script:v1 – Google Apps Script API
searchconsole:v1 – Google Search Console URL Testing Tools API
serviceconsumermanagement:v1 – Service Consumer Management API
servicecontrol:v1 – Google Service Control API
servicemanagement:v1 – Google Service Management API
serviceusage:v1 – Service Usage API
serviceuser:v1 – Google Service User API
sheets:v4 – Google Sheets API
siteVerification:v1 – Google Site Verification API
slides:v1 – Google Slides API
sourcerepo:v1 – Cloud Source Repositories API
spanner:v1 – Cloud Spanner API
spectrum:v1explorer – Google Spectrum Database API
speech:v1 – Google Cloud Speech API
speech:v1beta1 – Google Cloud Speech API
sqladmin:v1beta3 – Cloud SQL Administration API
sqladmin:v1beta4 – Cloud SQL Administration API
storage:v1 – Cloud Storage JSON API
storage:v1beta1 – Cloud Storage JSON API
storage:v1beta2 – Cloud Storage JSON API
storagetransfer:v1 – Google Storage Transfer API
streetviewpublish:v1 – Street View Publish API
surveys:v2 – Surveys API
tagmanager:v1 – Tag Manager API
tagmanager:v2 – Tag Manager API
taskqueue:v1beta1 – TaskQueue API
taskqueue:v1beta2 – TaskQueue API
tasks:v1 – Tasks API
testing:v1 – Google Cloud Testing API
toolresults:v1beta3 – Cloud Tool Results API
tpu:v1alpha1 – Cloud TPU API
translate:v2 – Google Cloud Translation API
urlshortener:v1 – URL Shortener API
vault:v1 – Google Vault API
videointelligence:v1beta1 – Cloud Video Intelligence API
vision:v1p1beta1 – Google Cloud Vision API
vision:v1p2beta1 – Google Cloud Vision API
vision:v1 – Google Cloud Vision API
webfonts:v1 – Google Fonts Developer API
webmasters:v3 – Search Console API
youtube:v3 – YouTube Data API
youtubeAnalytics:v1 – YouTube Analytics API
youtubeAnalytics:v1beta1 – YouTube Analytics API
youtubereporting:v1 – YouTube Reporting API
Press any key to continue…
Store Zipped data in #SqlLite BLOB with C#

SqlLite is great if you want to include pre-prepared data with your app or website, but if you find your .sqlite file becoming massive, you might look at how you are storing your data.
This approach is only relevant, if you have one or more fields that contain large blocks of text. It also comes in handy if you are storing base64 encoded binary data or text with UTF8 / UTF16 chars
First, use the BLOB data type, rather than TEXT for storing your big-data field.
Next, you’ll need these two C# functions to Compress and Decompress byte arrays in-memory:
static byte[] Compress(byte[] data)
{
using (var compressedStream = new MemoryStream())
using (var zipStream = new GZipStream(compressedStream, CompressionMode.Compress))
{
zipStream.Write(data, 0, data.Length);
zipStream.Close();
return compressedStream.ToArray();
}
}static byte[] Decompress(byte[] data)
{
using (var compressedStream = new MemoryStream(data))
using (var zipStream = new GZipStream(compressedStream, CompressionMode.Decompress))
using (var resultStream = new MemoryStream())
{
zipStream.CopyTo(resultStream);
return resultStream.ToArray();
}
}
Then, when inserting into the Sqlite file, then use the functions;
To Insert a row;
var bXml = System.Text.Encoding.UTF8.GetBytes(strXML);
var bCompress = Compress(bXml);
var command = new SQLiteCommand(connection)
{
CommandText = “insert into Table (ID,xml) values (” + ID + “,@xml)”
};
var parameter = new SQLiteParameter(“@xml”, System.Data.DbType.Binary) {Value = bCompress};
command.Parameters.Add(parameter);
command.ExecuteNonQuery();
Then to read the value back out again;
var connection = new SQLiteConnection(“Data Source=” + strDbFile);
connection.Open();
var strSql = “select xml from Table limit 1;”;
var command = new SQLiteCommand(strSql, connection);
var obj = command.ExecuteScalar();
var bArray = (byte[])obj;
var bXml = Decompress(bArray);
var strXML = System.Text.Encoding.UTF8.GetString(bXml);
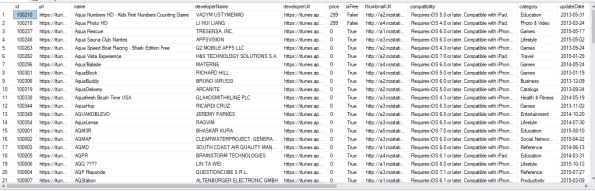
Database of 1.2 Million #iOS apps available for download.
Check out this download: https://payhip.com/b/7NIg
A database of over 1.2 million iOS apps listed on the Apple App store, including the following details;
- url
- name
- developer Name
- developer Url
- price
- is Free
- thumbnail Url
- compatibility
- category
- update Date
- version
- size
- minimum Age
- developer Website
- support Website
- license Agreement
- description
Install #IPA – An over-the-air IOS app installation service

InstallIPA.com – is a website that helps you install .IPA files on your iOS device by automatically creating the OTA Manifest file, and creating a email-installable link, or QR code.
It’s designed so that you can provide an easy-to-install link to demo your app to your client, without asking them to plug their iPhone into iTunes.
Or, from the tester’s perpective – If you’ve been sent an .ipa file from your developer, and want an easy way to install it on your phone, then you can use this site to easily install this app on your phone.
