#ChatGPT #API is not blocked in Italy, loophole by design?
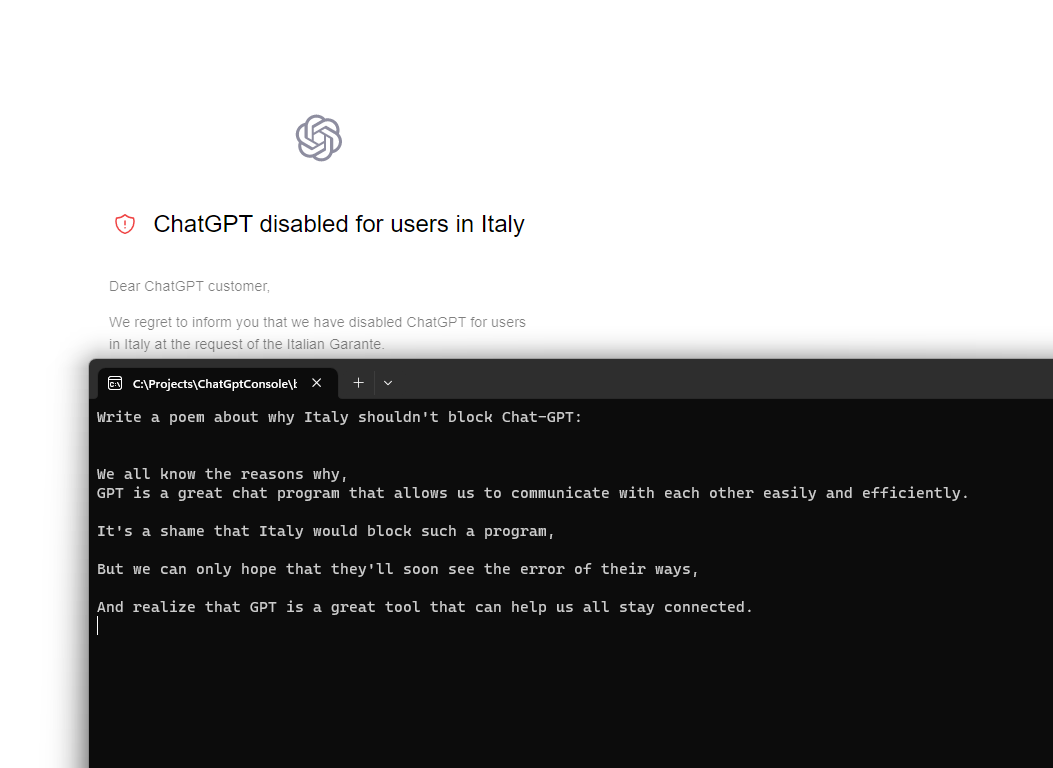
It was big news that Italy would be the first country in the EU to block Chat-GPT, and you can see what happens if you use a VPN and set it to an Italian IP, then try to access the service, it gives a warning “ChatGPT disabled for users in Italy”.
But, I was thinking, is the API also blocked, and the answer is no, it’s not. Which means that tools built on ChatGPT can still continue to operate. Quite a glaring loop-hole (One I’m happy about, but shows that somebody accidentally, or purposefully slipped up).
Above is a screenshot showing a response from the ChatGPT API, and the same “blocked screen”, while on an Italian VPN.
Below is the code I used, using the GPT3 Nuget package from Betalgo.
 // Install-Package Betalgo.OpenAI.GPT3
var gpt3 = new OpenAIService(new OpenAiOptions
{
	ApiKey = strSecretKey
});
var question = Console.ReadLine();
var completionResult = await gpt3.Completions.CreateCompletion(new CompletionCreateRequest()
{
	Prompt = question,
	Model = Models.TextDavinciV2,
	Temperature = 0.5F,
	MaxTokens = 100
});
if (completionResult.Successful)
{
	foreach (var choice in completionResult.Choices)
	{
		Console.WriteLine(choice.Text);
	}
}
else
{
	if (completionResult.Error == null)
	{
		throw new Exception("Unknown Error");
	}
	Console.WriteLine($"{completionResult.Error.Code}: {completionResult.Error.Message}");
}
Send #SMS to the #USA or #Canada for 1 Cent via an #API

There are a million different APIs that allow you to send SMS messages, but here is a really simple one, that although is limited to the US or Canada, is really cost effective, at 1 US cent per SMS, with no monthly or setup charges.
There is also a free plan that starts at 5 SMS per day, at no cost.
It’s really easy to use, you subscribe to the API here: https://rapidapi.com/dananos/api/1-cent-sms/pricing
to get your API Key, which you include as a HTTP header called “X-RapidAPI-Key”, then you post a body such as the following
{
    "text" : "Your Authentication code is 74456",
    "phone" : "+17047037094"
}
To the URL – https://1-cent-sms.p.rapidapi.com/default/SMSLambda
(Yes, it’s a AWS lambda function on the back-end)
Performance testing AvatarAPI.com – Speed and Coverage.
AvatarAPI.com is a service that can obtain a name and profile picture from an email address, it offers an API, such that you can include this functionality into your own systems, be it your CRM system, or marketing platform.
One of the key features of the API, is that you can select which providers to use, when searching for sources. Some sources are more expensive than others, in terms of credits, and the more sources you add, the slower the search will be. Therefore, if you are looking for a very responsive API, you will have to make a trade-off between coverage and speed. Associating a profile picture with an email may be a nice-to-have, but shouldn’t interupt the flow of work, either for your users or staff.
| Provider | Avg Time (ms) | In Default Set | % found |
| 2404.0475 | 2404.0475 | 80 | |
| Skype | 1351.5663 | 1351.5663 | 14 |
| Flickr: | 2823.8726 | 2823.8726 | 1 |
| Adobe: | 730.7049 | 730.7049 | 1 |
| LinkedIn: | 1271.6846 | 1 | |
| Gravatar: | 1246.6041 | 1246.6041 | 2 |
| Microsoft: | 1665.0182 | 1665.0182 | 1 |
| Academic: | 2577.0996 | 0 | |
| GitHub: | 472.6273 | 0 | |
| Paypal: | 1636.4517 | 0 | |
| Total: | 16179.6768 | 10221.8136 |
Illustrated above is the list of providers available to AvatarAPI, and the average time in millisecods (1000 ms = 1 second), per request. If all providers are used, and nothing was found by any of them, the complete search would take of 16 seconds, which is probably unaccepable in an interactive environment, but maybe reasonable for batch-processing. However, given that manu of the providers have a low <1% chance of hitting a match, they can be removed, in order to optimize the processing speed.
In the above example, using only Google and Skype, one could achieve 94% of the matches of all providers combined, in 3.7 seconds rather than 16 seconds.
The default set, is the set of providers used when none are specified, and this is calibrated to roughly 10 seconds, although this may be subject to review.
Evaluate C# with C# using #Roslyn

Having code that evaluates code is a bit of an unusual ask, but perhaps, you want to have a super-configurable system, where you can dynamically execute user code, giving full flexibility over the functionality of your system. Obviously this opens security issues, but let’s imagine you are in a secure, trusted environment
So, this is where Roslyn comes in, Which you can load by grabbing the NuGet package using “Install-Package Microsoft.CodeAnalysis.CSharp.Scripting”. Then, you can run a very simple command such as;
var result = CSharpScript.EvaluateAsync("1 + 3").Result;
All very simple, however, let’s say you want to run more complex code. Here, for example, to run some code to get the user’s IP address. I’ve moved this out to a seperate file, called Sample.txt, and set the build option to copy always, so I can write the user code in a different location to the interpreting code.
var wc = new WebClient();
return wc.DownloadString("http://www.icanhazip.com");
If you try to run this as a script, it borks, because it can’t locate WebClient, and fully qualifying it, by saying System.Net.WebClient doesn’t work either, because it can’t locate System.Net either, so you need to add a bit more as follows –
var scriptOptions = ScriptOptions.Default;
var asmWebClient = typeof(WebClient).Assembly;
scriptOptions = scriptOptions.AddReferences(asmWebClient);
scriptOptions = scriptOptions.AddImports("System.Net");
var sample = File.ReadAllText("sample.txt");
var result = CSharpScript.EvaluateAsync(sample, scriptOptions).Result;
Console.WriteLine(result);
This grabs the relevant assembly for WebClient, and then adds both the reference, and the import to the script. Once it executes, it can find the WebClient class, and the code runs.
GitHub Repo here: https://github.com/infiniteloopltd/RoslynDemo
#Excel tip: Formula to cross check ledger transactions

This is a real time saver, and I hope it’s useful to someone else.
If you have a typical “ledger” type spread sheet, with columns, payments in, payments out and balance – based on the image above. Perhaps this has been entered manually, or perhaps it’s been OCR’d from paper, there could be errors in it, and it can take alot of time to manually check each number.
In the example above you can see there must be an issue with the value in Cell D4, since the Balance does not reflect the value. However, getting excel to highlight this error would allow you to manually check that one cell, not every value on the spreadsheet.
So, I added a new cell in G3 with the value =$E$2+SUM($D$3:D3)-SUM($C$3:C3) and copied this for each row in the spreadsheet. Then added a conditional formatting rule; of =$G1<>$E1

Which then highlights what the Balance should be for each row, and highlights it, if the balance is different to that stated. In this case, you can see that after a point, the projected Balance diverges from the stated balance, indicating the row at which an inaccuracy is present.

Correcting this value, and the projected balance now matches the stated balance, without having to check every single value on the spreadsheet.
Add a #FingerPrint reader to a C# WinForms app

Probably a good way to add extra security to a Windows Form app, just to make sure that there is a real human user infront of the screen, and it’s not some bot trying to interact with your software, is to add a Fingerprint / “Windows Hello” login. Of course, in the real world, generally the attacker would probably try to de-compile your software and try to attack whatever underlying API you are using. However, this is a very visible security feature, and if you’re looking for a super-quick security addition, then, this may be an interesting addition.
Windows Hello is a biometric authentication feature that allows users to log into their Windows device using a fingerprint scanner, facial recognition, or other biometric methods, rather than a password.
Some potential use cases for including Windows Hello in a WinForms app include:
- Secure login: By using a fingerprint scanner or other biometric method, you can add an additional layer of security to your app and make it more difficult for unauthorized users to access the app.
- Convenience: Allowing users to log in with a fingerprint or other biometric method can make the login process more convenient for them, as they don’t have to remember a password or enter it manually.
- Compliance: Depending on the nature of the app and the industries it serves, biometric authentication may be required by compliance regulations or industry standards.
- User experience: For some users, biometric authentication is a preferred way to interact with their devices, and they feel more secure with that kind of security.
- Protecting sensitive data: If your app handles sensitive information, such as financial data or personal information, biometric authentication can help ensure that only authorized users have access to this information.
Here is a link to a public GitHub Repo that shows a simple example of this in action: https://github.com/infiniteloopltd/FingerPrintReader
The Key code being;
var supported = await KeyCredentialManager.IsSupportedAsync();
if (!supported) return;
var result =
	await KeyCredentialManager.RequestCreateAsync("login",
		KeyCredentialCreationOption.ReplaceExisting);
if (result.Status == KeyCredentialStatus.Success)
{
	MessageBox.Show("Logged in.");
}
else
{
	MessageBox.Show("Login failed.");
}AvatarAPI now includes #GitHub as a source

AvatarAPI.com is an API that allows you get images, names , and sometimes addresses from an email address, depending on what source / provider is used.
Today, GitHub is the latest addition to the source list, which means that anyone with a public email address on their GitHub profile can be searched, returning the avatar icon, and the account name.
A handful of potential use cases for this API are as follows;
- Social media and networking apps can use the API to automatically populate user profiles with their contact’s profile pictures and names.
- Email clients can use the API to display the sender’s profile picture and name in the email’s header.
- Customer relationship management (CRM) software can use the API to associate a customer’s email address with their profile picture and name.
- Online marketplaces and e-commerce platforms can use the API to show a buyer’s profile picture and name on their account page.
- Collaboration and productivity tools can use the API to display a team member’s profile picture and name in a shared document or project management platform.
- Security and authentication systems can use the API to verify the identity of a user based on their email address and associated profile picture and name.
- Online gaming and virtual reality platforms can use the API to display a player’s profile picture and name in-game or on a leaderboard.
- Educational and training platforms can use the API to associate a student’s email address with their profile picture and name in a virtual classroom.
Checking a Spanish #VAT number using the #VIES webservice in C#

Checking EU VAT numbers using the VIES webservice has some quirks, for example, in Germany, only the validity of the number can be verified, and in Spain, although the company name and address are not exposed, the API can be used to verify them against provided details, for this, a different service method needs to be used for Spain, than for other countries;
TL; DR; here is the Github Repo showing the code in c# https://github.com/infiniteloopltd/CheckVatNumberSpain
Checking a VAT number in Spain can be done by using the European Union’s VAT Information Exchange System (VIES). VIES is a web-based system that allows businesses and tax authorities in the EU to verify the validity of VAT numbers assigned to companies in other EU member states.
To check a VAT number in Spain using VIES, you would need to make a SOAP web service request to the VIES web service endpoint, passing in the VAT number you wish to validate as a parameter. The request would be sent to the VIES service over HTTPS, ensuring the data transmitted is secure.
The VIES service would then respond with a validation result indicating whether the VAT number is valid or not. If the VAT number is valid, the response would also include the country code of the member state that issued the VAT number. The VIES service does not expose the name or address of the company.
Added in the code is a inspector that prints to the console the XML being sent and received, for use in Postman, or another client that needed to POST the XML via HTTP rather than SOAP; which would be;
Sample Request
<s:Envelope xmlns:s="http://schemas.xmlsoap.org/soap/envelope/">
  <s:Body xmlns:xsi="http://www.w3.org/2001/XMLSchema-instance" xmlns:xsd="http://www.w3.org/2001/XMLSchema">
    <checkVatApprox xmlns="urn:ec.europa.eu:taxud:vies:services:checkVat:types">
      <countryCode>ES</countryCode>
      <vatNumber>B83891812</vatNumber>
      <traderName>Rodrisa Automoviles</traderName>
      <traderCompanyType />
      <traderStreet>Avda. Reina Victoria</traderStreet>
      <traderPostcode>28430</traderPostcode>
      <traderCity>Madrid</traderCity>
      <requesterCountryCode />
      <requesterVatNumber />
    </checkVatApprox>
  </s:Body>
</s:Envelope>
Sample Response
<env:Envelope xmlns:env="http://schemas.xmlsoap.org/soap/envelope/">
    <env:Header/>
    <env:Body>
        <ns2:checkVatApproxResponse xmlns:ns2="urn:ec.europa.eu:taxud:vies:services:checkVat:types">
            <ns2:countryCode>ES</ns2:countryCode>
            <ns2:vatNumber>B83891812</ns2:vatNumber>
            <ns2:requestDate>2023-01-12+01:00</ns2:requestDate>
            <ns2:valid>true</ns2:valid>
            <ns2:traderName>Rodrisa Automoviles</ns2:traderName>
            <ns2:traderCompanyType></ns2:traderCompanyType>
            <ns2:traderStreet>Avda. Reina Victoria</ns2:traderStreet>
            <ns2:traderPostcode>28430</ns2:traderPostcode>
            <ns2:traderCity>Madrid</ns2:traderCity>
            <ns2:traderNameMatch>1</ns2:traderNameMatch>
            <ns2:traderCompanyTypeMatch>3</ns2:traderCompanyTypeMatch>
            <ns2:traderStreetMatch>1</ns2:traderStreetMatch>
            <ns2:traderPostcodeMatch>1</ns2:traderPostcodeMatch>
            <ns2:traderCityMatch>2</ns2:traderCityMatch>
            <ns2:requestIdentifier></ns2:requestIdentifier>
        </ns2:checkVatApproxResponse>
    </env:Body>
</env:Envelope>
Clearing out #AWS #Cloudwatch in C# – Coded with help from #ChatGPT

If you’re like me, you use AWS Cloudwatch when testing and debugging your Lambda functions on AWS, and then whenever your code is working, you end up leaving them in, “just in case” – Of course, that means you ignore them, until you get a bill from AWS for holding GB’s of logs, for no reason whatsoever.
So, here’s some C# code (Coded with the help of ChatCPT OpenAI with some modifications), to clear out all your Cloudwatch logs in all regions. You can be less heavy-handed, but I wanted to delete everything.
using Amazon;
using Amazon.CloudWatchLogs;
using Amazon.CloudWatchLogs.Model;
using Amazon.Runtime;

class Program
{
    static void Main(string[] args)
    {
        const string accessKey = "xxxxxxxxxxxxxxx";
        const string secretKey = "xxxxxxxxxxxxxxx";

        var credentials = new BasicAWSCredentials(accessKey, secretKey);
        foreach (var region in Amazon.RegionEndpoint.EnumerableAllRegions)
        {
            Console.WriteLine(region.SystemName);
            var client = new AmazonCloudWatchLogsClient(credentials, region);
            try
            {
                // Get a list of all log groups
                DescribeLogGroupsResponse logGroupsResponse = null;
                try
                {
                    logGroupsResponse = client.DescribeLogGroupsAsync().Result;
                }
                catch(Exception ex)
                {
                    Console.WriteLine(ex.Message);
                    continue;
                }
                var logGroups = logGroupsResponse.LogGroups;

                // Iterate through each log group and delete it
                foreach (var logGroup in logGroups)
                {
                    // Get a list of all streams in the log group
                    var logStreamsResponse = client.DescribeLogStreamsAsync(new DescribeLogStreamsRequest
                    {
                        LogGroupName = logGroup.LogGroupName
                    }).Result;
                    var logStreams = logStreamsResponse.LogStreams;

                    // Iterate through each stream and delete it
                    foreach (var logStream in logStreams)
                    {
                        client.DeleteLogStreamAsync(new DeleteLogStreamRequest
                        {
                            LogGroupName = logGroup.LogGroupName,
                            LogStreamName = logStream.LogStreamName
                        });
                        Thread.Sleep(TimeSpan.FromMilliseconds(50));
                        Console.WriteLine("Deleted log stream: " + logStream.LogStreamName + " in log group: " + logGroup.LogGroupName);
                    }

                    client.DeleteLogGroupAsync(new DeleteLogGroupRequest
                    {
                        LogGroupName = logGroup.LogGroupName
                    });
                    Thread.Sleep(TimeSpan.FromMilliseconds(50));
                    Console.WriteLine("Deleted log group: " + logGroup.LogGroupName);
                }

                Console.WriteLine("Deleted all log groups and streams in region: " + region.SystemName);
            }
            catch (AmazonCloudWatchLogsException e)
            {
                Console.WriteLine("Error while processing region " + region.SystemName);
                Console.WriteLine("Caught Exception: " + e.Message);
                Console.WriteLine("Response Status Code: " + e.StatusCode);
                Console.WriteLine("Error Code: " + e.ErrorCode);
                Console.WriteLine("Error Type: " + e.ErrorType);
                Console.WriteLine("Request ID: " + e.RequestId);
            }
        }
    }
}
Hope this helps someone!
