Archive
Asymetric Encryption in C# and #Javascript

Here is a scenario, where you generate RSA asymetric encryption keys in C#, use the public key to encrypt a message, then decrypt it using Javascript.
First, generate a pair of keys in C#
RSACryptoServiceProvider rsa = new RSACryptoServiceProvider(2048);
tbPublicKey.Text = rsa.ToXmlString(false); // false to get the public key
tbPrivateKey.Text = rsa.ToXmlString(true); // true to get the private key
I’ve selected a key length of 2014 bits, this gives an output cypher text of 255 bytes, or 344 bytes when base64 encoded.
You then use code such as the following to encrypt:
static string EncryptText(string publicKey, string text)
{
// Convert the text to an array of bytes
UTF8Encoding byteConverter = new UTF8Encoding();
byte[] dataToEncrypt = byteConverter.GetBytes(text);// Create a byte array to store the encrypted data in it
byte[] encryptedData;
using (RSACryptoServiceProvider rsa = new RSACryptoServiceProvider())
{
// Set the rsa pulic key
rsa.FromXmlString(publicKey);// Encrypt the data and store it in the encyptedData Array
// MAX 245 bytes
encryptedData = rsa.Encrypt(dataToEncrypt, false);
}
// Base 64 encode enctrypted data
return Convert.ToBase64String(encryptedData);
}
Then the following code to decrypt
static string DecryptText(string privateKey, string cyphertext)
{
// read the encrypted bytes from the file
byte[] dataToDecrypt = Convert.FromBase64String(cyphertext);// Create an array to store the decrypted data in it
byte[] decryptedData;
using (RSACryptoServiceProvider rsa = new RSACryptoServiceProvider())
{
// Set the private key of the algorithm
rsa.FromXmlString(privateKey);
decryptedData = rsa.Decrypt(dataToDecrypt, false);
}// Get the string value from the decryptedData byte array
UTF8Encoding byteConverter = new UTF8Encoding();
return byteConverter.GetString(decryptedData);
}
Now, you may note the comment “// MAX 245 bytes”, This is important, since if you try to encrypt text over 245 bytes, the code will break. Note, I’m using UTF8 here, if you wanted to support chinese text, you’d need Unicode, which sets the max to 122
You can however, break the text into 245 byte chunks as follows; (Using a pipe char as a seperator)
static string EncryptLongText(string publicKey, string text)
{
var strOutput = “”;
var stringParts = Split(text, 245);
foreach(var stringPart in stringParts)
{
strOutput += EncryptText(publicKey, stringPart) + “|”;
}
return strOutput;
}public static IEnumerable<string> Split(string str, int chunkSize)
{
if (string.IsNullOrEmpty(str) || chunkSize < 1)
throw new ArgumentException(“String can not be null or empty and chunk size should be greater than zero.”);
var chunkCount = str.Length / chunkSize + (str.Length % chunkSize != 0 ? 1 : 0);
for (var i = 0; i < chunkCount; i++)
{
var startIndex = i * chunkSize;
if (startIndex + chunkSize >= str.Length)
yield return str.Substring(startIndex);
else
yield return str.Substring(startIndex, chunkSize);
}
}
Then reverse the process with a Regex;
static string DecryptLongText(string privateKey, string text)
{
var strOutput = “”;
var stringParts = Regex.Split(text, @”\|”);
foreach (var stringPart in stringParts)
{
if (stringPart != “”) strOutput += DecryptText(privateKey, stringPart);
}
return strOutput;
}
That’s all there is to it in C#, now to turn to Javascript, you will need to look at the format of the keys;
<RSAKeyValue>
<Modulus>….</Modulus>
<Exponent>…</Exponent>
<P>….</P>
<Q>….</Q>
<DP>….</DP>
<DQ>….</DQ>
<InverseQ>…</InverseQ>
<D>…</D>
</RSAKeyValue>
The parts of the keys (elided with …) are in base64 format, you will need this in Hex format for Javascript, and a tool such as https://cryptii.com/base64-to-hex can do this online for you.
Then following the code example on http://www-cs-students.stanford.edu/~tjw/jsbn/rsa2.html – the values match up as follows;
Modulus: Modulus (hex): [n]
Exponent : Public exponent (hex, F4=0x10001): [e]
P: P (hex): [p]
Q: Q (hex): [q]
DP: D mod (P-1) (hex): [dmp1]
DQ: D mod (Q-1) (hex): [dmq1]
InverseQ : 1/Q mod P (hex): [coeff]
D : Private exponent (hex): [d]
The specified plex is a the current system or boot plex. #SoftRaid #Raid
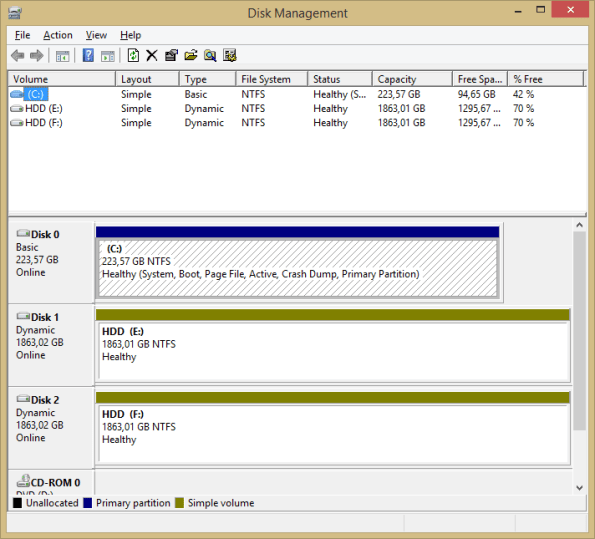
If you want to break a mirrored volume in Disk Management, because you want to resize the partition where your If you want to break a mirrored volume in Disk Management, because you want to resize the partition where your operating system is installed, then you may get the following error:
The specified plex is a the current system or boot plex. [sic]
As per KB 969749, the solution is detailed as follows, I’ve just added the commands required.
From an elevated Command Prompt, type diskpart to start DiskPart.
C:\Windows\system32>diskpart
Microsoft DiskPart version 10.0.14393.0
Copyright (C) 1999-2013 Microsoft Corporation.
On computer: xxxxxx
Use the list volume command in DiskPart to list the volumes present on the system.
DISKPART> list volume
Volume ### Ltr Label Fs Type Size Status Info
———- — ———– —– ———- ——- ——— ——–
Volume 0 X xxxx NTFS Spanned xxxx MB Healthy
Volume 1 X xxxxx NTFS Mirror xxx GB Healthy Boot
Volume 2 EFI FAT32 Partition xxx MB Healthy System
Volume 3 EFI FAT32 Partition xxx MB Healthy Hidden
Type the command select volume x to select the mirror volume, where x is the alphanumeric identifier of the mirror volume.
DISKPART> select volume 1
Volume 1 is the selected volume.
Determine the numeric identifier of the disk containing the plex you are currently booted into (“Boot Disk”) using the list disk, select disk, and detail disk commands.
DISKPART> list disk
Disk ### Status Size Free Dyn Gpt
——– ————- ——- ——- — —
Disk 0 Online xxx GB 1024 KB * *
Disk 1 Online xxx GB 1024 KB * *DISKPART> select disk 0
Disk 0 is now the selected disk.
DISKPART> detail disk
INTEL xxxxx
Disk ID: {xxxx}
Type : xxxx
Status : OnlinePath : 0
Target : 0LUN ID : 0
Location Path : …..
Current Read-only State : No
Read-only : No
Boot Disk : Yes
….
DISKPART> select disk 1
Disk 1 is now the selected disk.
DISKPART> detail disk
INTEL xxxxx
Disk ID: {xxxxx}
Type : xxxx
Status : Online
Path : 0
Target : 0
LUN ID : 0
Location Path : …
Current Read-only State : No
Read-only : No
Boot Disk : No
Pagefile Disk : Yes
Hibernation File Disk : No
Crashdump Disk : Yes
Clustered Disk : No
….
If you try to break the disk without selecting the volume, then you get the following error:
DISKPART> break disk 1
There is no volume selected to break.Please select a dynamic mirror to break.
Use the command break disk n to break the mirror, where n is the numeric identifier of the disk containing the mirror plex you are not currently booted from.The mirror will be broken, and both plexes will be converted to Simple volumes.
DISKPART> select volume 1
Volume 1 is the selected volume.
DISKPART> break disk 1
DiskPart successfully broke the mirror volume.
After this is done, you will have two simple volumes, rather than one mirrored volume which will be very similar in content. You can then use Disk Management to resize, the volumes, dealocate one of them, then select the boot volume and press Add Mirror to restore the Raid.
Enhance your #MSSQL Security with two keywords in C#

If your database server is on a different machine to your webserver, and the SQL queries travel through the network, then they are liable to be sniffed by third parties sharing the same network.
However, if you add the words:
Encrypt=True; TrustServerCertificate=True
To your connection string then the TDS data sent from client to server will be encrypted, and impossible to sniff from the network.
You can verify the connection is secure by running the following query;
SELECT session_id, net_transport, client_net_address, local_net_address,
local_tcp_port, auth_scheme, encrypt_option
FROM sys.dm_exec_connections
According to performance tests, I found no difference between the performance of secure vs plain text secure. over a batch of 200 queries.
Car Registration #API available on #Python #PIP

CarRegistration
This is an API Wrapper for Python for the VehicleRegistrationApi.com API which allows you to get car data from it’s number plate in many countries across the globe, from the USA, Europe, Australia, and Africa. Is is available as a package on PIP and easy_install
An account username and password is required from VehicleRegistrationApi.com
When using the Generic “CarRegistration” function, the fourth parameter is an API endpoint, which can be one of;
- Check (UK)
- CheckBelgium
- CheckCroatia
- CheckCzechRepublic
- CheckDenmark
- CheckEstonia
- CheckFinland
- CheckFrance
- CheckHungary
- CheckIndia
- CheckIreland
- CheckItaly
- CheckNetherlands
- CheckNewZealand
- CheckNigeria
- CheckNorway
- CheckPortugal
- CheckRussia
- CheckSlovakia
- CheckSouthAfrica
- CheckSpain
- CheckSriLanka
- CheckSweden
- CheckUAE
For Australia and USA, you must also pass a state parameter, and therefore you must use the CarRegistrationUSA or CarRegistrationAustralia methods.
Installation
pip install CarRegistration
Usage (UK)
 from CarRegistration import *
 CarRegistration("BL64JTZ","***YOUR USERNAME***","***YOUR PASSWORD***","Check")
Usage (France)
 from CarRegistration import *
 CarRegistration("Eg258ma","***YOUR USERNAME***","***YOUR PASSWORD***","CheckFrance")
Usage (USA)
 from CarRegistration import *
 CarRegistrationUSA("H84jae","nj","***YOUR USERNAME***","***YOUR PASSWORD***")
Usage (Australia)
 from CarRegistration import *
 CarRegistrationAustralia("YHC14Y","NSW","***YOUR USERNAME***","***YOUR PASSWORD***")
Sample output
{u'RegistrationYear': u'2015', u'CarModel': {u'CurrentTextValue': u'208'}, u'NumberOfDoors': {u'CurrentTextValue': u'3'}, u'EngineSize': {u'CurrentTextValue': u'1397And here’s the source code for those interested:
import urllib2, base64, json
def CarRegistration(registrationNumber, username, password):
request = urllib2.Request(“http://www.regcheck.org.uk/api/json.aspx/Check/” + registrationNumber)
base64string = base64.encodestring(‘%s:%s’ % (username, password)).replace(‘\n’, ”)
request.add_header(“Authorization”, “Basic %s” % base64string)
result = urllib2.urlopen(request)
data = json.load(result)
return(data)
Detect #Phising links in user submitted urls in C#

If your website displays urls which are user-submitted, then you can use a free API by google called Safe Browsing (key required), to detect if these are phishing / malware urls – here is the code, with the Google API Key removed;
static bool IsMalware(string url)
{
/*
http://testsafebrowsing.appspot.com/apiv4/ANY_PLATFORM/MALWARE/URL/
http://testsafebrowsing.appspot.com/apiv4/ANY_PLATFORM/SOCIAL_ENGINEERING/URL/
http://testsafebrowsing.appspot.com/apiv4/ANY_PLATFORM/UNWANTED_SOFTWARE/URL/
*/
var strRequestJson = File.ReadAllText(“requestjson.json”);
strRequestJson = strRequestJson.Replace(“*PLACEHOLDER*”, url);
WebClient wc = new WebClient();
var strurl = “https://safebrowsing.googleapis.com/v4/threatMatches:find?key=xxxx”;
wc.Headers[HttpRequestHeader.ContentType] = “application/json”;
var strResult = wc.UploadString(strurl, strRequestJson);
if (strResult.Trim() == “{}”) return false;
return true;
}
You will also need the file requestjson.json set to copy always in the build options, with the following content;
{
“client”: {
“clientId”: “yourcompanyname”,
“clientVersion”: “1.5.2”
},
“threatInfo”: {
“threatTypes”: [ “MALWARE”, “SOCIAL_ENGINEERING” , “UNWANTED_SOFTWARE” ],
“platformTypes”: [ “WINDOWS” ],
“threatEntryTypes”: [ “URL” ],
“threatEntries”: [
{ “url”: “*PLACEHOLDER*” }
]
}
}
Get automated notifications on #WindowsUpdate using C# and #WUApiLib

If you wanted to be notified as soon as a windows update is available on your server, but you don’t want it to be installed automatically, here is a script in C# that allows you to know when an update is ready.
It requires a COM library called WUApiLib which you can add via project > References
var updateSession = new UpdateSession();
var updateSearcher = updateSession.CreateUpdateSearcher();
updateSearcher.Online = false; //set to true if you want to search online
try
{
var searchResult = updateSearcher.Search(“IsInstalled=0 And IsHidden=0 And BrowseOnly=0”);
if (searchResult.Updates.Count > 0)
{
Console.WriteLine(“There are updates available for installation”);
foreach (IUpdate update in searchResult.Updates)
{
Console.WriteLine(update.Description);
foreach (string kbaid in update.KBArticleIDs)
{
Console.WriteLine(“http://support.microsoft.com/?kbid=” + kbaid);
}
}
}
}
catch (Exception ex)
{
Console.WriteLine(ex.Message, “Error”);
}
Cloud Answering Machine services now available in 33 new countries

CloudAnsweringMachine.com is a service that allows you to have a virtual answering machine attached to a real phone number practically anywhere in the world. This means that if you want to have a number that you can publish freely, without being bombarded with spam callers.
Having a virtual answering machine allows you to separate your high-priority calls from your low-priority calls, so that someone who is not in urgent need of reply, can leave a message, and you can get back to them – where your friends , family and important business partners can still contact you on your main phone line.
You can also receive text messages on your answering machine, so it can be used to activate services without disclosing your real phone number.
Up to now, we’ve had a simple pricing structure of $15 (USD), £ 15 (GBP) or € 12 (EUR) per month, but we’ve known that certain countries have higher setup costs to provision phone lines, so we haven’t been able to offer them.
So, we’ve decided, that although most countries will still remain on the simple $15 pricing, we’ve now opened up the possibility of 33 new countries – albeit at a higher monthly cost. These premium numbers are only bookable through the website at present, but this may change in future.
Here’s the pricing table;
| Country | iso | monthly price (USD) |
| United Arab Emirates | AE | 50 |
| Bosnia and Herzegovina | BA | 84 |
| Barbados | BB | 54 |
| Benin | BJ | 54 |
| Bolivia | BO | 50 |
| Botswana | BW | 100 |
| Belarus | BY | 50 |
| Colombia | CO | 50 |
| Algeria | DZ | 66 |
| Ecuador | EC | 68 |
| Grenada | GD | 54 |
| Georgia | GE | 28 |
| Ghana | GH | 54 |
| Guinea | GN | 54 |
| Guatemala | GT | 62 |
| Jamaica | JM | 54 |
| Kenya | KE | 32 |
| Cayman Islands | KY | 58 |
| Mali | ML | 76 |
| Macau | MO | 140 |
| Mauritius | MU | 86 |
| Namibia | NA | 66 |
| Philippines | PH | 50 |
| Serbia | RS | 210 |
| Singapore | SG | 150 |
| Thailand | TH | 50 |
| Tunisia | TN | 70 |
| Trinidad and Tobago | TT | 54 |
| Tanzania | TZ | 54 |
| Uganda | UG | 56 |
| Vietnam | VN | 72 |
#Car Registration #API available for Singapore vehicles

Singapore is a country with 5.6 million people, and is one of the most affluent city states in the world. It has a cap on the amount of new vehicles being registered in the city, but with an affluent population, and 45% car ownership, there are millions of registered vehicles in the city. If you offer a website or service to these users, then you may be interested in a car registration api for singapore at http://sg.carregistrationapi.com
Singapore support
Car registration plates in Singapore use the /CheckSingapore endpoint and return the following information:
- Make & Model
- Age
- Representative image
Sample Registration Number:
SJT8954X
Sample Json:
{
“Description”: “TOYOTA LEXUS IS250 AUTO STD FL”,
“RegistrationYear”: “2009”,
“CarMake”: {
“CurrentTextValue”: “TOYOTA”
},
“CarModel”: {
“CurrentTextValue”: “LEXUS IS250 AUTO STD FL”
},
“MakeDescription”: {
“CurrentTextValue”: “TOYOTA”
},
“ModelDescription”: {
“CurrentTextValue”: “LEXUS IS250 AUTO STD FL”
},
“TaxExpiry”: “05 Nov 2018”,
“ImageUrl”: “http://sg.carregistrationapi.com/image.aspx/@VE9ZT1RBIExFWFVTIElTMjUwIEFVVE8gU1REIEZM”
}
Download complete #Twilio Pricing table in C#

Twilio offer a great service in providing international phone numbers, – and it’s the provider behind CloudAnsweringMachine.com but the price varies greatly like from a $1 number in the US to a $110/month Toll free number in Bulgaria.
So, here is some code that queries the Twilio API to download all countries, and stores the pricing information in a database :
var strUrl = “https://pricing.twilio.com/v1/PhoneNumbers/Countries/?PageSize=100”;
var wc = new WebClient();
wc.Headers[“Content-Type”] = “application/x-www-form-urlencoded”;
var credentials = Convert.ToBase64String(Encoding.ASCII.GetBytes(username + “:” + password));
wc.Headers[HttpRequestHeader.Authorization] = string.Format(
“Basic {0}”, credentials);
var strCountries = wc.DownloadString(strUrl);
var jCountries = JObject.Parse(strCountries);
foreach(var jCountry in jCountries[“countries”])
{
Console.WriteLine(“Downloading ” + jCountry[“country”].ToString());
try
{
var strCountryUrl = jCountry[“url”].ToString();
var strCountryJson = wc.DownloadString(strCountryUrl);
var jCountryJson = JObject.Parse(strCountryJson);
if (jCountryJson[“price_unit”].ToString() != “USD”) throw new Exception(“Should be usd!”);
foreach (var jPhoneNumber in jCountryJson[“phone_number_prices”])
{
var strSQL = “insert into CAMPricing (country, numberType, price) values (‘{0}’,'{1}’,{2})”;
strSQL = string.Format(strSQL,
jCountryJson[“iso_country”].ToString(),
jPhoneNumber[“number_type”].ToString(),
jPhoneNumber[“current_price”].ToString());
Database.ExecuteNonQuery(strSQL);
}
}
catch(Exception ex)
{
Console.WriteLine(“Failed to download ” + jCountry[“country”].ToString());
Console.WriteLine(ex.ToString());
}}
And here is the pricing table correct as of time of writing:
| ISO Country | Number Type | Price (USD) |
| AE | toll free | 25.00 |
| AR | local | 8.00 |
| AR | toll free | 25.00 |
| AT | mobile | 6.00 |
| AT | national | 1.00 |
| AT | toll free | 25.00 |
| AU | local | 2.50 |
| AU | mobile | 6.00 |
| AU | toll free | 15.00 |
| BA | local | 42.00 |
| BA | national | 42.00 |
| BB | local | 27.00 |
| BE | local | 1.00 |
| BE | mobile | 1.00 |
| BE | national | 1.00 |
| BE | toll free | 25.00 |
| BG | local | 3.00 |
| BG | toll free | 110.00 |
| BJ | mobile | 27.00 |
| BO | toll free | 25.00 |
| BR | local | 4.00 |
| BR | toll free | 35.00 |
| BW | toll free | 50.00 |
| BY | toll free | 25.00 |
| CA | local | 1.00 |
| CA | toll free | 2.00 |
| CH | local | 1.00 |
| CH | mobile | 8.00 |
| CH | toll free | 25.00 |
| CL | local | 7.00 |
| CL | mobile | 10.00 |
| CO | local | 14.00 |
| CO | toll free | 25.00 |
| CY | national | 5.00 |
| CZ | local | 1.00 |
| CZ | mobile | 12.00 |
| CZ | national | 1.00 |
| CZ | toll free | 35.00 |
| DE | local | 1.00 |
| DE | mobile | 5.00 |
| DE | national | 1.00 |
| DE | toll free | 25.00 |
| DK | local | 1.00 |
| DK | toll free | 25.00 |
| DO | local | 7.00 |
| DZ | local | 33.00 |
| DZ | national | 33.00 |
| EC | local | 34.00 |
| EE | local | 1.00 |
| EE | mobile | 3.00 |
| EE | national | 1.00 |
| ES | local | 2.00 |
| ES | mobile | 4.00 |
| ES | national | 2.00 |
| ES | toll free | 25.00 |
| FI | local | 1.00 |
| FI | national | 1.00 |
| FI | toll free | 40.00 |
| FR | local | 1.00 |
| FR | mobile | 2.50 |
| FR | national | 1.00 |
| GB | local | 1.00 |
| GB | mobile | 1.00 |
| GB | national | 1.00 |
| GB | toll free | 2.00 |
| GD | local | 27.00 |
| GE | local | 14.00 |
| GE | national | 14.00 |
| GH | mobile | 27.00 |
| GN | mobile | 27.00 |
| GR | local | 1.00 |
| GR | toll free | 25.00 |
| GT | local | 31.00 |
| GT | mobile | 28.00 |
| HK | mobile | 15.00 |
| HK | national | 6.00 |
| HK | toll free | 25.00 |
| HR | local | 5.00 |
| HR | mobile | 6.00 |
| HU | local | 4.00 |
| HU | mobile | 25.00 |
| ID | local | 23.00 |
| ID | mobile | 3.00 |
| ID | toll free | 25.00 |
| IE | local | 1.00 |
| IE | mobile | 6.00 |
| IE | national | 1.00 |
| IE | toll free | 25.00 |
| IL | local | 4.00 |
| IL | mobile | 14.00 |
| IL | national | 4.00 |
| IL | toll free | 25.00 |
| IS | local | 1.00 |
| IT | local | 1.00 |
| IT | mobile | 25.00 |
| JM | local | 27.00 |
| JP | local | 4.50 |
| JP | national | 4.50 |
| JP | toll free | 25.00 |
| KE | local | 16.00 |
| KR | local | 3.00 |
| KR | national | 3.00 |
| KR | toll free | 25.00 |
| KY | local | 29.00 |
| LT | local | 1.00 |
| LT | mobile | 3.00 |
| LU | local | 3.00 |
| LV | local | 1.00 |
| LV | mobile | 3.00 |
| ML | local | 38.00 |
| MO | mobile | 70.00 |
| MT | national | 5.00 |
| MU | mobile | 43.00 |
| MX | local | 5.00 |
| MX | toll free | 30.00 |
| MY | mobile | 5.00 |
| MY | toll free | 25.00 |
| NA | local | 33.00 |
| NA | national | 33.00 |
| NL | local | 3.00 |
| NL | mobile | 5.00 |
| NL | national | 3.00 |
| NL | toll free | 25.00 |
| NO | local | 3.00 |
| NO | mobile | 12.00 |
| NO | toll free | 25.00 |
| NZ | local | 3.00 |
| NZ | toll free | 40.00 |
| PA | local | 8.00 |
| PE | local | 6.00 |
| PH | local | 15.00 |
| PH | toll free | 25.00 |
| PL | local | 1.00 |
| PL | mobile | 3.00 |
| PL | toll free | 25.00 |
| PR | local | 3.00 |
| PT | mobile | 15.00 |
| PT | national | 1.00 |
| PT | toll free | 25.00 |
| RO | local | 3.00 |
| RO | toll free | 25.00 |
| RS | toll free | 105.00 |
| SE | local | 1.00 |
| SE | mobile | 1.00 |
| SE | national | 1.00 |
| SE | toll free | 25.00 |
| SG | mobile | 75.00 |
| SI | local | 5.00 |
| SK | local | 1.00 |
| SK | toll free | 25.00 |
| SV | local | 7.00 |
| TH | local | 25.00 |
| TH | toll free | 25.00 |
| TN | local | 35.00 |
| TN | national | 35.00 |
| TT | local | 27.00 |
| TZ | local | 27.00 |
| TZ | national | 27.00 |
| UG | local | 28.00 |
| UG | national | 28.00 |
| UG | toll free | 25.00 |
| US | local | 1.00 |
| US | toll free | 2.00 |
| VN | local | 36.00 |
| ZA | national | 1.50 |
| ZA | toll free | 25.00 |
Getting Started With #SmtpJs & #React

Getting Started With SmtpJs & React
Introduction
My name is Alec Dilanchian and I am an avid programmer who enjoys working on side projects and creating cool tools. These projects all come to life on Twitch, a live streaming platform where I stream myself programming projects in 28 days from start to launch (If this sounds interesting to you, please consider checking out my stream @ https://www.twitch.tv/pixelogicdev).
I recently started a new project called FocusBlock, which can be found here. FocusBlock is an open source tool that helps you time block a task and contacts a designated person, via email, if you do not finish your task in the assigned time. Think of it like a pomodoro timer with a way to automatically gain assistance if needed. I needed a tool that would automatically send an email, via the client, if their timer ended before they finished their task. I came across SmtpJs. This component seemed straight forward and extrmemely easy to use. There was just one caveat, FocusBlock’s client side is being created with React. I wanted to keep everything as native as possible, so I challenged myself to create a very simple React component out of this awesome tool. In this article, I want to show you how easy it can be to do just this!
Download The Source Code
The component needed to get the basic logic for SmtpJs can be found @ https://wwww.smtpjs.com. When you reach the home page of the site you will want to select the “Download” button. This will download the source code needed in order for you to get started with SmtpJs. It should just be one .js file as of version 2.0.1.
Create a React Component
Once you have your source code, you are all set to get started on your React component. If you are unfamiliar with React, I would suggest checking out their guide here to gain much needed knowledge on how components work and what the library as a whole does. Do begin creating a React component, I start by adding a new folder of whatever the component will be called. In this instance I called my component SmtpService. This will hold any and all of our component logic. The next step should be straight forward. Go ahead and create a file called SmtpService.js. This will be the entry point of your component and where we will house all of its logic.
Next we will want to ge the basic layout of our React component. This is done with the following boilerplate code:
import { Component } from 'react';

class SmtpService extends Component {
    /* https://smtpjs.com/ */
    /* SmtpJS.com - v2.0.1 */
}

export default SmtpService;
Don’t forget to give credit to SmtpJs for their source code!
Add The SmtpJs Source Code
Once our barebones React component is setup, its time to add the soruce code of SmtpJs. This is as easy as copying and pasting it from that .js file you downloaded in step one. If your React app is already running, you will notice a lot of syntax errors that the linter is complaining about. Have no fear! These are easy changes that can be fixed.
Tweaking Methods
SmtpJs has multiple methods that are key for its functionality. We need to make sure we are abiding by our component’s rules and might as well convert it to JavaScript ES6 while we are at it!
I will demonstrate one method change which is identical for every other method in the code. Lets work with the send method. You are orignally given send: function (e, o, t, n, a, s, r, c) { /* Code */ );. In React, these methods are not recogonized using that syntax. To abide by ES6 and React, all you have to do is change the format to this: send = (e, o, t, n, a, s, r, c) => { /* Code */};. There is a very slight difference.
Changing var to let
This step is just a simple ES6 change. Since all of our properties are only going to be accessed within their respective methods, we want to make sure that they do not hold a global scope. At this point, change any var to let and you are golden.
A Bit of Refactoring
While the source code of the project came to us as a minified file (from the looks of it), it makes it almost illegible. For this we want to make quite a few changes. At this point in the article, I am going to just post the rest of the source code. Feel free to compare the differences! Just as a note, these changes were not React specific:
send = (e, o, t, n, a, s, r, c) => {
    let d = Math.floor(1e6 * Math.random() + 1);
    let i = `From=${e}&to=${o}&Subject=${encodeURIComponent(
        t
    )}&Body=${encodeURIComponent(n)}`;

    if (!a.token) {
        i += `&Host=${a}&Username=${s}&Password=${r}&Action=Send`;
    } else {
        i += `&SecureToken=${a.token}&Action=SendFromStored`;
        c = a.callback;
    }
    i += '&cachebuster=' + d;

    this.ajaxPost('https://smtpjs.com/v2/smtp.aspx?', i, c);
};
sendWithAttachment = (e, o, t, n, a, s, r, c, d) => {
    let i = Math.floor(1e6 * Math.random() + 1);
    let m = `From=${e}&to=${o}&Subject=${encodeURIComponent(
        t
    )}&Body=${encodeURIComponent(n)}&Attachment=${encodeURIComponent(c)}`;

    if (!a.token) {
        m += `&Host=${a}&Username=${s}&Password=${r}&Action=Send`;
    } else {
        m += `&SecureToken=${a.token}&Action=SendFromStored`;
    }

    m += `&cachebuster=${i}`;

    this.ajaxPost('https://smtpjs.com/v2/smtp.aspx?', m, d);
};
ajaxPost = (e, o, t) => {
    let n = this.createCORSRequest('POST', e);
    n.setRequestHeader('Content-type', 'application/x-www-form-urlencoded');
    n.onload = () => {
        let e = n.responseText;
        if (t) t(e);
    };
    n.send(o);
};
ajax = (e, o) => {
    let t = this.createCORSRequest('GET', e);
    t.onload = () => {
        let e = t.responseText;
        if (o) o(e);
    };
    t.send();
};
createCORSRequest = (e, o) => {
    let t = new XMLHttpRequest();
    return (
        'withCredentials' in t
            ? t.open(e, o, !0)
            : 'undefined' !== typeof XDomainRequest
                ? (t = new XDomainRequest()).open(e, o)
                : (t = null),
        t
    );
};
Send An Email
Once you are done with your component, you are free to utilize it like any other React component. Import it where you need it, and then use it:
import SmtpService from 'My/File/Path/SmtpService';

...

sendEmail = () => {
    let sender = new SmtpService();
    sender.send(...);
};
Conclusion
I want to give a huge shout out to the folks who created SmtpJs and thank them for the awesome and light weight component they had created to send out emails through the client side. I had a blast converting this into a React component and I hope this has helped get you started! I do want to inform you that there are many more changes that can be made to make this an even better component, but I will leave that up to you!
Please feel free to get in contact with me about this or anything else through:
Twitch
Twitter
Email
***********
Thanks Alec for this great guest post, if you’d like to appear in this blog with some tips and tricks on SMTP.JS or another of our components, then drop us a comment or email.
