Archive
Charge a Credit card using #Stripe and #Node

Stripe makes it super-easy to charge a credit card, here is an example from the command line:
var stripe = require(‘stripe’)(‘sk_test_…..’);
stripe.tokens.create({
card: {
number: ‘4242424242424242’,
exp_month: 12,
exp_year: 2020,
cvc: ‘123’
}
}, function(err, token) {
if (err != null)
{
console.log(“err:” + err);
}
else
{
console.log(“tokenid:” + token.id);
stripe.charges.create({
amount: 2000,
currency: “usd”,
source: token.id,
description: “Charge for 4242424242424242”
}, function(err, charge) {
if (err != null)
{
console.log(“err:” + err);
}
else {
console.log(“charge:” + charge.id);
}
});
}
});
Proxy testing script in #NodeJs

Not going to win any awards, but here is a little script in Node.js to test if a proxy is working or not
const request = require(‘request’);
request({
‘url’:’http://icanhazip.com’,
‘proxy’:process.argv[2]
}, function (error, response, body) {
console.log(‘error:’, error); // Print the error if one occurred
console.log(‘statusCode:’, response && response.statusCode); // Print the response status code if a response was received
console.log(‘ip:’, body); // Print the HTML for the Google homepage.
});
It requires npm install request
and is run like node proxycheck.js <ProxyAddress>
Unit testing a AWS #Lambda function with #Cloudwatch

Unit testing is primarily used to detect breaking code changes, but it can also be used to detect breaking changes in external environments, if run periodically.
So, imagine your code connects to an external database, that is operated by a third party. Perhaps they might suddenly change something without telling you, and your code breaks in the middle of the night, with no warning. In fact the first alert you’ll get will be an irate customer.
I’m assuming a serverless environment running Node on Lambda.
So, firstly, I set up a special entry point for my Lambda function, so that it knows it’s under test; In my case, was the following
exports.handler = function (event, context) {
if (typeof event.request == “undefined”)
{
console.log(“Lambda called via Cloudwatch”);
console.log(event);
console.log(event.test);
testing.selectTest(event.test,function(){
context.succeed();
});
return;
}
Which, in my case, was if the lambda function was being called via cloudwatch, rather than alexa, it wouldn’t have a event.request element, but would have a event.test element.
Now, “testing” is a javascript file, which selects a test as follows;
module.exports.selectTest = function(testName,callback)
{var testMethod = null;
if (testName == “testA”) testMethod = testA;testMethod(
function(pass)
{
console.log(pass);
console.log(testName + ” passed”);
},
function(fail)
{
console.log(fail);
console.log(testName + ” failed”);
email.send({..} )}
In this case, it would just console.log the output, unless, it failed, it would email me with the warning.
An individual test would be defined as
function testA(pass, fail)
{
myIntent.Search(function(result)
{
if(result == “Fail“)
{
fail(result);
}
else
{
pass(result);
}
});
}
myIntent.Search is outside of the scope of this example, but in this example, imagine it returns “Fail” on Failure, and some other string on success.
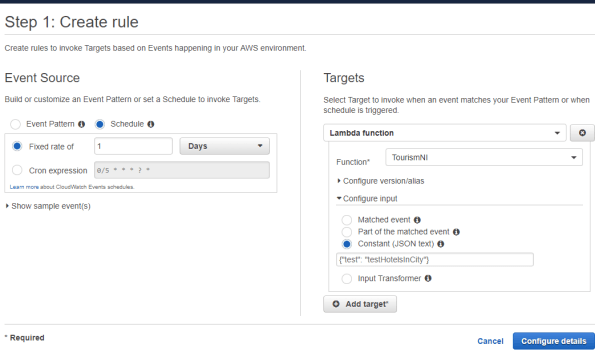
Now, to schedule this regularly, then you create a CloudWatch Rule, where you set the event source to a schedule of 1 day (in my case), and the target to your lambda function. You set the input to a constant JSON text of {“test”: “testA”}, or whatever the name of your test is.
Hopefully, this will mean if someone unplugs your database, you will get an alert before your customers discover it’s down.
Run #Windows exe on #OSX using #Wine

To run Windows on a mac, you can run a virtual machine, or make it dual boot. However, those approaches use a load of disk space, and memory. There is another approach, which would be obvious to anyone from the Linux world, but it also applies to OSX. – It’s called Wine, and it is available for download here; https://wiki.winehq.org/MacOS
You will also need to download XQuartz, which is an X11 windows server, and is available here; https://www.xquartz.org/
With that, you can then simply right click your exe, and press Send to > Wine Stable, and it might just run. The interface looks quite different, and some applications I tried didn’t work.
Return Asynchronous responses from #dialogflow-fulfillment

If you are writing a Dialogflow webhook in node, you’re probably using dialogflow-fulfillment , and if you’re reading this post, you’ve run into the issue where DialogFlow is not returning properly when you carry out an asynchronous call.
Let’s see a typical syncronous case first;
intentMap.set(‘Default Welcome Intent’, welcome);
….
function welcome(agent) {
agent.add(“Welcome”);
}
Which returns Welcome, when the Default Welcome Intent is fired.
In this next typical use case, where I want to record failed queries, i.e. queries that trigger the fallback intent in a database. The Database is asyncronous, so it will fire a callback once the data is stored.
intentMap.set(‘Default Fallback Intent’, fallback);
….
function fallback(agent) {
database.recordFailure(request.body.queryResult.queryText, function(text)
{
agent.add(“Sorry, I couldn’t help you”);
});
}
Now, if you run this with the fallback intent, then you may notice that the data is stored in the database, but you get an error response back, rather than the “Sorry, I couldn’t help you” message
The trick is, to wrap the function in a promise like so;
function fallback(agent) {
return new Promise ( (resolve, reject) => {
database.recordFailure(request.body.queryResult.queryText, function(text)
{
agent.add(text);
return resolve();
});
});
}
And call resolve() once you’re ready to reply to the user.
Quickly upload a #Lambda function on Windows #7z

If you have a lambda function above a certain size, (50 MB ish), then the inline code editor will no longer be available in AWS lambda. You then have to resort to uploading zipped files of your lambda function. This can be cumbersome on windows, if you haven’t got a quick script to run to zip and upload the lambda function.
You will need to have run AWS configure, and given this the correct credentials, and you will need to replace the function name below
@echo off
erase Lambda.zip
“C:\Program Files\7-Zip\7z” a Lambda.zip
aws lambda update-function-code –function-name xxxxxxx –zip-file “fileb://lambda.zip”
This ran in about 17 seconds for my lambda function, which would have taken easily a minute using the GUI. – plus, it’s less prone to human error.
Update daily exchange rates in a database using #Node, #lambda and #CloudWatch

If you hold a database of products or services priced in one currency, you might make it easier for your customers to display the offers in their own currency. But, you need to keep your exchange rates up to date, otherwise a sudden dip in a currency might mean that you loose money, or quote the wrong price to consumers.
There are plenty of free, and accurate feeds for currencies. I chose to use one from the ECB (European Central Bank), which I would trust.
Here is the XML Feed url:
https://www.ecb.europa.eu/stats/eurofxref/eurofxref-daily.xml
Now, we want to pull that data on a daily basis, and import it into our database, using a serverless architecture on AWS. Using Lambda, Node, and I’m using SQL server as the database.
First off, in order to trigger a Lambda function on a schedule, you need to set up another service called cloudwatch. You create a cloudwatch rule, and set a schedule for one day – but for debugging purposes, set it to one minute initially, until the system is working. You connect this rule to your Lambda Function.
Now, I installed a number of NPM packages, Request, xml2Js, and MSsql. Those are to make HTTP requests easier, help handling XML, and connecting to SQL server, respectively.
Now, to set up my database, I created a table:
Create Table ExchangeRates
(
Currency char(3),
Rate float,
DateUpdated datetime default getdate()
)
The DateUpdated, is not strictly necessary, but it helps me see that the update function is running reliably.
I have to write some node code to execute my SQL statement, which I place in a file called database.js
const sql = require(‘mssql’);
(function() {
// ——- Database support ——- //
module.exports.execute = function (sqlQuery, callback)
{
const config = {
user: ‘xxxxx’,
password: ‘xxxx’,
server: ‘xxx.xxx.xxx’,
database: ‘xxxxx’,
};
sql.connect(config, (err) => {
if (err) {
console.log(err);
callback(err);
} else {
const req = new sql.Request();
req.query(sqlQuery, (error, result) => {
if (error) {
console.log(error);
callback(error);
} else {
console.log(result);
sql.close();
callback(null, result.recordset);
}
});
}
});sql.on(‘error’, (err) => {
console.log(err);
callback(err);
});};
}());
Now, I can simply say database.execute( SQL , callback) and the SQL will run.
Now, to make the request, parse the XML, and convert it into a SQL statement, I use this code;
function GetRatesFromECB(callback)
{
var strUrl = “https://www.ecb.europa.eu/stats/eurofxref/eurofxref-daily.xml”;
request(strUrl, function (error, response, body) {
console.log(‘error:’, error);
console.log(‘statusCode:’, response && response.statusCode);
xml2js.parseString(body, function (_err, result) {
var strSQL = “truncate table ExchangeRates; \r\n”;
var cube = result[“gesmes:Envelope”][“Cube”][0][“Cube”][0][“Cube”];
for(var i in cube)
{
var exchange = cube[i][“$”];
strSQL += “insert into ExchangeRates (currency,rate) values (‘” + exchange.currency + “‘,” + exchange.rate + “); \r\n”;
console.log(exchange);
}
database.execute(strSQL, function(){
callback();
});
});
});
}
What this does, is that it reads all the rates from the XML file, then creates an SQL statement that wipes the table, and re-populates it with the latest rates.
Then, the standard boilerplate entry point is as follows
exports.handler = (event, context, callback) => {
GetRatesFromECB(function(){
callback(null, “OK”);
});
};
#Cors with #AWS Serverless #Lambda

One of the key elements of serverless computing, is that you probably end up making requests to a third party domain via ajax to do any dynamic processing. In this case I’m imagining you are calling a Lambda function on AWS from a static website hosted on S3.
But, unless you enable CORS (Cross origin resource sharing) then the browser will prevent this type of AJAX calls being made.
So, you will need to do two things to enable CORS on AWS. The first, it log into API gateway, and select Enable CORS on the Actions drop down.

However, this is only half of the battle, since it enables CORS on the OPTIONS preflight request, you need to also set the CORS header in your lamda function, for which I use the following helper function;
function cors(data)
{
var response = {
statusCode: 200,
headers: {
‘Access-Control-Allow-Origin’: ‘*’,
‘Access-Control-Allow-Credentials’: true,
},
body: JSON.stringify(data),
};
return response;
}
Then, whenever you are returning from your lambda, you write something akin to;
callback(null, cors(“Hello World”));
Connect to #MSSQL from #AWS #LAMBDA using #NODE

In order to connect to Microsoft SQL server from Node in AWS Lambda you need to include a reference to require(‘mssql’); – but how do you install NPM packages on AWS Lambda.
That’s where the AWS CLI comes in. Download it, and the first thing you do is configure it with an IAM user as follows
aws configure
which prompts;
AWS Access Key ID [****************]:
AWS Secret Access Key [****************]:
Default region name [None]: eu-west-1
Default output format [None]:
Now, get a list of lambda functions as follows;
aws lambda list-functions
You can get the function name from the json returned, then if you want to get a zip of your function call;
aws lambda get-function –function-name <Function Name>
The JSON will return a property “Location” which you use to download the zip file. Unzip the zip file, and navigate into the folder, then type
npm install mssql
Once complete, zip up the folder, and upload it back to AWS as follows
aws lambda update-function-code –function-name <Function Name> –zip-file “fileb://<ZIP Name>”
Now, you can create a file, database.js in your Lambda project as follows
const sql = require(‘mssql’);
(function() {
// ——- Database support ——- //
module.exports.execute = function(sqlQuery, callback)
{
const config = {
user: ‘xxxxxx’,
password: ‘xxxxx’,
server: ‘xxxx.xx.xx.xxx’,
database: ‘xxxxxx’,
};
sql.connect(config, (err) => {
if (err) {
console.log(err);
callback(err);
} else {
const req = new sql.Request();
req.query(sqlQuery, (error, result) => {
if (error) {
console.log(error);
callback(error);
} else {
console.log(result);
sql.close();
callback(null, result.recordset);
}
});
}
});sql.on(‘error’, (err) => {
console.log(err);
callback(err);
});};
}());
#Arduino Packet Sniffer using w5100 ethernet shield.

It is often surprising how busy your home network is, even when you think nothing much is happening on it, our homes are filled with smart devices that chat constantly on the network, constantly announcing technical details about themselves. If you run Wireshark on your computer, you can see just how noisy the network is.
This bit of code sniffs packets off the network, using a Arduino and a W5100 based ethernet shield. Note that this is will only pick up packets directed at the arduino, or broadcast packets, and since the serial interface is way slower than your network connection, expect plenty of dropped packets.
I’ve got the output to show human-readable text where possible, – filtering out the null character (0), which interfered with copy and pasting the output. There’s not much intellegence going on here, so there’s going to be IPv4 mixed with IPv6 and ARP frames here.
The code is based on Nicolas Humfrey’s W5100 Mac Raw project here https://github.com/njh/W5100MacRaw
#include “w5100.h”
const byte mac_address[] = {
0xae, 0x03, 0xf3, 0xc7, 0x08, 0x78
};Wiznet5100 w5100;
void setup() {
// Setup serial port for debugging
Serial.begin(115200);
w5100.begin(mac_address);
}
uint8_t buffer[800];
void loop() {
uint16_t len = w5100.readFrame(buffer, sizeof(buffer));
if ( len > 0 ) {
for(uint16_t i=0; i<len; i++)
{
if (buffer[i]>0)
{
Serial.print((char)buffer[i]);
}
}
Serial.println();
}
}
For more information on Packet Sniffing, check out chapter 10 in my book
http://webtropy.com/articles/book-network-programming-art6-10.asp
