Self Updating ASP.NET website using #Octokit and #GitHub

Deploying a website with every check-in is quite a risky buisness, but it’s great for testing, so that your testers can be sure that they are looking at the very latest build of your website.
So, if you are using GitHub as your source control, then you can use Github’s Webhook system to trigger your website to download the latest version of itself from Github, effectively self-updating.
So, if you want to skip to the end, just check out our Github repo at https://github.com/infiniteloopltd/AutoBuild and the corresponding test website at http://autobuild.webtropy.com The website is set to automatically download content from Github on every push.
First, set up a webhook. Go to the repo, and click Settings > WebHooks > Add Webhook
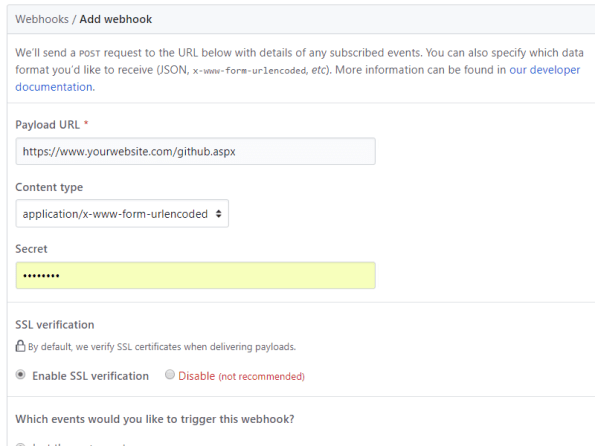
Set up the payload url to point to your website, plus “github.aspx”, and keep the other settings as default.
Next, Add the following three Nuget packages to your project;
Install-Package Octokit
Install-Package SharpZipLib
Install-Package Newtonsoft.Json
and then the corresponding using statements;
using Octokit; // Install-Package Octokit
using System;
using System.Configuration;
using System.IO;
using ICSharpCode.SharpZipLib.GZip; // Install-Package SharpZipLib
using ICSharpCode.SharpZipLib.Tar; // Install-Package SharpZipLib
using System.Threading;
using Newtonsoft.Json.Linq; // Install-Package Newtonsoft.Json
Now, I’ve kept my settings in my web.config, as follows;
<add key=”GITHUB_USERNAME” value=”infiniteloopltd”/>
<add key=”GITHUB_PASSWORD” value=”xxxxxx”/>
<add key=”GITHUB_REPO” value=”AutoBuild”/>
<add key=”DEPLOY_PATH” value=”C:\temp\”/>
And, I’ve set up some public variables as follows
protected GitHubClient client = new GitHubClient(new ProductHeaderValue(“Autobuild”));
string username = ConfigurationManager.AppSettings[“GITHUB_USERNAME”];
string password = ConfigurationManager.AppSettings[“GITHUB_PASSWORD”];
string repository = ConfigurationManager.AppSettings[“GITHUB_REPO”];
string output = ConfigurationManager.AppSettings[“DEPLOY_PATH”];
The ProductHeaderValue seems arbirary, but I’ve called it AutoBuild.
Now, the magic happens when I start using Octokit;
private bool DownloadArchive(string expectedCommit)
{
var tDownload = client.Repository.Content.GetArchive(username, repository);
var bArchive = tDownload.Result;
var stream = new MemoryStream(bArchive);
Stream gzipStream = new GZipInputStream(stream);
Stream gzipStream2 = new GZipInputStream(stream);
TarInputStream tarIn = new TarInputStream(gzipStream);
TarEntry tarEntry;
var strRoot = “”;
while ((tarEntry = tarIn.GetNextEntry()) != null)
{
string name = tarEntry.Name.Replace(‘/’, Path.DirectorySeparatorChar);
if (strRoot == “”)
{
strRoot = name;
if (!strRoot.Contains(expectedCommit)) return false;
}
if (tarEntry.IsDirectory)
continue;
if (Path.IsPathRooted(name))
name = name.Substring(Path.GetPathRoot(name).Length);
name = name.Replace(strRoot, “”);
string outName = Path.Combine(output, name);
string directoryName = Path.GetDirectoryName(outName);
Directory.CreateDirectory(directoryName);
FileStream outStr = new FileStream(outName, System.IO.FileMode.Create);
tarIn.CopyEntryContents(outStr);
outStr.Close();
}
tarIn.Close();
gzipStream.Close();
stream.Close();
return true;
}
What happens here, is that I request the latest archive of my repo from GitHub, which is in TAR.GZ format. What that actually means is that it is a TAR container of files, that has been compressed into a GZip stream.
I unzip the byte array, and pass it into a TarInputStream from SharpZipLib. GitHub wraps all your files into a folder that’s named
infiniteloopltd-AutoBuild-51d1c48\
i.e. {username}-{repo}-{commit}, this means that each file needs to be extracted one by one, since this wrapper folder needs to be removed.
However, the wrapper folder comes in very handy later on.
Now, that’s where everything is nice and sensible, then it gets ugly….
Unfortunately, if you call GetArchive too soon after the webhook is called, then you get the previous commit, and that’s useless, your files don’t update.
So, therefore, I need to read the parameters sent to the webhook to ensure that the commit I am expecting matches the one in the Archive, luckily, there is plenty of data sent to the webhook by github in Json format as follows;
{
  "ref": "refs\/heads\/master",
  "before": "b75dcf060de3710bfd7c054e4869397cc75380ba",
  "after": "90d9567997f96203853e071500136a16b1335c3a",
  "created": false,
  ....
The first 7 chars of this commit guid match the code shown on the website

… and also match the code contained in the wrapper folder, which allows you match the archive with the code. And if it doesn’t match, I just wait 5 seconds and try again.
So my Page_Load is defined as (With some logging)
protected void Page_Load(object sender, EventArgs e)
{
var strLog = “Started at ” + DateTime.Now;
client.Credentials = new Credentials(username, password);
var strJsonPayload = Request.Form[“Payload”];
string strExpectedCommit = “”;
if (!string.IsNullOrEmpty(strJsonPayload))
{
strLog += “\nGitHub payload ” + strJsonPayload;
var jPayload = JObject.Parse(strJsonPayload);
strExpectedCommit = jPayload[“after”].ToString().Substring(0, 7);
strLog += “\nExpected Commit ” + strExpectedCommit;
}
for(int i=0;i<10;i++)
{
var blnOK = DownloadArchive(strExpectedCommit);
if (blnOK) break;
Thread.Sleep(TimeSpan.FromSeconds(5));
strLog += “\nRetry ” + i;
}
File.WriteAllText(output + “buildlog.txt”, strLog);
}
Et Voila … every time you push a code change to GitHub. github calls this webhook, which downloads a zip of the code, and deploys it ontop of itself, creating a self-updating website! 🙂
#internationalising an #Angular web app

This perhaps is not the best way to internationalize (i.e. make available in multiple languages) an Angular web app, but it works well for me, both as a Web app, or as part of a Cordova / Phonegap app.
In App.js, I define the following “Constant”
angular.module(‘app’, [‘ionic’, …. ])
.constant(‘translations’, {
‘en’ :
{
‘Register’ : ‘Register’,
‘Login’ : ‘Login’,
},
‘es’ :
{
‘Register’ : ‘Registrar’,
‘Login’ : ‘Iniciar sesión’,
},
current : function()
{
lang = ‘en’;
if (navigator.languages != undefined) lang = navigator.languages[0]; else lang = navigator.language;
if (lang.indexOf(“es”) != -1 ) return this.es;
return this.en; // default en
}
})
Which effectively defines two languages “en” (English) and “es” (Spanish), and defines two variables, or strings within it “Login” and “Register”, you can see how the translation differs between English and Spanish. You can of course define more words, and more languages, this demo is just making a basic case.
Now, in order to use this in a controller, you pass it in as follows;
.controller(‘loginCtrl’, [‘translations’,‘$scope’, …..
function (translations, $scope, …) {
$scope.translations = translations.current();
Then you can refer to the translation in the template html as follows;
<a class=“button” ng-click=“login()”>{{ translations.Login }}</a>
Or in code as follows;
alert($scope.translations.Login);
This, once again is going to be used in version 1.5 of our iOS app for CloudAnsweringMachine.com
Send #Whatsapp message with WhatsApp #API
The WhatsApp Business API is open for applications, which you can sign up for via https://www.facebook.com/business/m/whatsapp/business-api – and it looks like they are working with Twilio to create a webhook layer on top of this.
But, there are some simple things you can do today, for example, if you want to encourage your users to send you a WhatsApp message from your app or website, then you can add a link to;
https://api.whatsapp.com/send?phone=<your number>&text=hello
It’s important to remember that whatsapp is not typically used from the desktop, so if you want this to work, and your user is on a desktop browser, then it is better to show a QR code for the URL above – that they can scan with their phone, rather than sending them directly to this url.
Once this API is in general release, it’ll be a new feature that we’ll add to https://www.cloudansweringmachine.com
Mistakes that can render your #CloudFlare protection obsolete

Cloudflare is a service that can help keep your website safe from DDOS attacks, by taking the load of the attack without affecting your underlying server too badly.
However, assuming that your website is being specifically targeted, then it is obvious for an attacker to spot that your website is behind cloudflare, by simply checking the NS records on your domain. – So an attacker will look to find your underlying webserver, and attack it directly, rather than a “front door” attack via Cloudflare.
So, the first step, as a domain owner, is to make sure that your underlying werserver is not published anywhere on the web. Since, if you can find it – you can bet an attacker will too.
A first search is here: http://www.crimeflare.org:82/cfs.html – Scroll to the foot of the page, and enter your domain – if it’s there, make sure you change your IP address of your server, or ask the owner of this website to remove your listing from his database.
Next, check for historic A records of your domain here; https://securitytrails.com/domain/<your domain>/history/a – and make sure the IP address of the server you used before you moved to cloudFlare is no longer your production IP address.
In short, the general tip is – that if you used the same server IP before moving to CloudFlare, as you do now, – change it. Otherwise an attacker can bypass your CloudFlare protection.
New #API to determine the current #Insurer of a vehicle in #Italy

If you are looking to implement a system that can determine if a car is insured in Italy, and to find its current insurer, then here is an API that solves this for you;
You can also find the current insurer of a car in Italy, by calling the following API; CheckInsuranceStatusItaly at http://www.targa.co.it/api/bespokeapi.asmx , passing the number plate and your username from www.targa.co.it
The response is in XML as follows;
| <InsuranceDetails xmlns:xsd=”http://www.w3.org/2001/XMLSchema” xmlns:xsi=”http://www.w3.org/2001/XMLSchema-instance” xmlns=”http://Regcheck.org.uk/”>
<Company>GENERALI ITALIA</Company> <Expiry>2019-01-03T00:00:00</Expiry> <IsInsured>true</IsInsured> </InsuranceDetails> |
unauthorized_client in #VSTS #OAUTH

If you have an app on VSTS, which suddenly started returning the error
{“Error”:”unauthorized_client”,”ErrorDescription”:null} and InvalidScope in the query string, then it appears that the culprit is vso.codesearch, which needs to be removed from the scope.
Unfortunately, if you already have created an app with this in it’s scope, then a bug in VSTS prevents you from saving it again – so you may need to create a duplicate of the app.
Automatically post #domain name ideas to #Twitter

This is a script in c# that runs a Twitter Bot that posts domain name ideas to https://twitter.com/dotcomideas
First, I generate some random pronouncable words using this class
using System;
namespace words
{
class PasswordGenerator
{
//string vowels = “aeiou”;
//string consonants = “bcdfghjklmnprstvwxyz”;/*
The reason for the duplicate letters is to add “weighting” to certain letters to allow them more chance
of being randomly selected. This is due to the fact that certain letters in the English language are more
frequently used than others.The breakdown of usage is as follows (from most frequent to least frequent):
1. E (7)
2. T (6)
3. A, O, N, R, I, S (5)
4. H (4)
5. D, L, F, C, M, U (3)
6. G, Y, P, W, B (2)
7. V, K, X, J, Q, Z (1)
*/string vowels = “aaaaaeeeeeeeiiiiiooooouuu”;
string consonants = “bbcccdddfffgghhhhjklllmmmnnnnnpprrrrrsssssttttttvwwxyyz”;string[] vowelafter = { “th”, “ch”, “sh”, “qu” };
string[] consonantafter = { “oo”, “ee” };
Random rnd = new Random();public string GeneratePassword(int length)
{
string pass = “”;
bool isvowel = false;for (int i = 0; i < length; i++)
{
if (isvowel)
{
if (rnd.Next(0, 5) == 0 && i < (length – 1))
{
pass += consonantafter[rnd.Next(0, consonantafter.Length)];
}
else
{
pass += vowels.Substring(rnd.Next(0, vowels.Length), 1);
}
}
else
{
if (rnd.Next(0, 5) == 0 && i < (length – 1))
{
pass += vowelafter[rnd.Next(0, vowelafter.Length)];
}
else
{
pass += consonants.Substring(rnd.Next(0, consonants.Length), 1);
}
}
isvowel = !isvowel;
}
return pass;
}
}
}
Then I check that the domain ( word + .com ) is available using the WhoApi api and Newtwonsoft Json
var strUrl = “http://api.whoapi.com/?apikey=…..&r=taken&domain=” + word + “.com”;
WebClient wc = new WebClient();
var strJson = wc.DownloadString(strUrl);
var jResult = JObject.Parse(strJson);
var blnTaken = (jResult[“taken”].ToString() != “0”);
As part of the process, I want to post an image of the new domain name;
FontFamily fontFamily = new FontFamily(“Arial”);
Font font = new Font(
fontFamily,
45,
FontStyle.Regular,
GraphicsUnit.Pixel);
var img = DrawText( word + “.com”, font, Color.DarkOrchid, Color.Beige);
var strPath = Directory.GetCurrentDirectory();
var tempFile = strPath + @”\temp.jpg”;
img.Save(tempFile, ImageFormat.Jpeg);
Where drawtext is as follows
private static Image DrawText(String text, Font font, Color textColor, Color backColor)
{
//first, create a dummy bitmap just to get a graphics object
Image img = new Bitmap(1, 1);
Graphics drawing = Graphics.FromImage(img);//measure the string to see how big the image needs to be
SizeF textSize = drawing.MeasureString(text, font);//free up the dummy image and old graphics object
img.Dispose();
drawing.Dispose();//create a new image of the right size
img = new Bitmap((int)textSize.Width, (int)textSize.Height);drawing = Graphics.FromImage(img);
//paint the background
drawing.Clear(backColor);//create a brush for the text
Brush textBrush = new SolidBrush(textColor);drawing.DrawString(text, font, textBrush, 0, 0);
drawing.Save();
textBrush.Dispose();
drawing.Dispose();return img;
}
Then it is posted to Twitter using code;
var twitter = new SendTweet(
ConsumerKey,
ConsumerKeySecret,
AccessToken,
AccessTokenSecret
);string response = twitter.PublishToTwitter(word + “.com is available #” + word + ” – register it at https://www.namesilo.com/register.php?rid=c233459im” , tempFile);
#API to retrieve vehicle information from #IOM registered number plates

The Isle of man is a small island between UK and Ireland, with just over 65,000 registered vehicles. However, up to now, vehicles registered in the IOM fell outside the data returned by the API https://www.regcheck.org.uk
Following a customer enquiry, we added a bespoke API to allow vehicle data to be determined from an IOM registered plate via the following endpoint;
https://www.regcheck.org.uk/api/bespokeapi.asmx?op=CheckIOM
This API returns data in the following format;
{
“Description”: “HONDA JAZZ”,
“RegistrationYear”: 2012,
“CarMake”: {
“CurrentTextValue”: “HONDA”
},
“CarModel”: {
“CurrentTextValue”: “JAZZ”
},
“EngineSize”: {
“CurrentTextValue”: “1339”
},
“FuelType”: {
“CurrentTextValue”: “PETROL”
},
“MakeDescription”: {
“CurrentTextValue”: “HONDA”
},
“ModelDescription”: {
“CurrentTextValue”: “JAZZ”
},
“Version”: “I-VTEC ES”,
“Colour”: “SILVER”,
“Co2”: “126”,
“RegistrationDate”: “06/07/2012”,
“WheelPlan”: “2-AXLE Rigid”,
“Taxed”: “Active”,
“TaxExpiry”: “31/07/2018”,
“ImageUrl”: “https://www.regcheck.org.uk/image.aspx/@SE9OREEgSkFaWg==”
}
If the number plate matches one of the following patterns listed below, it will be returned in IOM format, rather than the standard UK format.
| Pool | Registration Number | Example | Notes |
|---|---|---|---|
| 1 | MN-(1-9999) | MN-543 | |
| 2 | MAN-(1-9999) | MAN-8947 | |
| 3 | MAN-(1-999)-X | MAN-23-T | Excluding x = I, O, Q, S, Z |
| 4 | xMN-(1-999) | JMN-129 | Excluding x = A, I, Q, S, Z |
| 5 | xMN-(1-999)-y | GMN-423-K | Excluding x = A, I, Q, S, Z and y = I, O, Q, S, Z |
| 6 | (1-999)-xMN | 582-PMN | Excluding x = A, I, Q, S, Z |
| 7 | (1-9999)-MN | 39-MN | |
| 8 | (1-9999)-MAN | 284-MAN | |
| 9 | X-(1-9999)-MAN | F-3-MAN | Excluding x = I, Q, S, Z |
| 10 | MANX-(1-999) | MANX-471 | |
| 11 | (1-999)-MANX | 471-MANX |
Car Registration #API now on #Bower

Bower is a cool front-end component manager for Javascript, CSS, and the like. We’ve just published our Car Registration API to Bower, as a component. – It’s not the recommended way to connect to our API, but just to help people out, here’s a sample.
A bower package as a simple wrapper for the Reg Check API, to use this library, run
bower install CarRegistrationAPI
Then include the scripts;
bower_components/jquery/dist/jquery.min.js
bower_components/Car Registration API/api.js
Finally call the API as follows
  lookup("Check","**your username**","**UK License Plate**",function(data){
    console.log(data);
  });
You will need a username from Car Registration API to get started.
Asymetric Encryption in C# and #Javascript

Here is a scenario, where you generate RSA asymetric encryption keys in C#, use the public key to encrypt a message, then decrypt it using Javascript.
First, generate a pair of keys in C#
RSACryptoServiceProvider rsa = new RSACryptoServiceProvider(2048);
tbPublicKey.Text = rsa.ToXmlString(false); // false to get the public key
tbPrivateKey.Text = rsa.ToXmlString(true); // true to get the private key
I’ve selected a key length of 2014 bits, this gives an output cypher text of 255 bytes, or 344 bytes when base64 encoded.
You then use code such as the following to encrypt:
static string EncryptText(string publicKey, string text)
{
// Convert the text to an array of bytes
UTF8Encoding byteConverter = new UTF8Encoding();
byte[] dataToEncrypt = byteConverter.GetBytes(text);// Create a byte array to store the encrypted data in it
byte[] encryptedData;
using (RSACryptoServiceProvider rsa = new RSACryptoServiceProvider())
{
// Set the rsa pulic key
rsa.FromXmlString(publicKey);// Encrypt the data and store it in the encyptedData Array
// MAX 245 bytes
encryptedData = rsa.Encrypt(dataToEncrypt, false);
}
// Base 64 encode enctrypted data
return Convert.ToBase64String(encryptedData);
}
Then the following code to decrypt
static string DecryptText(string privateKey, string cyphertext)
{
// read the encrypted bytes from the file
byte[] dataToDecrypt = Convert.FromBase64String(cyphertext);// Create an array to store the decrypted data in it
byte[] decryptedData;
using (RSACryptoServiceProvider rsa = new RSACryptoServiceProvider())
{
// Set the private key of the algorithm
rsa.FromXmlString(privateKey);
decryptedData = rsa.Decrypt(dataToDecrypt, false);
}// Get the string value from the decryptedData byte array
UTF8Encoding byteConverter = new UTF8Encoding();
return byteConverter.GetString(decryptedData);
}
Now, you may note the comment “// MAX 245 bytes”, This is important, since if you try to encrypt text over 245 bytes, the code will break. Note, I’m using UTF8 here, if you wanted to support chinese text, you’d need Unicode, which sets the max to 122
You can however, break the text into 245 byte chunks as follows; (Using a pipe char as a seperator)
static string EncryptLongText(string publicKey, string text)
{
var strOutput = “”;
var stringParts = Split(text, 245);
foreach(var stringPart in stringParts)
{
strOutput += EncryptText(publicKey, stringPart) + “|”;
}
return strOutput;
}public static IEnumerable<string> Split(string str, int chunkSize)
{
if (string.IsNullOrEmpty(str) || chunkSize < 1)
throw new ArgumentException(“String can not be null or empty and chunk size should be greater than zero.”);
var chunkCount = str.Length / chunkSize + (str.Length % chunkSize != 0 ? 1 : 0);
for (var i = 0; i < chunkCount; i++)
{
var startIndex = i * chunkSize;
if (startIndex + chunkSize >= str.Length)
yield return str.Substring(startIndex);
else
yield return str.Substring(startIndex, chunkSize);
}
}
Then reverse the process with a Regex;
static string DecryptLongText(string privateKey, string text)
{
var strOutput = “”;
var stringParts = Regex.Split(text, @”\|”);
foreach (var stringPart in stringParts)
{
if (stringPart != “”) strOutput += DecryptText(privateKey, stringPart);
}
return strOutput;
}
That’s all there is to it in C#, now to turn to Javascript, you will need to look at the format of the keys;
<RSAKeyValue>
<Modulus>….</Modulus>
<Exponent>…</Exponent>
<P>….</P>
<Q>….</Q>
<DP>….</DP>
<DQ>….</DQ>
<InverseQ>…</InverseQ>
<D>…</D>
</RSAKeyValue>
The parts of the keys (elided with …) are in base64 format, you will need this in Hex format for Javascript, and a tool such as https://cryptii.com/base64-to-hex can do this online for you.
Then following the code example on http://www-cs-students.stanford.edu/~tjw/jsbn/rsa2.html – the values match up as follows;
Modulus: Modulus (hex): [n]
Exponent : Public exponent (hex, F4=0x10001): [e]
P: P (hex): [p]
Q: Q (hex): [q]
DP: D mod (P-1) (hex): [dmp1]
DQ: D mod (Q-1) (hex): [dmq1]
InverseQ : 1/Q mod P (hex): [coeff]
D : Private exponent (hex): [d]
